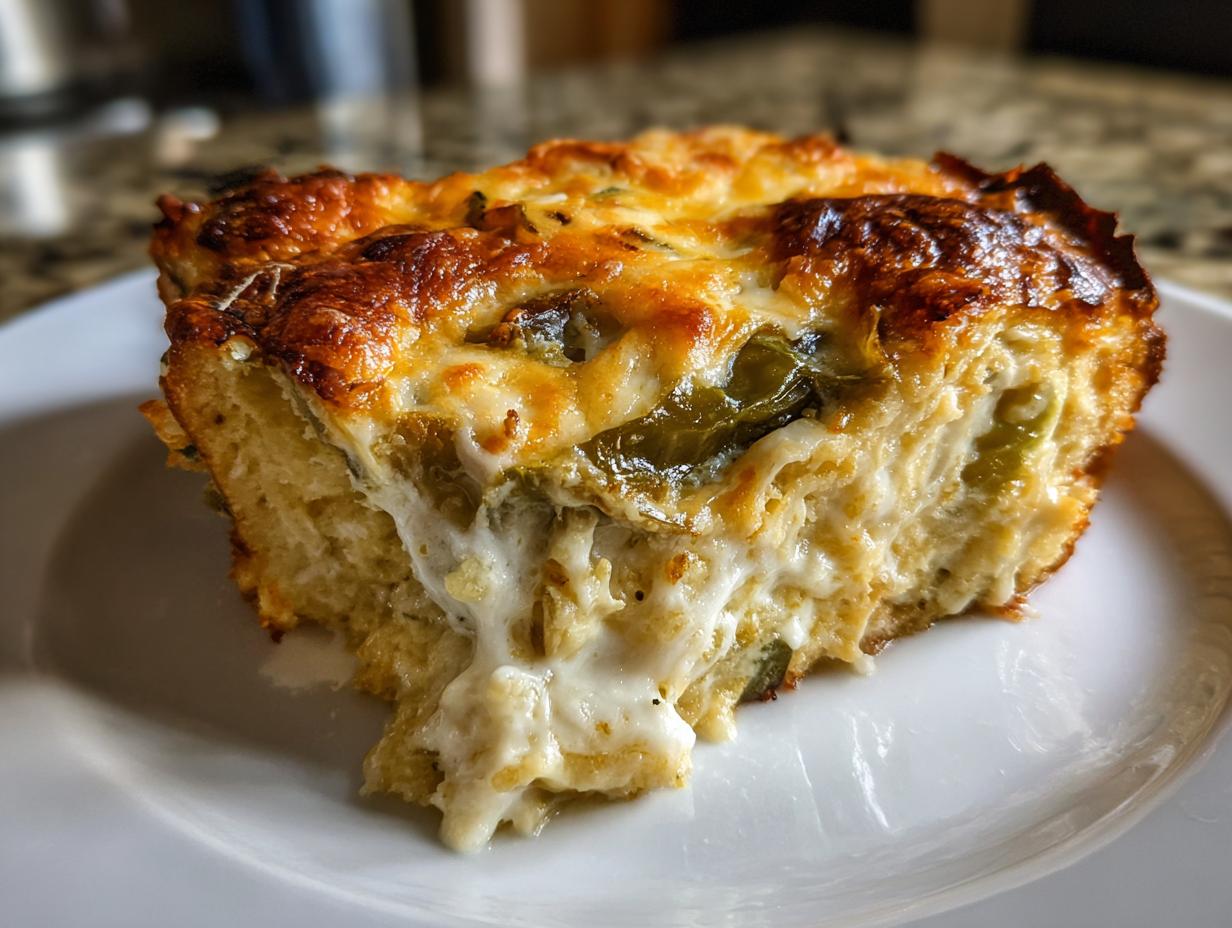
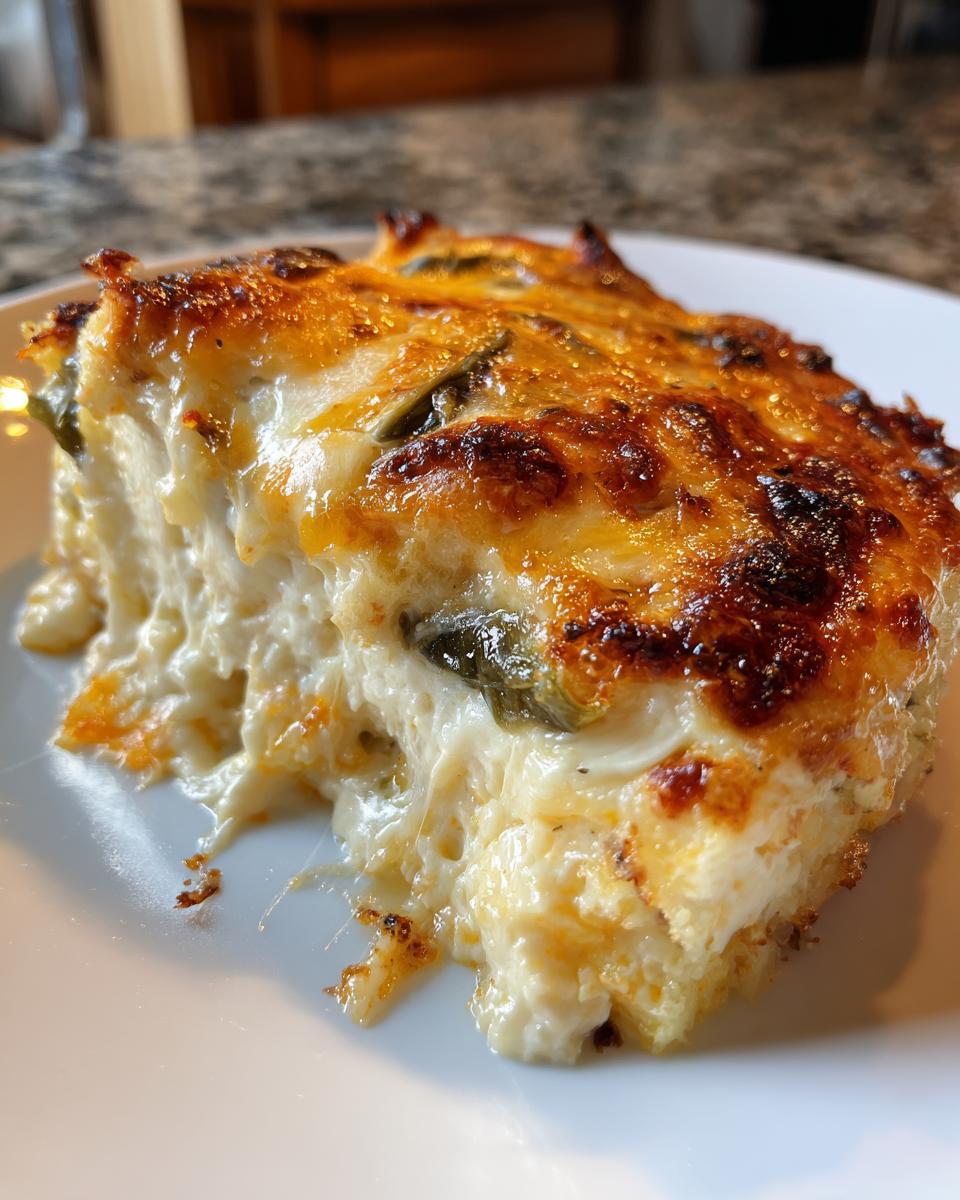
Oh, do I have a treat for you! My creamy cheese hatch chile relleno casserole is the kind of dish that makes people hover around the oven, begging for just one more bite. I first fell in love with this recipe when my neighbor Rosa brought it to a potluck – one taste of that gooey cheese and smoky chiles and I knew I had to make it my own. What I love most is how it takes all the fuss out of traditional chile rellenos while keeping that incredible flavor combo. The eggs puff up around the roasted chiles and melted cheese to create something magical – crispy on top, creamy in the middle, with just the right kick of heat. It’s become my go-to for everything from lazy Sunday brunches to “I forgot it’s my turn to bring a dish” emergencies. Trust me, this casserole disappears faster than you can say “seconds please!”
Why You’ll Love This Creamy Cheese Hatch Chile Relleno Casserole
Let me tell you why this casserole is about to become your new favorite dish—it’s got everything! First off, it’s ridiculously easy. No stuffing individual chiles or wrestling with batter—just layer, pour, and bake. But the flavor? Oh boy. The creamy Monterey Jack and sharp cheddar melt into the smoky roasted hatch chiles, and that eggy batter puffs up like a golden cloud around it all. Here’s why you’ll adore it:
- Weeknight hero: Throw it together in 15 minutes flat—perfect for when you’re tired but still want something spectacular.
- Crowd-pleaser magic: Serves a hungry bunch, and trust me, nobody leaves leftovers.
- Flexible friend: Swap cheeses, add corn or black beans, or kick up the heat—it’s forgiving and fabulous every time.
Seriously, once you try it, you’ll wonder how you ever lived without it. Breakfast, brunch, or taco night—this casserole does it all!
Ingredients for Creamy Cheese Hatch Chile Relleno Casserole
Okay, let’s get real—the magic starts with great ingredients. Don’t skimp here! Here’s what you’ll need to make this cheesy, smoky dream come to life:
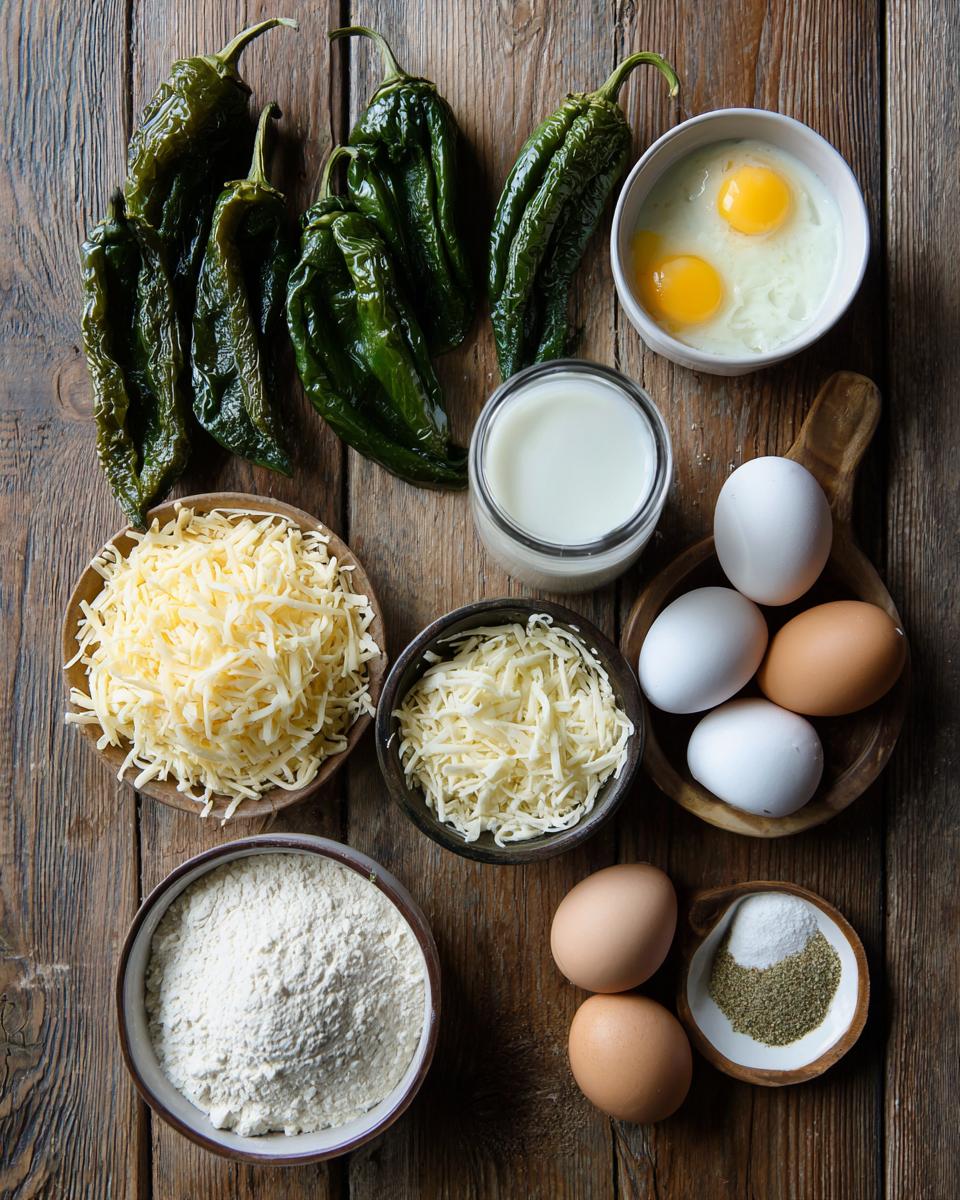
- 6 large hatch chiles – fresh is best! Roast them yourself for that incredible charred flavor. (Psst—I’ll show you how in the next section!)
- 2 cups shredded Monterey Jack – this melts like a dream and gives that perfect creamy texture
- 1 cup shredded cheddar – for that sharp little kick that balances everything out
- 4 eggs – straight from the fridge is fine, no need to temper them
- 1 cup milk – whole milk makes it extra rich, but 2% works too
- ½ cup all-purpose flour – just scoop and level, no need to sift
- ½ tsp salt – brings all the flavors together
- ¼ tsp each black pepper & garlic powder – my secret little flavor boosters
See? Nothing fancy, just good, honest ingredients that work their magic together. Now let’s get cooking!
How to Make Creamy Cheese Hatch Chile Relleno Casserole
Alright, let’s dive into making this beauty! Don’t worry—it’s way easier than traditional rellenos. Just follow these steps, and you’ll have everyone begging for the recipe.
Preparing the Hatch Chiles
First, roast those gorgeous hatch chiles! I throw mine directly on the gas burner (medium flame) and turn with tongs until blistered all over—about 5 minutes. No gas stove? Broil them on a baking sheet instead! Immediately pop them into a bowl covered with plastic wrap to steam for 10 minutes—this makes peeling a breeze. The skins should slide right off under running water.
Layering the Casserole
Now the fun part! Grease your baking dish well—trust me, you don’t want cheesy casualties sticking to the pan. Tear the peeled chiles into strips (seeds and all for heat lovers!) and layer half in the dish. Sprinkle with half the cheeses, then repeat. The cheese melts into every nook of those smoky chiles—pure magic!
Mixing the Batter
Grab your biggest whisk and go to town! Beat the eggs vigorously first—you want them frothy. Then whisk in milk, flour, and seasonings until smooth. No lumps! The batter should coat the back of a spoon but still pour easily. Pro tip: Let it sit 2 minutes so the flour hydrates.
Baking the Casserole
Pour that golden batter evenly over your chile-cheese layers—it’ll seep into all the gaps. Bake at 375°F for 35-40 minutes until puffed and golden brown. Give it the jiggle test—the center should barely wobble. Let it rest 5 minutes (crucial!) before slicing into cheesy, custardy perfection.
Tips for Perfect Creamy Cheese Hatch Chile Relleno Casserole
After making this casserole more times than I can count (okay, maybe I can count—it’s a lot!), I’ve picked up some foolproof tricks to make it absolutely perfect every time. First, always roast extra chiles—they freeze beautifully for next time! If your batter seems too thick, add a splash more milk—it should pour like heavy cream. And here’s my favorite secret: let the assembled casserole sit for 10 minutes before baking. This lets the flavors mingle and the flour absorb properly.
Cheese choices matter too—try pepper jack for extra kick or queso fresco for a milder twist. And whatever you do, don’t skip the resting time after baking—those 5 minutes make all the difference between neat slices and cheesy chaos!
Variations for Creamy Cheese Hatch Chile Relleno Casserole
One of my favorite things about this casserole is how easily you can make it your own! Feeling spicy? Swap in pepper jack for half the Monterey Jack—it’ll give you that extra kick. For a heartier meal, I sometimes layer in black beans or roasted corn between the chiles. My veggie-loving sister adds sautéed mushrooms and spinach (just squeeze out all that liquid first!). And when I’m feeling fancy, a sprinkle of crumbled cotija cheese on top adds the perfect salty crunch. The possibilities are endless—just remember to keep that perfect cheese-to-chile ratio!
Serving Suggestions for Creamy Cheese Hatch Chile Relleno Casserole
Oh, let me tell you how I love to serve this casserole—it’s practically a blank canvas for delicious toppings! A big dollop of cool sour cream on each slice balances the heat beautifully. My neighbor Rosa taught me to drizzle on some creamy avocado salsa verde—game changer! For breakfast, I’ll pair it with crispy beef bacon and fresh fruit. Taco night? Just add warm tortillas and all the fixings—pico de gallo, guac, the works! Honestly, it’s fantastic straight from the pan too (not that I’d know… okay, maybe I do). However you serve it, get ready for happy faces around your table!
Storing and Reheating Creamy Cheese Hatch Chile Relleno Casserole
Here’s the good news—this casserole tastes almost better the next day! Let it cool completely, then cover tightly with foil or transfer slices to an airtight container. It’ll keep in the fridge for up to 4 days (if it lasts that long!). For reheating, I swear by the oven—350°F for about 15 minutes brings back that perfect texture. Microwave works in a pinch (30-second bursts!), but the edges might get a tad rubbery. Freezing? Absolutely! Wrap individual portions in foil, then thaw overnight in the fridge before reheating. Pro tip: Sprinkle a little extra cheese before reheating for that just-baked magic!
Nutritional Information for Creamy Cheese Hatch Chile Relleno Casserole
Now, I’m no nutritionist, but here’s the scoop—this casserole packs protein from the eggs and cheese, with a good dose of vitamin C from those hatch chiles! Keep in mind that nutritional values can vary based on exact ingredients and brands used. My advice? Enjoy every cheesy, delicious bite guilt-free—life’s too short not to!
Frequently Asked Questions About Creamy Cheese Hatch Chile Relleno Casserole
I get asked about this casserole all the time—so let me answer the big ones before you even have to ask!
Can I Use Canned Hatch Chiles?
Absolutely—in a pinch! Canned chiles save time (no roasting!), but fresh-roasted give that unbeatable smoky depth. If using canned, drain well and pat dry—excess liquid makes the casserole soggy. My trick? Splurge on good-quality canned hatch chiles—the cheap ones taste metallic.
Can I Make This Dish Ahead of Time?
Oh honey, yes! Assemble the whole casserole (unbaked) up to 24 hours ahead—just cover and refrigerate. Add 5-10 extra baking minutes since it’ll be cold. The batter actually benefits from resting—the flour hydrates better for a creamier texture!
Is This Casserole Freezer-Friendly?
Freezes like a dream! Cool completely, then wrap individual portions in foil, then thaw overnight in the fridge before reheating. Reheat frozen at 350°F for 25-30 minutes (no thawing needed!). The edges might get slightly drier, but a spoonful of salsa fixes everything!
Share Your Thoughts on This Creamy Cheese Hatch Chile Relleno Casserole
Tell me, did this casserole become your new obsession like it did mine? I’d love to hear how yours turned out—did you add any fun twists? Leave a comment below or snap a photo of your cheesy masterpiece! Your tips might just help another home cook fall in love with this recipe too.
Print
Creamy Cheese Hatch Chile Relleno Casserole
A delicious and easy-to-make casserole combining creamy cheese and hatch chiles for a flavorful dish.
- Total Time: 55 minutes
- Yield: 6 servings 1x
Ingredients
- 6 large hatch chiles, roasted and peeled
- 2 cups shredded Monterey Jack cheese
- 1 cup shredded cheddar cheese
- 4 eggs
- 1 cup milk
- 1/2 cup all-purpose flour
- 1/2 teaspoon salt
- 1/4 teaspoon black pepper
- 1/4 teaspoon garlic powder
Instructions
- Preheat your oven to 375°F (190°C).
- Grease a 9×13-inch baking dish.
- Layer half of the roasted hatch chiles in the dish.
- Sprinkle half of the Monterey Jack and cheddar cheese over the chiles.
- Repeat with the remaining chiles and cheese.
- In a bowl, whisk together eggs, milk, flour, salt, pepper, and garlic powder.
- Pour the mixture evenly over the chiles and cheese.
- Bake for 35-40 minutes or until golden and set.
- Let cool for 5 minutes before serving.
Notes
- Use fresh hatch chiles for the best flavor.
- Adjust the cheese types to your preference.
- Serve with sour cream or salsa if desired.
- Prep Time: 15 minutes
- Cook Time: 40 minutes
- Category: Casserole
- Method: Baking
- Cuisine: Mexican-American
- Diet: Vegetarian
Nutrition
- Serving Size: 1 serving
- Calories: 320
- Sugar: 4g
- Sodium: 480mg
- Fat: 18g
- Saturated Fat: 10g
- Unsaturated Fat: 6g
- Trans Fat: 0g
- Carbohydrates: 20g
- Fiber: 2g
- Protein: 18g
- Cholesterol: 160mg