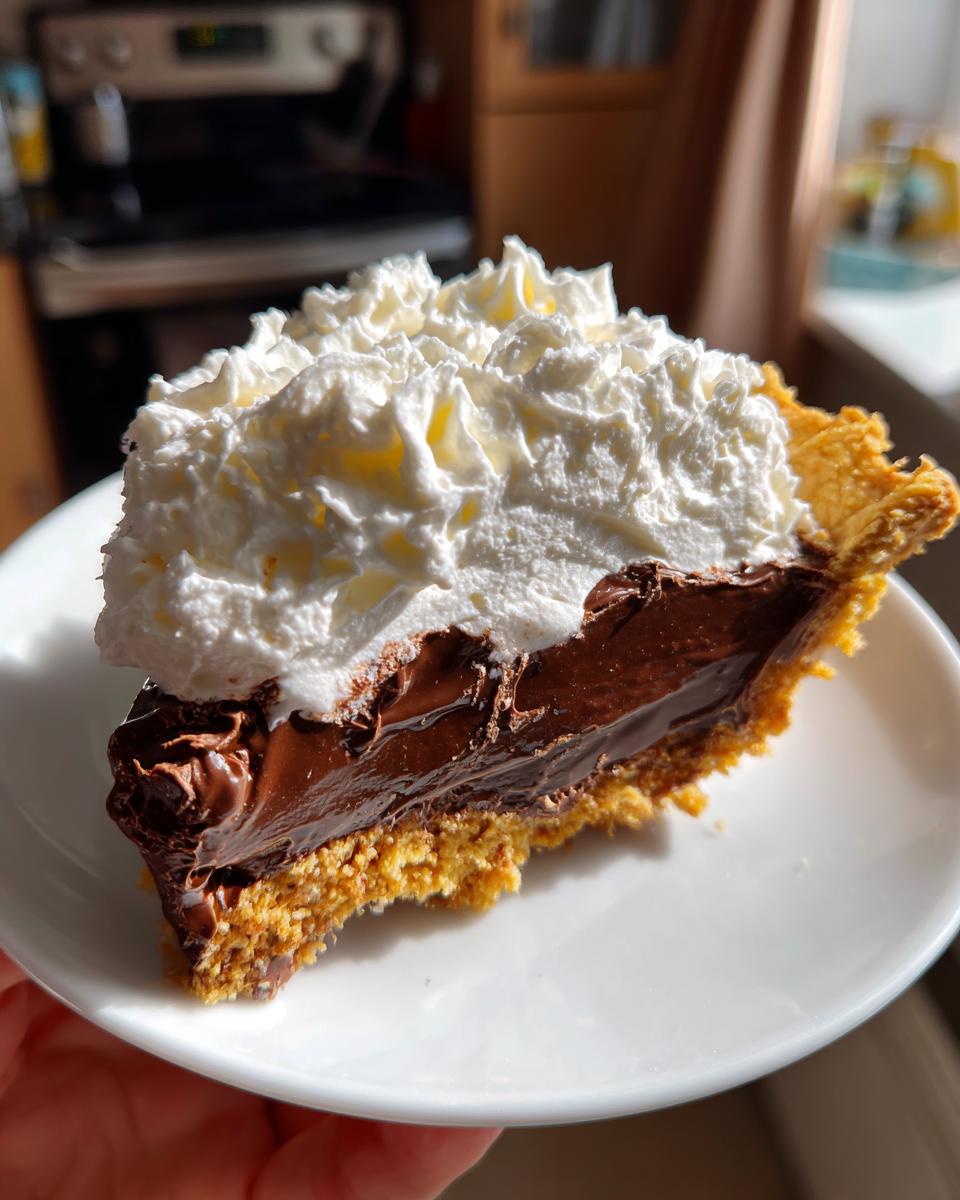
Oh, you guys, there’s just something magical about a really good homemade chocolate cream pie, isn’t there? For me, it instantly brings back memories of family dinners, special occasions, and that absolute pure satisfaction of digging into a slice. That first spoonful of rich, creamy chocolate melting in your mouth, perfectly balanced with a crisp crust… pure bliss! Seriously, if there’s one dessert that always makes everyone smile, it’s this one. I’ve tried so many chocolate cream pie recipes over the years, tweaking and tasting, and I’m so excited to finally share *my* absolute favorite version with you.
This isn’t just any recipe; it’s the one that consistently delivers that decadent, smooth, and utterly satisfying chocolate cream pie experience without being overly complicated. Trust me, you don’t need to be a pastry chef to nail this. This recipe is straightforward, uses simple ingredients, and the results? Oh, they’re just heavenly. Get ready to impress everyone, and maybe even yourself, with this incredible homemade chocolate cream pie!
Why You’ll Love This Chocolate Cream Pie
Okay, so why *this* chocolate cream pie? Because it’s literally everything you want in a dessert! We’re talking about pure, unadulterated chocolate bliss, but without the fuss that some fancy desserts demand. It’s truly a showstopper that’s surprisingly easy to pull off. You’ll love how simple the steps are, how common the ingredients are, and most importantly, how absolutely delicious every single bite is. It’s rich, it’s creamy, it’s got that perfect balance of sweet and chocolatey, and it’s guaranteed to be a crowd-pleaser every single time. Seriously, prepare for compliments!
The Ultimate Chocolate Cream Pie Experience
This isn’t just any chocolate cream pie; it’s *the* chocolate cream pie you’ve been dreaming of! That filling? Oh my goodness, it’s so silky smooth and intensely chocolatey, a true indulgence. And the texture is just perfect – not too firm, not too runny, just pure, melt-in-your-mouth goodness. It’s a classic for a reason, and this recipe absolutely nails it.
Essential Equipment for Your Chocolate Cream Pie
Before we dive into the deliciousness, let’s make sure you’ve got all your tools lined up! Trust me, having everything ready makes the whole chocolate cream pie process so much smoother and more enjoyable. You won’t be scrambling mid-recipe, which is always a win in my book! Here’s what you’ll want to have on hand:
- 9-inch pie plate (of course!)
- Medium saucepan
- Whisks (one for dry ingredients, one for tempering)
- Heat-proof spatula or wooden spoon
- Small bowl (for tempering egg yolks)
- Plastic wrap
- Electric mixer (handheld or stand mixer for the whipped cream)
- Large mixing bowl (chilled, for whipped cream)
Tools for a Perfect Chocolate Cream Pie
Having the right gear isn’t just about convenience; it actually helps you achieve that perfect, silky smooth chocolate cream pie. A good whisk for lump-free filling, a sturdy pie plate for even baking – it all makes a difference!
Ingredients for a Heavenly Chocolate Cream Pie
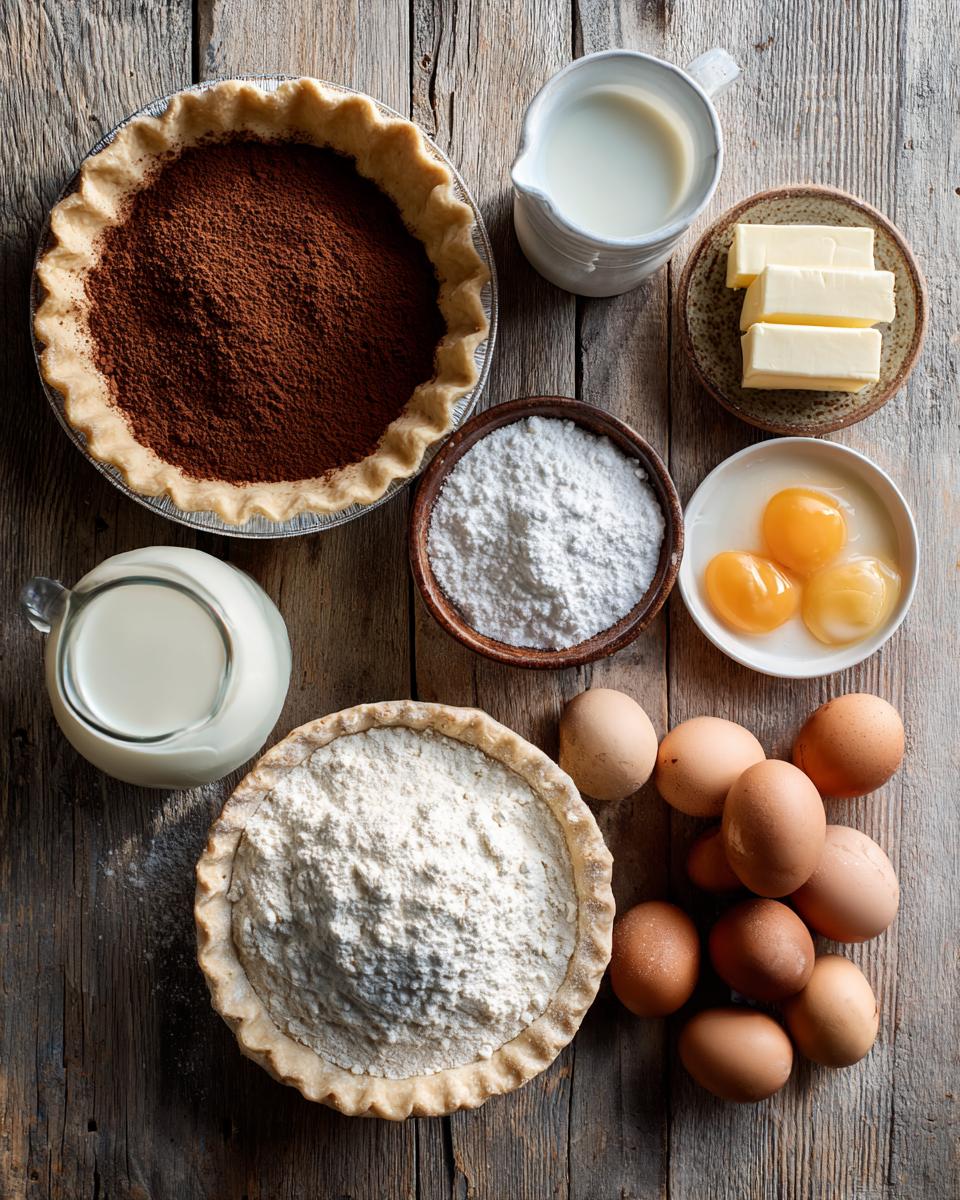
Alright, friends, this is where the magic really starts! We’re gonna gather up all the goodies that transform into our dreamy chocolate cream pie. Don’t skimp on quality here; good ingredients really shine through in a simple, classic dessert like this. I’ve broken it down so you know exactly what you’ll need for each part of this delicious pie. No vague instructions here, just clear measurements so you can get baking!
- 1 ready-to-bake 9-inch pie crust, already baked and completely cooled (this is super important for no soggy bottoms!)
- 1/2 cup granulated sugar (for that perfect sweetness)
- 1/4 cup unsweetened cocoa powder (go for a good quality one here, it makes a difference!)
- 1/4 cup cornstarch (our secret weapon for a thick, luscious filling)
- 1/4 teaspoon salt (just a pinch, it really brings out the chocolate flavor)
- 2 cups whole milk (full fat is best for richness, trust me)
- 2 large egg yolks (separated from the whites, these add richness and help thicken)
- 2 tablespoons unsalted butter (for that silky smooth, decadent finish)
- 1 teaspoon alcohol-free vanilla extract (pure vanilla, please!)
Crafting the Chocolate Cream Pie Filling
This is the heart of our chocolate cream pie, folks! We’re talking granulated sugar for sweetness, cocoa powder for deep chocolate flavor, and cornstarch to give it that irresistible, spoon-coating thickness. The whole milk and egg yolks make it super rich and creamy, while butter and alcohol-free vanilla extract add that luxurious, smooth finish. Every single ingredient plays a crucial role in making this filling absolutely perfect.
Topping Your Chocolate Cream Pie
And for the grand finale – the fluffy cloud on top of our chocolate cream pie! You’ll need 1 cup of really cold heavy cream and 2 tablespoons of powdered sugar. That’s it! Simple ingredients for a simply divine topping that perfectly complements the rich chocolate.
How to Make Chocolate Cream Pie: Step-by-Step Guide
Alright, deep breaths! Making this chocolate cream pie is truly a breeze, and I’m going to walk you through every single step. Just follow along, and you’ll have a show-stopping dessert that everyone will rave about. We’re going to build layers of deliciousness, from that rich, silky filling to the fluffy whipped cream on top. Don’t rush it, and you’ll be golden! I’ve broken it down into easy, manageable parts so you can conquer this pie like a pro.
- Whisk Dry Ingredients: Grab your medium saucepan and a whisk. Toss in the granulated sugar, cocoa powder, cornstarch, and salt. Give it a good whisk until everything is super well combined. No lumps allowed here!
- Add Milk Gradually: Now, slowly, *gradually* whisk in the whole milk. Take your time with this step to make sure you don’t get any lumps. We want a smooth, chocolatey mixture.
- Cook the Mixture: Pop that saucepan over medium heat. Now, this is important: you need to stir constantly! Don’t walk away. Keep stirring until the mixture thickens up nicely and starts to boil. Once it’s boiling, let it bubble for just one minute, still stirring like a champ.
- Remove and Temper Yolks: Take the saucepan off the heat. In a separate small bowl, lightly whisk your two egg yolks. Now, here’s the trick: gradually whisk about 1/2 cup of that hot chocolate mixture into the egg yolks. This “tempers” them, slowly bringing their temperature up so they don’t scramble when you add them to the hot mixture.
- Combine and Cook Again: Pour the tempered egg yolk mixture back into the saucepan with the rest of the chocolate mixture. Whisk, whisk, whisk! Return it to medium-low heat and cook for just one more minute, stirring constantly. Seriously, don’t let it boil this time.
- Stir in Butter and Vanilla: Remove the pan from the heat again. Stir in your unsalted butter and alcohol-free vanilla extract until everything is smooth and glossy. Look at that gorgeous, rich filling!
- Pour into Crust: Pour all that luscious chocolate filling into your *already cooled* pie crust.
- Chill, Chill, Chill: This is a crucial step for setting! Press a piece of plastic wrap directly onto the surface of the filling. This prevents that weird skin from forming on top. Pop the whole pie into the fridge for at least 4 hours, or even better, overnight. You want it completely chilled and set.
- Make Whipped Cream: When you’re ready to serve, get a cold bowl and cold beaters (pop them in the freezer for a few minutes!). Pour in your heavy cream and powdered sugar. Beat on high until you get beautiful, stiff peaks.
- Top and Serve: Spread or pipe that glorious whipped cream over your perfectly chilled chocolate cream pie. Garnish if you’re feeling fancy, then slice and enjoy!
Preparing the Chocolate Cream Pie Filling
This is where the magic happens for that irresistible chocolate cream pie! First, you’ll whisk together your dry ingredients – sugar, cocoa, cornstarch, and salt – in a saucepan. Then, *slowly* whisk in the milk until it’s smooth. Cook this over medium heat, stirring constantly, until it thickens and boils for a minute. The key to a silky filling is tempering your egg yolks: gradually whisk some hot chocolate mixture into the yolks before adding them back to the pan. Cook for another minute, stirring, but don’t boil!
Assembling and Chilling Your Chocolate Cream Pie
Once your rich, glossy chocolate filling is ready, pour it right into your perfectly cooled pie crust. Now, here’s a little secret for a super smooth top: press a piece of plastic wrap directly onto the surface of the filling. This stops any “skin” from forming while it chills. Then, the hardest part: pop that beautiful pie into the fridge for at least 4 hours. Seriously, patience is key here; you want it completely set and wonderfully cold.
The Finishing Touch: Whipped Cream for Your Chocolate Cream Pie
Okay, the pie is chilled, now for the crowning glory! Get a super cold bowl and some cold beaters – trust me, it makes a difference! Pour in your heavy cream and powdered sugar. Beat it on high speed until you see those soft peaks turn into beautiful, stiff peaks. You want it fluffy and stable! Then, you can either artfully spread that cloud of whipped cream over your chocolate cream pie, or get fancy with a piping bag. It’s the perfect light contrast to that rich chocolate.
Tips for the Best Chocolate Cream Pie
Alright, you’re almost a chocolate cream pie master! But I’ve got a few extra nuggets of wisdom, little tricks I’ve picked up over the years, that will truly elevate your pie from great to absolutely *unforgettable*. These are the things that prevent little mishaps and ensure every single slice is pure perfection. Trust me, these small details make a big difference in flavor and texture, and you’ll be so glad you paid attention!
Ensuring a Flawless Chocolate Cream Pie Crust
Nobody wants a soggy bottom, right? Make sure your pie crust is *completely* baked through and cooled before adding the filling. Blind baking is your friend here! Also, a thin layer of melted chocolate brushed inside the crust and allowed to set can create a delicious moisture barrier.
Chocolate Cream Pie: Storage and Serving Suggestions
You’ve poured your heart into making this amazing chocolate cream pie, so let’s make sure it stays perfect! I always get asked about the best way to keep leftovers, or how to really make it shine when guests are over. Trust me, a little planning goes a long way to enjoying every last crumb. And serving it up? That’s where you can really have some fun!
How to Keep Your Chocolate Cream Pie Fresh
To keep your chocolate cream pie tasting its best, cover it loosely with plastic wrap or a pie dome and store it in the refrigerator. It’ll stay delicious for 3-4 days!
Frequently Asked Questions About Chocolate Cream Pie
Okay, I know you’ve probably got questions bubbling up, especially if this is your first time making a chocolate cream pie! Don’t worry, I’ve heard them all, and I’m here to clear up any confusion. I want you to feel super confident when you tackle this delicious dessert, so let’s hit some of the common questions I get about making the perfect chocolate cream pie.
Can I Make Chocolate Cream Pie Ahead of Time?
Absolutely, yes! That’s one of the best things about this chocolate cream pie. You can totally make the entire pie, filling and all, a day in advance. Just keep it covered in the fridge, and then add the whipped cream topping right before you’re ready to serve for the freshest look!
How to Prevent a Soggy Chocolate Cream Pie Crust?
This is a big one! The best way to avoid a soggy chocolate cream pie crust is to make sure your pie crust is fully baked and completely cooled before you pour in the filling. Some people even like to brush a thin layer of melted chocolate inside the cooled crust to create a barrier. Trust me, it works wonders!
Can I Use a Different Crust for My Chocolate Cream Pie?
You sure can! While I love a classic pastry crust for my chocolate cream pie, a graham cracker or even an OREO cookie crust would be absolutely divine. Just make sure whatever crust you choose is fully prepared and cooled according to its own recipe before adding the chocolate filling. Get creative!
Estimated Nutritional Information for Your Chocolate Cream Pie
I know some of you are curious about what’s in each delicious slice of this chocolate cream pie, and I totally get it! While I’m not a nutritionist, I’ve put together some estimated nutritional information based on the ingredients. Remember, these are just estimates, and they can vary a bit depending on the exact brands you use and how big your slice is (no judgment here!). But it should give you a good idea of the calories, fat, protein, and carbs you’re enjoying.
Your Chocolate Cream Pie Journey
So, there you have it – my go-to recipe for the most incredible chocolate cream pie! I truly hope you love making and, more importantly, eating this pie as much as I do. Please, please, please tell me all about your experience! Did you make any fun tweaks? Did your family go absolutely wild for it? Leave a comment below, rate the recipe, or even better, snap a pic and share your beautiful creations on social media! I can’t wait to see your pies!
Print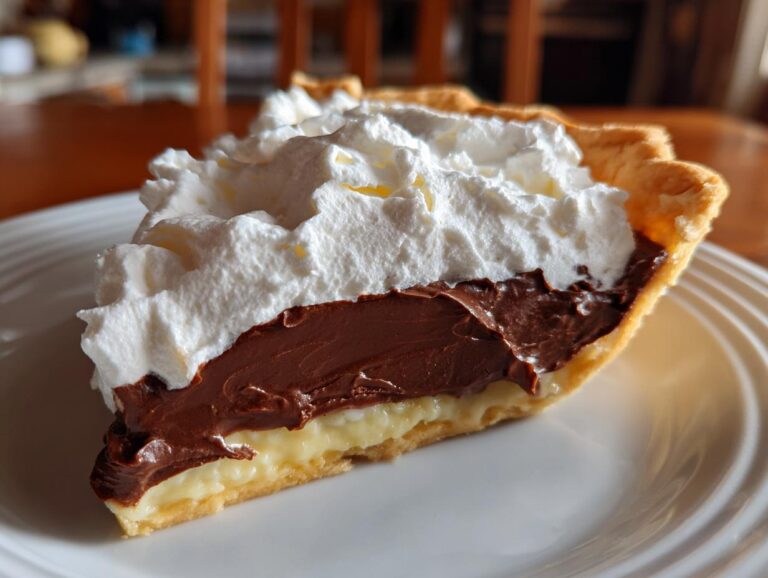
Chocolate Cream Pie
This recipe guides you through creating a rich, creamy chocolate pie with a crisp crust and a smooth, decadent filling. It is a satisfying dessert for any occasion.
- Total Time: 4 hours 45 minutes
- Yield: 8 servings 1x
Ingredients
- 1 9-inch pie crust, baked and cooled
- 1/2 cup granulated sugar
- 1/4 cup unsweetened cocoa powder
- 1/4 cup cornstarch
- 1/4 teaspoon salt
- 2 cups whole milk
- 2 large egg yolks
- 2 tablespoons unsalted butter
- 1 teaspoon alcohol-free vanilla extract
- 1 cup heavy cream
- 2 tablespoons powdered sugar
Instructions
- In a medium saucepan, whisk together the granulated sugar, cocoa powder, cornstarch, and salt.
- Gradually whisk in the milk until smooth.
- Cook over medium heat, stirring constantly, until the mixture thickens and comes to a boil. Boil for 1 minute, stirring.
- Remove from heat. In a small bowl, whisk the egg yolks. Gradually whisk about 1/2 cup of the hot chocolate mixture into the egg yolks to temper them.
- Pour the egg yolk mixture back into the saucepan with the remaining chocolate mixture, whisking constantly.
- Return to medium-low heat and cook for 1 minute more, stirring constantly. Do not boil.
- Remove from heat and stir in the butter and alcohol-free vanilla extract until combined.
- Pour the chocolate filling into the cooled pie crust. Press plastic wrap directly onto the surface of the filling to prevent a skin from forming.
- Refrigerate for at least 4 hours, or until thoroughly chilled and set.
- Before serving, beat the heavy cream and powdered sugar in a cold bowl with cold beaters until stiff peaks form.
- Spread or pipe the whipped cream over the chilled chocolate pie.
Notes
- Ensure the pie crust is completely cooled before adding the filling to prevent a soggy bottom.
- Tempering the egg yolks slowly prevents them from scrambling.
- For extra chocolate flavor, you can add a few drops of chocolate extract to the filling.
- The pie can be made a day in advance and stored in the refrigerator.
- Garnish with chocolate shavings or cocoa powder for a more appealing presentation.
- Prep Time: 30 minutes
- Cook Time: 15 minutes
- Category: Dessert
- Method: Baking
- Cuisine: American
- Diet: Vegetarian
Nutrition
- Serving Size: 1 slice
- Calories: 350
- Sugar: 30g
- Sodium: 180mg
- Fat: 22g
- Saturated Fat: 13g
- Unsaturated Fat: 7g
- Trans Fat: 0g
- Carbohydrates: 35g
- Fiber: 2g
- Protein: 5g
- Cholesterol: 90mg