Nothing beats coming home to the smell of sizzling ground beef and melted cheese—it’s pure comfort food magic! My Ultimate Cheesy Ground Beef Melt has been our family’s go-to weeknight dinner for years. I’ll never forget how my picky nephew devoured three helpings at his first bite (and how his mom begged me for the recipe afterward). This dish is everything you want: hearty, cheesy, and ready in under 30 minutes. The secret? Letting that cheddar get gloriously gooey while the beef stays juicy. Trust me, once you try it, you’ll understand why my kids call it “Mom’s Famous Meat Hug.”
Why You’ll Love This Ultimate Cheesy Ground Beef Melt
This recipe isn’t just delicious—it’s practically a superhero in the kitchen. Here’s why it’s my forever favorite:
- Weeknight lifesaver: Ready in 25 minutes flat, even when you’re exhausted
- Cheese pull perfection: That molten cheddar blanket makes everything better
- Kid-approved magic: My pickiest eater licks the plate clean every time
- Budget-friendly: Uses pantry staples you probably have right now
- Endlessly adaptable: Swap veggies, cheese, or add spices to make it yours
It’s the kind of meal that makes everyone ask for seconds while you secretly smile because it was so easy.
Ingredients for the Ultimate Cheesy Ground Beef Melt
Gather these simple ingredients – I promise you won’t need any fancy trips to specialty stores. Every item here plays a special role in creating that perfect cheesy, beefy goodness we’re after:
- 1 lb ground beef (85/15 blend): The slightly higher fat content keeps it juicy (but you can go leaner if you prefer)
- 1 cup shredded cheddar cheese (packed): Pack it in the measuring cup – we want serious cheese coverage!
- 1/2 cup finely diced onions: Tiny pieces melt into the beef for sweet flavor without crunchy bits
- 1/2 cup diced bell peppers (any color): My kids love when I use the rainbow mix for extra color
- 1 tbsp olive oil: Just enough to get those veggies singing in the pan
- 1/2 cup tomato sauce: The secret ingredient that brings everything together
- 1 tsp salt: Trust me, you’ll need it to balance all that richness
1/2 tsp black pepper: Freshly ground if you’ve got it – makes all the difference
See? Nothing complicated here. I always keep these basics on hand for last-minute dinner emergencies. The magic happens in how we combine them!
How to Make the Ultimate Cheesy Ground Beef Melt
Okay, let’s get cooking! This is where the magic happens – turning those simple ingredients into a melty, beefy masterpiece. I’ve made this so many times I could probably do it in my sleep, but I’ll walk you through each step like I’m right there beside you in the kitchen.
Browning the Beef
First things first – grab your favorite skillet (I swear by my trusty cast iron for this). Heat that tablespoon of olive oil over medium heat until it shimmers – about 1 minute should do it. Now toss in your diced onions and bell peppers with a pinch of salt. You’ll know they’re ready when the onions turn translucent and the peppers soften up – about 3-4 minutes. That sizzle sound? Music to my ears!
Here comes the star – add your ground beef, breaking it up with a wooden spoon. The trick is to let it sit undisturbed for a minute or two before stirring. This gives it that beautiful browned crust (that’s where all the flavor lives!). Keep breaking it into small crumbles as it cooks. When there’s no pink left – about 5-6 minutes – drain any excess grease if needed (I leave just a tablespoon for extra flavor).
Melting the Cheese Perfectly
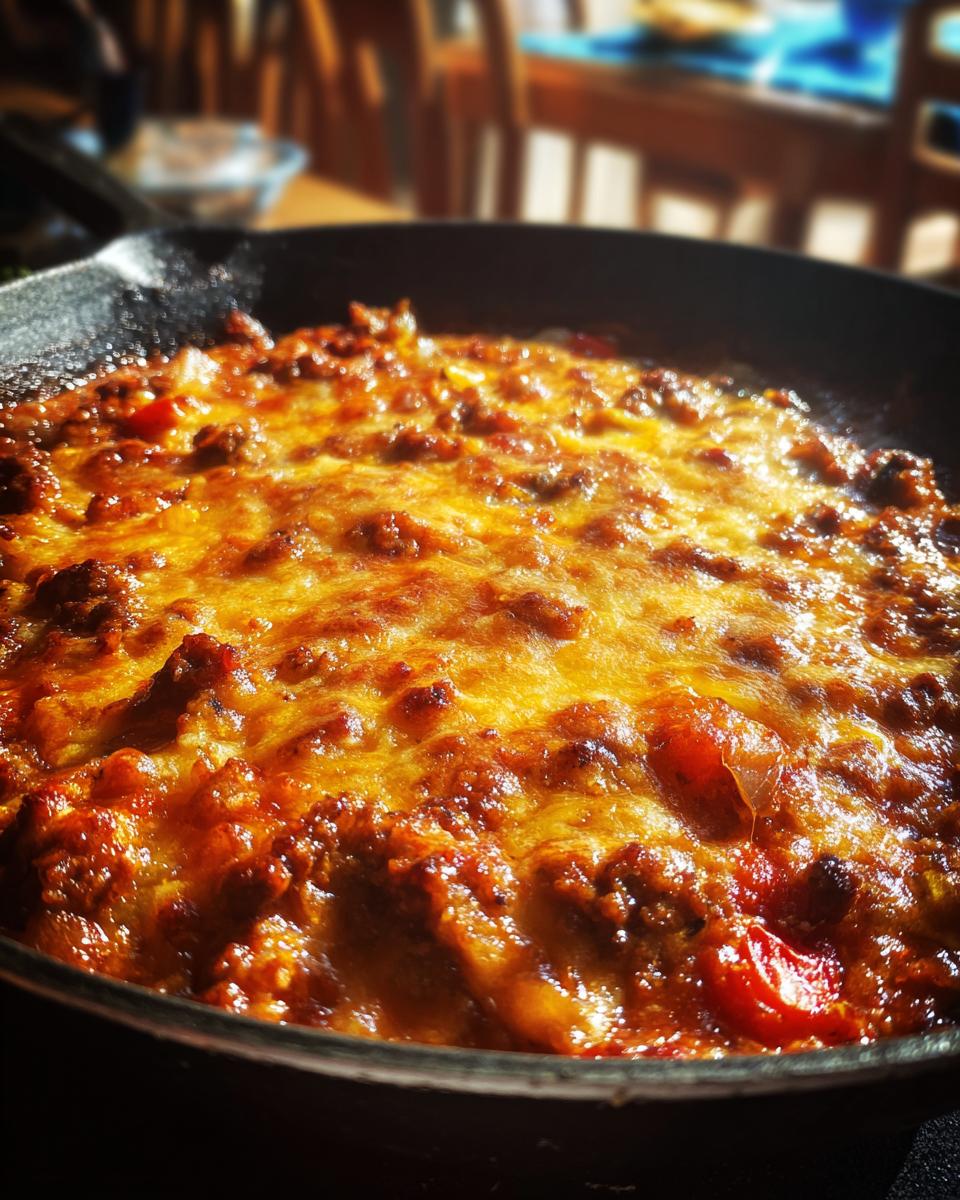
Now for the best part – the cheese! Stir in your tomato sauce, salt, and pepper, letting everything mingle for about 1 minute. Then – drumroll please – sprinkle that glorious shredded cheddar evenly over the top. Here’s my pro tip: cover the skillet immediately and reduce the heat to low. Walk away for exactly 2 minutes (set a timer if you’re like me and get distracted). That gentle heat lets the cheese melt slowly into a velvety blanket instead of turning greasy.
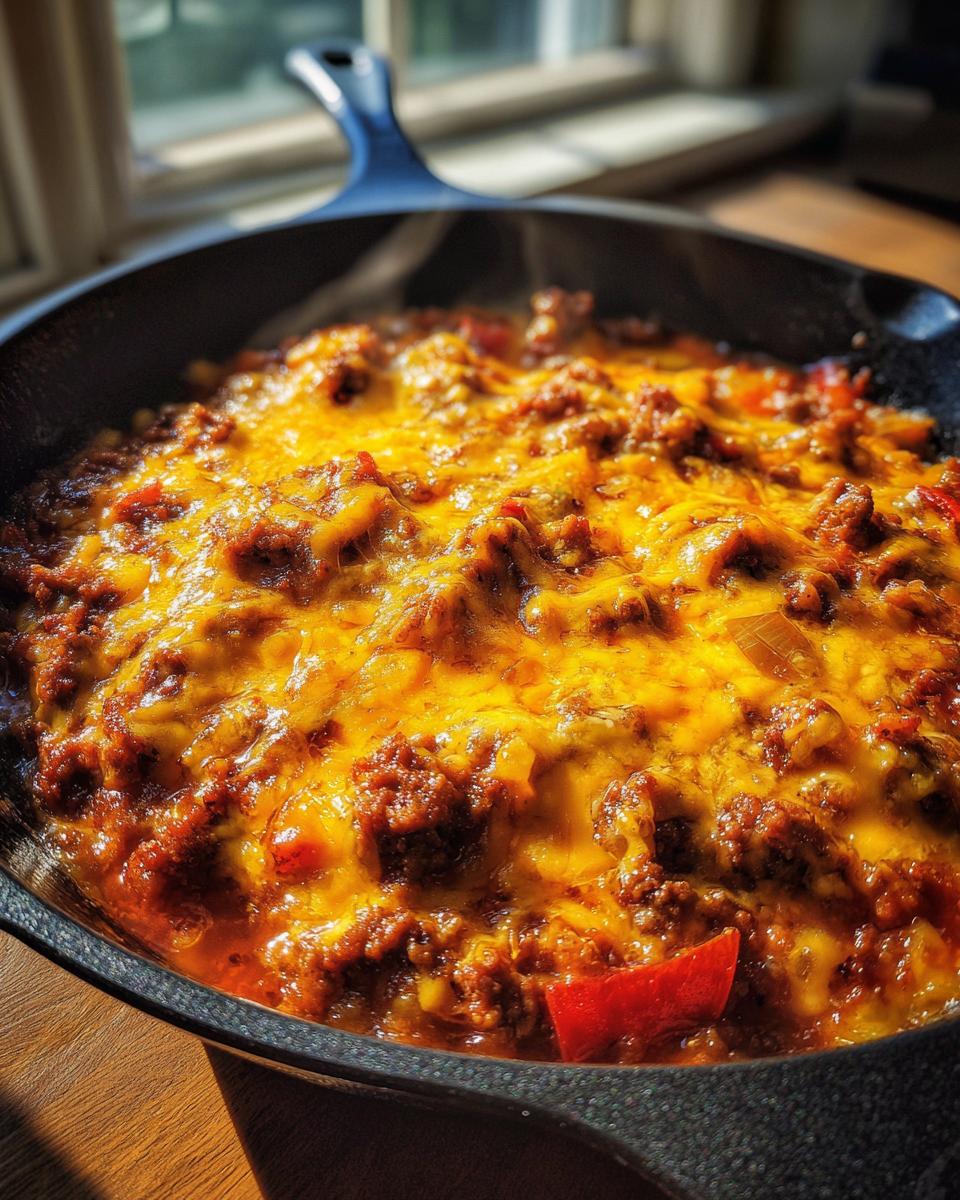
When you lift the lid, you should see your cheese perfectly melted – no weird oily separation or stubborn unmelted spots. If it needs another 30 seconds, go for it, but don’t overdo it or the beef will dry out. The moment that molten cheese pulls away in glorious strings when you scoop it? That’s your cue to serve immediately before anyone starts stealing bites straight from the pan!
Tips for the Best Ultimate Cheesy Ground Beef Melt
After making this recipe more times than I can count, I’ve picked up some tricks that take it from good to “oh-my-goodness-can-I-have-the-last-bite” amazing. Here’s what you need to know:
- Drain smartly: Don’t pour all that beef fat down the drain! I tilt my skillet and use a spoon to remove just enough grease, leaving about a tablespoon for flavor. For an even lighter version, blot the beef with paper towels.
- Cheese choices matter: While cheddar is our family favorite, I’ve had incredible results with pepper jack (for heat), smoked gouda (hello, campfire vibes), or even a Mexican blend. Just make sure whatever you use melts well – skip the pre-shredded stuff with anti-caking agents if you can.
- The veggie shuffle: No bell peppers? No problem! I’ve swapped in mushrooms, zucchini, or even frozen corn when the fridge was looking bare. The key is dicing them small so they cook quickly and blend right in with the beef.
- Low and slow wins the cheese race: That moment when you cover the skillet? Don’t peek! Keeping the lid on and heat low prevents the cheese from getting rubbery or separating. If you see oil pooling, you’ve gone too far – but hey, still tastes great stirred back in!
- Flavor boosters: My secret weapons? A splash of Worcestershire sauce with the beef, or a pinch of garlic powder with the veggies. Sometimes I’ll stir in a teaspoon of mustard powder for depth – my husband swears it tastes like his childhood diner favorite.
Remember – recipes are just guidelines, not rules. The beauty of this dish is how forgiving it is. Messed up? More cheese fixes everything. That’s my kitchen motto anyway!
Serving Suggestions for Ultimate Cheesy Ground Beef Melt
Now that you’ve got this glorious cheesy beef masterpiece ready, let’s talk about how to serve it up right. Over the years, I’ve discovered some perfect pairings that turn this simple dish into a full meal that’ll have everyone at the table smiling. Here are my go-to serving ideas:
- Crusty garlic bread soldiers: My kids love scooping up the beef and cheese with thick slices of toasted garlic bread. The crispy edges and buttery flavor cut through the richness perfectly. Bonus – it soaks up every last bit of sauce!
- Baked potato boats: Split open fluffy baked potatoes and pile this cheesy beef mixture on top. The steam rising from the potato mingles with the melted cheese – it’s comfort food heaven. Don’t forget the sour cream and chives on the side!
- Crisp green salad: When I want to balance things out, a simple salad with romaine, cherry tomatoes and a tangy vinaigrette works wonders. The fresh crunch is the perfect contrast to all that melty goodness.
- Buttered egg noodles: On extra busy nights, I serve it over wide egg noodles. The beef and cheese sauce coats every noodle, making each bite irresistible. It’s like a lazy cook’s beef stroganoff!
Honestly? Sometimes we just eat it straight from the skillet with forks – no judgment here! But when you want to make it feel special, any of these options will do the trick. What’s your favorite way to serve it? I’m always looking for new ideas to try!
Storing and Reheating
Okay, confession time – leftovers rarely happen in my house because we always gobble this up! But when we do manage to save some, here’s how I keep that cheesy beef goodness tasting just as amazing the next day.
For the fridge, I transfer any leftovers to an airtight container – but here’s my trick: place a piece of parchment paper right on top of the cheesy layer before sealing. This prevents that weird “dried cheese skin” from forming. It’ll stay fresh for 3-4 days this way.
Freezing works surprisingly well too! Just portion it out into freezer bags, press out all the air, and it’ll keep for 2-3 months. Pro tip: undercook the beef slightly before freezing so it doesn’t get tough when reheated.
Now, reheating is where most people go wrong – nobody wants rubbery cheese! My foolproof method: for small portions, microwave at 50% power in 30-second bursts, stirring between each. But for best results? Toss it back in a skillet over low heat with a teaspoon of water or broth. Cover and let it warm gently, stirring occasionally until it’s heated through – about 5-7 minutes. The steam keeps everything creamy instead of greasy.
One last tip – if the cheese separates a bit after reheating, stir in a splash of milk or cream to bring it back together. Works like a charm every time!
Nutritional Information
Now, I’m no nutritionist – I’m just a home cook who believes in balance (and cheese!). But since folks ask, here’s the scoop on what’s in each serving of our Ultimate Cheesy Ground Beef Melt. Remember, these are estimates – your actual numbers might dance around a bit depending on your exact ingredients!
- Calories: About 350 per serving (but who’s counting when it’s this good?)
- Protein: 25g – that beef packs a powerful punch!
- Fat: 20g (8g saturated) – hey, flavor doesn’t come from nowhere
- Carbs: 10g with 2g fiber – just enough to keep it balanced
- Sugar: 3g – mostly from those sweet bell peppers and onions
- Sodium: 500mg – go easy if you’re watching salt
A little secret? If you want to lighten it up without losing flavor, try 90% lean beef and reduce the cheese by 1/4 cup. But between you and me? Some nights are just worth the full-fat, full-flavor version. Life’s too short to skip the good cheese!
Frequently Asked Questions
Over the years, I’ve gotten so many great questions about this recipe from friends and family (and even a few desperate midnight texts from my sister when she’s missing an ingredient!). Here are the answers to the most common ones – straight from my kitchen to yours:
Can I use ground turkey instead of beef?
Absolutely! I do this all the time when I’m trying to lighten things up. The key is adding 1 tbsp of olive oil to the pan first since turkey is leaner. Also, don’t skip the Worcestershire sauce if you have it – it gives that umami depth turkey sometimes lacks.
How long does this keep in the fridge?
About 3-4 days stored properly (remember my parchment paper trick!). The tomato sauce actually helps it stay moist. If the cheese looks a little sad when you reopen the container, just stir in a splash of milk before reheating.
Can I make this ahead and freeze it?
You bet! I often double the recipe to freeze half. Cook everything except the cheese step, then cool completely before freezing in airtight bags. When ready, thaw overnight in the fridge, reheat in a skillet, then add fresh cheese – it’ll taste like you just made it!
What if my cheese isn’t melting smoothly?
First, check that your heat is low – high heat makes cheese greasy. If it’s still being stubborn, try grating your own cheese instead of pre-shredded (those anti-caking agents can be trouble). A sprinkle of cornstarch (1/4 tsp) mixed with the cheese helps too!
Is there a way to make this spicier?
Oh honey, yes! My favorite ways: swap in pepper jack cheese, add a diced jalapeño with the bell peppers, or stir in 1/2 tsp chili powder with the tomato sauce. For real heat lovers, a dash of cayenne never hurts!
There you have it – my Ultimate Cheesy Ground Beef Melt in all its gooey glory! This recipe has saved countless busy nights at our house, and I hope it becomes a favorite in your kitchen too. Nothing makes me happier than hearing how you put your own spin on it – maybe you added mushrooms or tried it with Swiss cheese? I’m all ears! Drop a comment below to let me know how it turned out or share your clever twists. And if this recipe made your crew as happy as mine? Give it a rating so others can discover this cheesy magic. Now grab a fork and dig in – that perfectly melted cheese won’t wait forever!
Print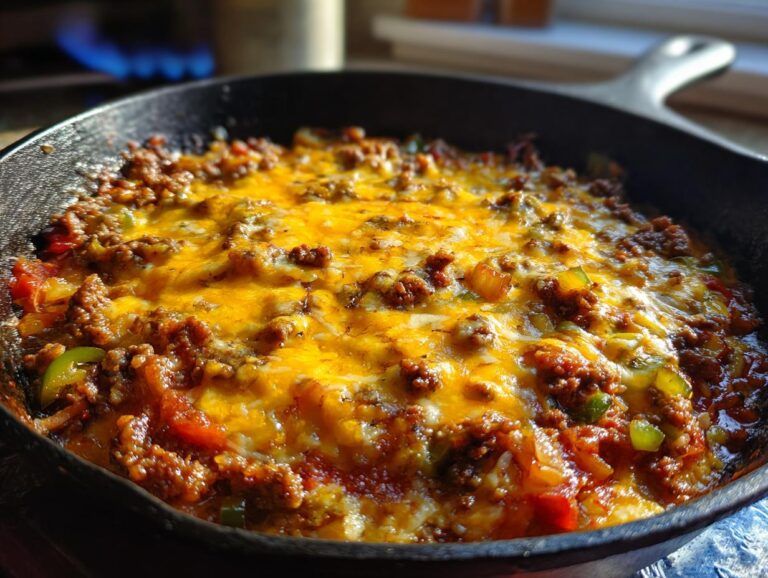
30-Minute Ultimate Cheesy Ground Beef Melt Recipe You’ll Crave
A delicious and hearty dish featuring ground beef smothered in melted cheese, perfect for a satisfying meal.
- Total Time: 25 mins
- Yield: 4 servings 1x
Ingredients
- 1 lb ground beef
- 1 cup shredded cheddar cheese
- 1/2 cup diced onions
- 1/2 cup diced bell peppers
- 1 tsp salt
- 1/2 tsp black pepper
- 1 tbsp olive oil
- 1/2 cup tomato sauce
Instructions
- Heat olive oil in a skillet over medium heat.
- Add onions and bell peppers, sauté until softened.
- Add ground beef, cook until browned.
- Stir in tomato sauce, salt, and pepper.
- Sprinkle shredded cheese on top, cover until melted.
- Serve hot.
Notes
- Use lean ground beef for a healthier option.
- Adjust cheese quantity to taste.
- Pair with a side of bread or salad.
- Prep Time: 10 mins
- Cook Time: 15 mins
- Category: Main Dish
- Method: Stovetop
- Cuisine: American
- Diet: Low Lactose
Nutrition
- Serving Size: 1 serving
- Calories: 350
- Sugar: 3g
- Sodium: 500mg
- Fat: 20g
- Saturated Fat: 8g
- Unsaturated Fat: 10g
- Trans Fat: 0g
- Carbohydrates: 10g
- Fiber: 2g
- Protein: 25g
- Cholesterol: 70mg