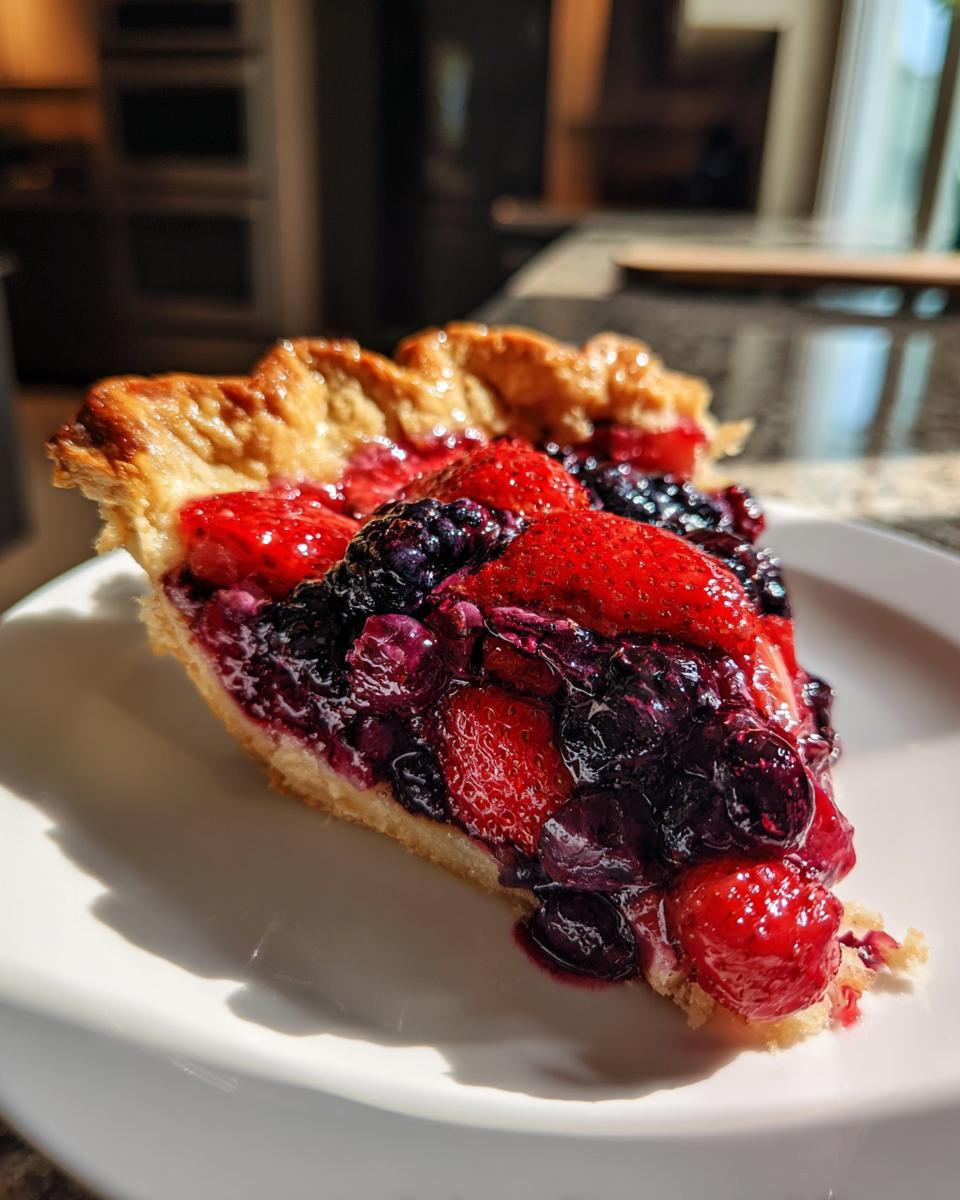
Oh my goodness, you guys! Get ready for some serious pie magic because today, I’m spilling all my secrets for the ABSOLUTE best mixed berry pie you’ll ever sink your teeth into. Seriously, this isn’t just a recipe; it’s a hug in a pie plate! I’ve been baking pies for what feels like forever – since I was tiny, helping my grandma in her kitchen, getting flour all over my face. Over those years, I’ve made countless pies, from apple to pecan, but there’s something truly special about a mixed berry pie.
There’s nothing quite like pulling a golden, bubbling pie out of the oven, the sweet-tart aroma filling every corner of the house. This recipe, my friends, is designed to be ridiculously easy, but tastes like you slaved over it for hours. It’s got that perfect flaky crust and a jewel-toned filling that just sings with fresh flavor. My family practically demands this pie at every gathering, and honestly, seeing their happy faces makes all the berry-stained fingers worth it!

Why You’ll Love This Mixed Berry Pie
The Irresistible Charm of Mixed Berry Pie
Okay, so why is *this* mixed berry pie going to be your new go-to? Well, let me tell you, it’s not just a dessert; it’s an experience! It hits all the right notes, and I promise you’ll be making it again and again. Here’s the lowdown on why this recipe is a total winner:
- Sweet and Tart Flavor Balance: Oh, the dance of flavors! You get that lovely burst of sweetness from the ripe berries, perfectly balanced by a little tang. It’s never overly sweet, just pure, fruity bliss.
- Flaky, Golden Crust Perfection: This crust, oh my word! It’s everything you dream of: buttery, tender, and beautifully golden. It shatters just right when you cut into it, providing the perfect contrast to the juicy filling.
- Perfect for Any Season: Seriously, whether it’s a summer BBQ or a cozy winter evening, this pie fits right in. You can use fresh berries in season or grab those frozen gems from your freezer any time of year!
- A Crowd-Pleasing Dessert: Trust me, this pie is a showstopper. It looks gorgeous, smells incredible, and tastes even better. Everyone, and I mean *everyone*, will ask for a second slice (and the recipe!).
Essential Equipment for Your Mixed Berry Pie
Tools for a Perfect Mixed Berry Pie
Alright, before we dive into the deliciousness, let’s chat about what you’ll need in your kitchen arsenal. Don’t worry, you won’t need any fancy gadgets here, just some basic tools that’ll make pie-making a breeze. Having the right stuff really does make a difference, especially when you’re aiming for that perfect, flaky crust and bubbly filling!
- 9-inch pie plate: This is a must-have, obviously! A ceramic or glass one works wonderfully for even baking.
- Large mixing bowls: You’ll need at least two – one for your berries and one for your dry ingredients. Easy peasy!
- Rolling pin: Essential for getting that pie crust nice and thin. My grandma always swore by her wooden one!
- Measuring cups and spoons: Precision is key in baking, so make sure yours are accurate.
- Pastry brush: For that beautiful egg wash that gives your crust that gorgeous golden sheen.
Ingredients for a Delicious Mixed Berry Pie
Gathering Your Mixed Berry Pie Ingredients
Okay, now for my favorite part – gathering all the yummy bits that make this pie so magical! You know, sometimes people think baking is super strict, but really, it’s about getting
How to Bake Your Mixed Berry Pie
Step-by-Step Guide to the Perfect Mixed Berry Pie
Alright, this is where the real fun begins! Don’t you worry, I’m going to walk you through every single step, just like I would with my best friend. It’s actually much simpler than you might think, and the reward is so, so worth it. Get ready to create some magic!
- First up, that glorious pastry! Grab one half of your prepared double-crust pie pastry. Roll it out on a lightly floured surface until it’s about 1/8-inch thick and large enough to fit your 9-inch pie plate. Carefully transfer it to the pie plate, letting it drape nicely. Leave about a 1/2-inch overhang around the edges for later crimping. Don’t stress too much about perfection here; rustic is charming!
- Now for the berries! In a big, roomy bowl, gently tumble in your blueberries, raspberries, blackberries, and those lovely sliced strawberries. We want to be gentle, so they don’t get squished before they even make it into the pie.
- Time for the flavor magic! In a separate, smaller bowl, whisk together your 1/2 cup granulated sugar, the all-purpose flour (this is our thickening hero!), that splash of lemon juice, the warm cinnamon, and a tiny hint of nutmeg. Give it a good whisk until it’s all blended.
- Coat those beautiful berries: Pour that sugar mixture right over your mixed berries. Now, with a big spoon or your (clean!) hands, gently toss and fold the berries until they’re all beautifully coated. You want every berry to get some of that sugary goodness!
- Fill ‘er up! Spoon your berry filling into the pastry-lined pie crust. Try to get it mounded slightly in the center. Then, take those little pieces of cold butter and dot them all over the top of the filling. This is my little secret for extra richness and a perfectly gooey center.
- Top it off! Roll out your second half of the pie pastry. Carefully place it over the berry filling. Now, trim the edges so they match up with the bottom crust’s overhang. Press the edges together, then crimp them creatively with your fingers or a fork to seal everything in. Don’t forget to cut several little slits or a fun design on top—this lets the steam escape, preventing a blow-out!
- The golden touch: In a tiny bowl, lightly beat that large egg. Brush this egg wash all over the top crust. This is what gives us that beautiful golden sheen! And for an extra sparkle and a little crunch, sprinkle some extra granulated sugar over the top.
- Oven, get ready! Preheat your oven to a nice hot 400°F (200°C).
- Bake time! Pop your gorgeous pie into the preheated oven. Bake it for 15 minutes at 400°F (200°C). Then, reduce the oven temperature to 375°F (190°C) and continue baking for another 35-45 minutes. You’re looking for a crust that’s beautifully golden brown and a filling that’s bubbly and thick.
- Watch those edges! If you notice the edges of your pie crust are browning too quickly (it happens!), just loosely cover them with a little strip of aluminum foil. This protects them while the rest of the pie catches up.
- The hardest part: cooling! I know, I know, it’s torture, but this is CRUCIAL! Let your mixed berry pie cool completely on a wire rack for at least 2-3 hours. This lets the filling set up properly, so you get nice, clean slices instead of a runny mess. Trust me, it’s worth the wait!
Expert Tips for Your Mixed Berry Pie
Achieving Mixed Berry Pie Perfection
Okay, so you’ve got the basic steps down, but if you want to elevate your mixed berry pie from “good” to “OH MY GOSH, AMAZING,” I’ve got a few extra tricks up my sleeve. These are the little things that make all the difference, the secrets I’ve picked up over years of pie-making!
- Mix it up for maximum flavor: Don’t be afraid to use a combination of fresh and frozen berries! The frozen ones often have a deeper, more concentrated flavor, and mixing them with fresh gives you the best of both worlds. Just don’t thaw the frozen ones completely before mixing, or things can get a bit watery.
- Taste those berries! Seriously, taste them before you add all the sugar. Some berries are naturally sweeter than others, so you might want to slightly adjust the amount of sugar you add. It’s all about balance, my friends.
- Patience, grasshopper, patience! I know it’s hard, but letting that pie cool COMPLETELY is non-negotiable. It truly needs those 2-3 hours for the filling to set up beautifully. If you slice it too soon, it’ll be runny, and we don’t want that!
- Soggy bottom blues? No more! If you’re worried about a soggy bottom crust (a common pie fear!), you can blind bake your bottom crust for about 10-15 minutes before adding the filling. Just prick it all over with a fork, line it with parchment paper, fill with pie weights or dried beans, and bake until slightly golden. Remove the weights and parchment before filling. It creates a little barrier and helps keep things perfectly crisp!
Serving and Storing Your Mixed Berry Pie
Enjoying Your Mixed Berry Pie
Okay, the hardest part (the cooling!) is over, and now it’s time for the best part – digging in! This pie is absolutely divine, and there are a couple of ways I love to serve it. Plus, I’ll tell you how to keep those precious leftovers fresh!
- Seriously, you HAVE to try this: Serve your mixed berry pie warm! A generous scoop of creamy vanilla ice cream melting over the top is pure heaven. Or, if you’re feeling fancy, a dollop of freshly whipped cream is just as delightful.
- If you’re lucky enough to have leftovers (that’s a big “if” in my house!), you can keep them right on the counter at room temperature for up to 2 days. Just cover it loosely to keep it fresh.
- Need it to last a bit longer? Pop it in the fridge! It’ll be perfectly good for up to 4 days.
- Want to bring back that “fresh from the oven” magic? Gently reheat individual slices in the oven at a low temperature until just warmed through. It really makes a difference for the crust!
Mixed Berry Pie Frequently Asked Questions
Your Mixed Berry Pie Questions Answered
I know when you’re baking, little questions pop up, right? So, I’ve rounded up some of the most common ones I get about this mixed berry pie. Hopefully, these answers will help you bake with confidence and get the perfect pie every single time!
- Can I use only frozen berries for this Mixed Berry Pie? Absolutely, you can! Just make sure you don’t thaw them completely before you mix them with the sugar and flour. If they get too watery, your filling might be a bit runnier than we want. So, straight from the freezer to the bowl is usually best!
- How do I prevent a soggy bottom crust in my Mixed Berry Pie? Ah, the age-old pie dilemma! My favorite trick is to blind bake the bottom crust. Just prick it all over with a fork, line it with parchment paper, fill it with pie weights (or even dried beans), and bake it for 10-15 minutes before you add your berry filling. It creates a lovely little barrier!
- Can I make this Mixed Berry Pie ahead of time? You betcha! You can assemble the whole pie (before baking, of course) and pop it in the fridge for up to 24 hours. Just bake it when you’re ready. Or, you can bake it completely and store it as directed for later enjoyment.
- What can I use instead of butter in the Mixed Berry Pie filling? If you’re looking for an alternative, you can certainly just omit the butter in the filling. It primarily adds a little extra richness. Or, if you want that similar creamy texture, a dairy-free butter alternative would work beautifully!
Estimated Nutritional Information for Mixed Berry Pie
Okay, so while we’re all about enjoying every delicious bite of this mixed berry pie, I know some of you like to keep an eye on the nutritional side of things. I totally get it! Below is an estimated nutritional breakdown for one slice of this glorious pie. Keep in mind, this is just an estimate, and the actual values can vary depending on the exact ingredients you use, how big your slice is (no judgment here!), and even the specific brands. Think of it as a helpful guide rather than a precise scientific calculation!
- Serving Size: 1 slice
- Calories: Approximately 350
- Sugar: Around 35g
- Sodium: About 200mg
- Fat: Roughly 18g
- Saturated Fat: Around 9g
- Unsaturated Fat: About 7g
- Trans Fat: Approximately 0.5g
- Carbohydrates: Roughly 45g
- Fiber: About 4g
- Protein: Approximately 3g
- Cholesterol: Around 30mg
See? It’s a treat, but a berry-filled one! Enjoy every single forkful without a speck of guilt, because life’s too short for boring desserts!
Share Your Mixed Berry Pie Experience
Join the Mixed Berry Pie Discussion
Alright, my amazing bakers, you’ve made it! You’ve baked the pie, you’ve tasted the pie, and now I want to hear ALL about it! This is where we share our pie triumphs and maybe even a funny baking mishap or two (we’ve all been there!). Let’s build a little community of pie lovers, shall we?
- Don’t be shy! Leave a comment below and tell me what you thought of this mixed berry pie. Did you love it? What was your favorite part?
- If you’ve baked it, please, please, please rate this recipe! Your feedback helps so much, and I love seeing your successes.
- And for goodness sake, share your beautiful creations on social media! Tag me and show off your gorgeous mixed berry pies. I can’t wait to see them! For more great recipes, check out Simply Recipes.
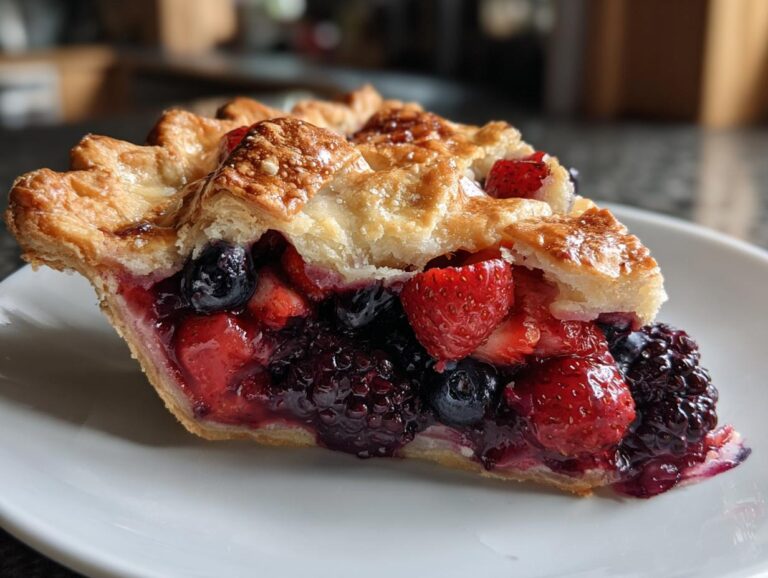
Mixed Berry Pie
This mixed berry pie is a delightful dessert, combining the sweetness of various berries in a flaky, golden crust. It’s perfect for any occasion.
- Total Time: 3 hours 20 minutes
- Yield: 8 servings 1x
Ingredients
- 1 recipe double-crust pie pastry
- 1 cup fresh or frozen blueberries
- 1 cup fresh or frozen raspberries
- 1 cup fresh or frozen blackberries
- 1 cup fresh or frozen sliced strawberries
- 1/2 cup granulated sugar, plus more for sprinkling
- 1/4 cup all-purpose flour
- 1 tablespoon lemon juice
- 1/2 teaspoon ground cinnamon
- 1/4 teaspoon ground nutmeg
- 2 tablespoons unsalted butter, cut into small pieces
- 1 large egg, beaten (for egg wash)
Instructions
- Prepare your favorite double-crust pie pastry. Divide dough in half, roll out one half and fit it into a 9-inch pie plate. Trim edges, leaving a 1/2-inch overhang.
- In a large bowl, gently combine blueberries, raspberries, blackberries, and strawberries.
- In a separate small bowl, whisk together 1/2 cup granulated sugar, flour, lemon juice, cinnamon, and nutmeg.
- Pour the sugar mixture over the berries and toss gently to coat evenly.
- Spoon the berry filling into the prepared pie crust. Dot the top of the filling with small pieces of butter.
- Roll out the remaining pie pastry. Place it over the berry filling. Trim and crimp the edges to seal. Cut several slits in the top crust to allow steam to escape.
- Brush the top crust with the beaten egg and sprinkle with additional granulated sugar.
- Preheat oven to 400°F (200°C).
- Bake for 15 minutes at 400°F (200°C). Reduce oven temperature to 375°F (190°C) and continue baking for 35-45 minutes, or until the crust is golden brown and the filling is bubbly.
- If the crust begins to brown too quickly, loosely cover the edges with aluminum foil.
- Let the pie cool completely on a wire rack for at least 2-3 hours before slicing and serving. This allows the filling to set properly.
Notes
- For a richer flavor, use a combination of fresh and frozen berries.
- Adjust sugar quantity based on the sweetness of your berries.
- Serve warm with a scoop of vanilla ice cream or a dollop of whipped cream.
- Leftovers can be stored at room temperature for up to 2 days or refrigerated for up to 4 days.
- Prep Time: 30 minutes
- Cook Time: 50 minutes
- Category: Dessert
- Method: Baking
- Cuisine: American
- Diet: Vegetarian
Nutrition
- Serving Size: 1 slice
- Calories: 350
- Sugar: 35g
- Sodium: 200mg
- Fat: 18g
- Saturated Fat: 9g
- Unsaturated Fat: 7g
- Trans Fat: 0.5g
- Carbohydrates: 45g
- Fiber: 4g
- Protein: 3g
- Cholesterol: 30mg