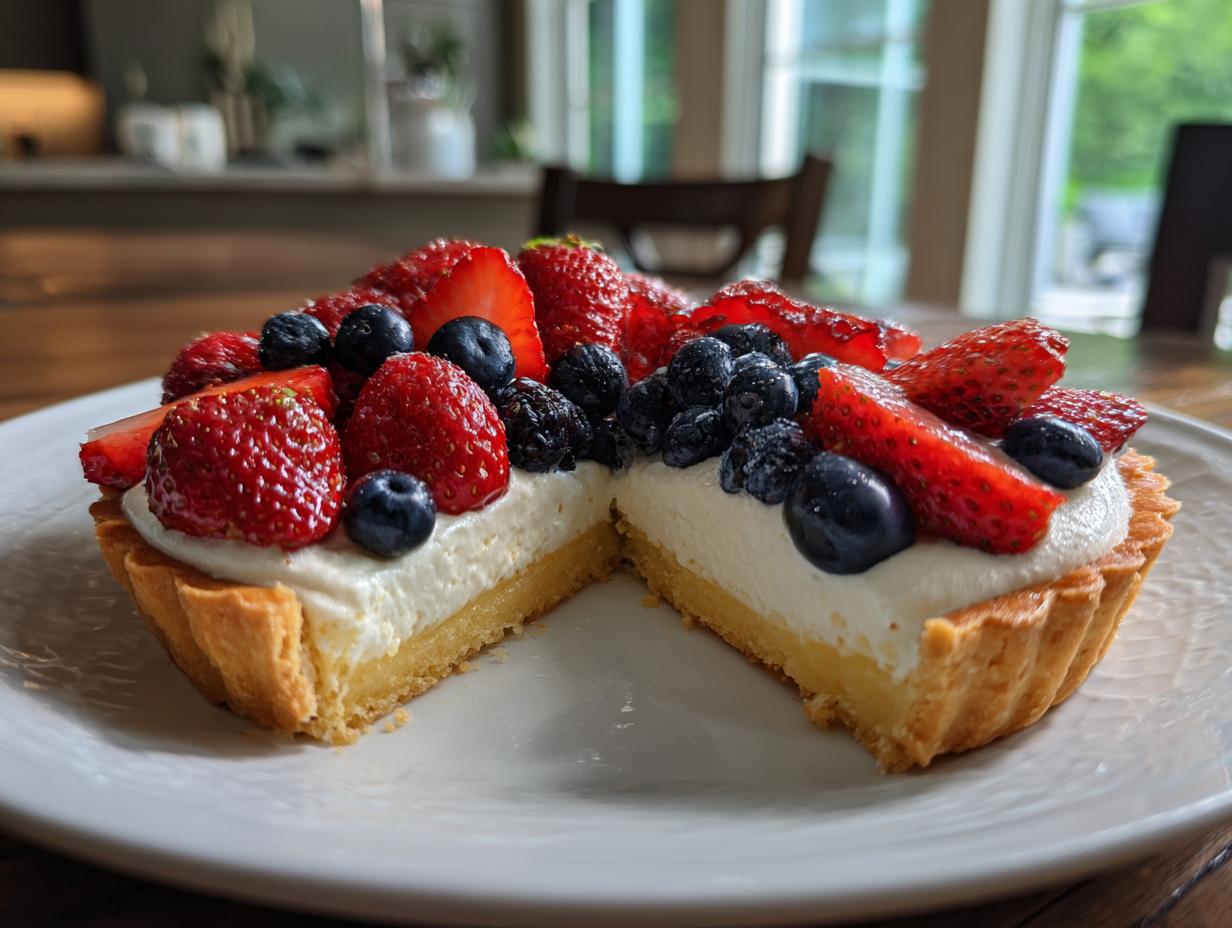
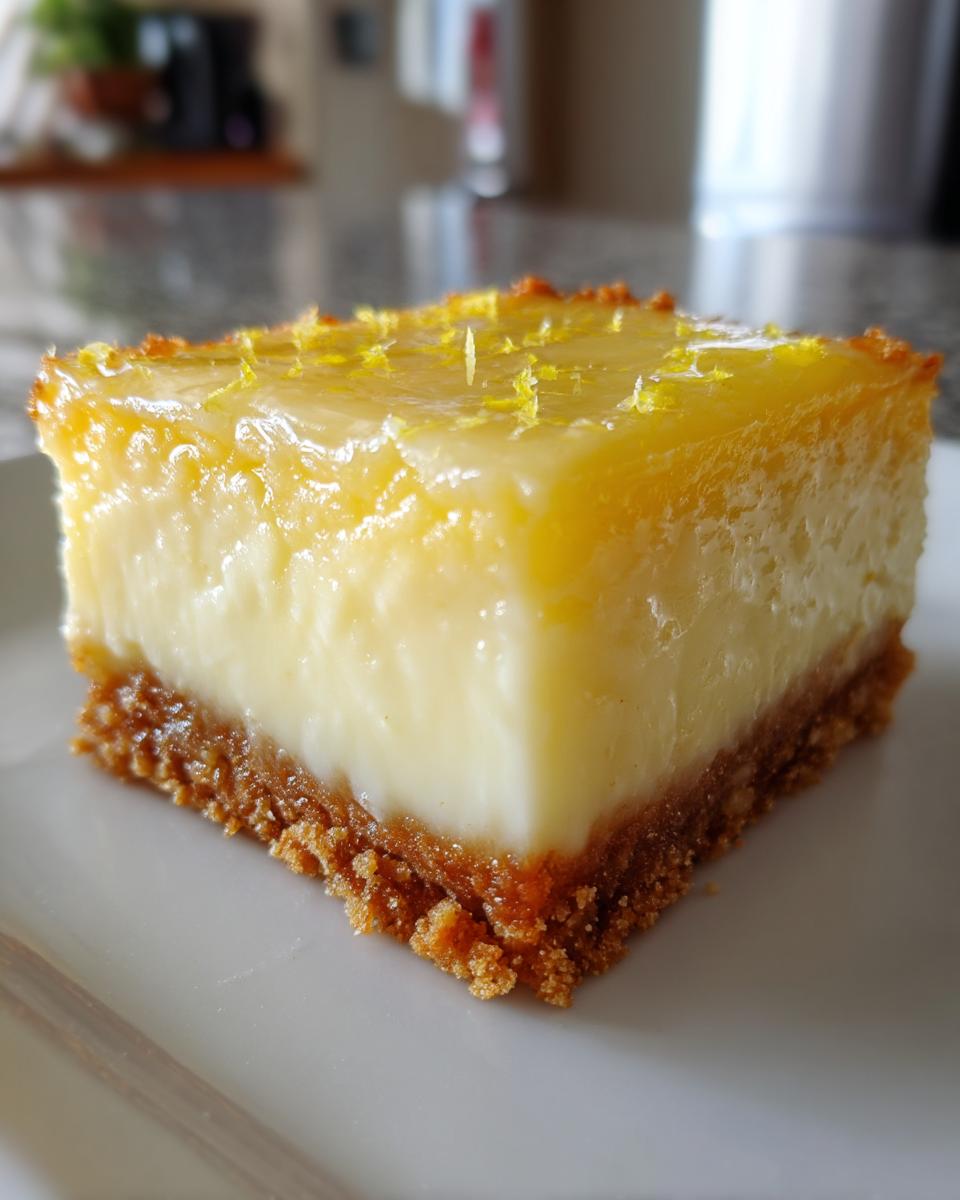
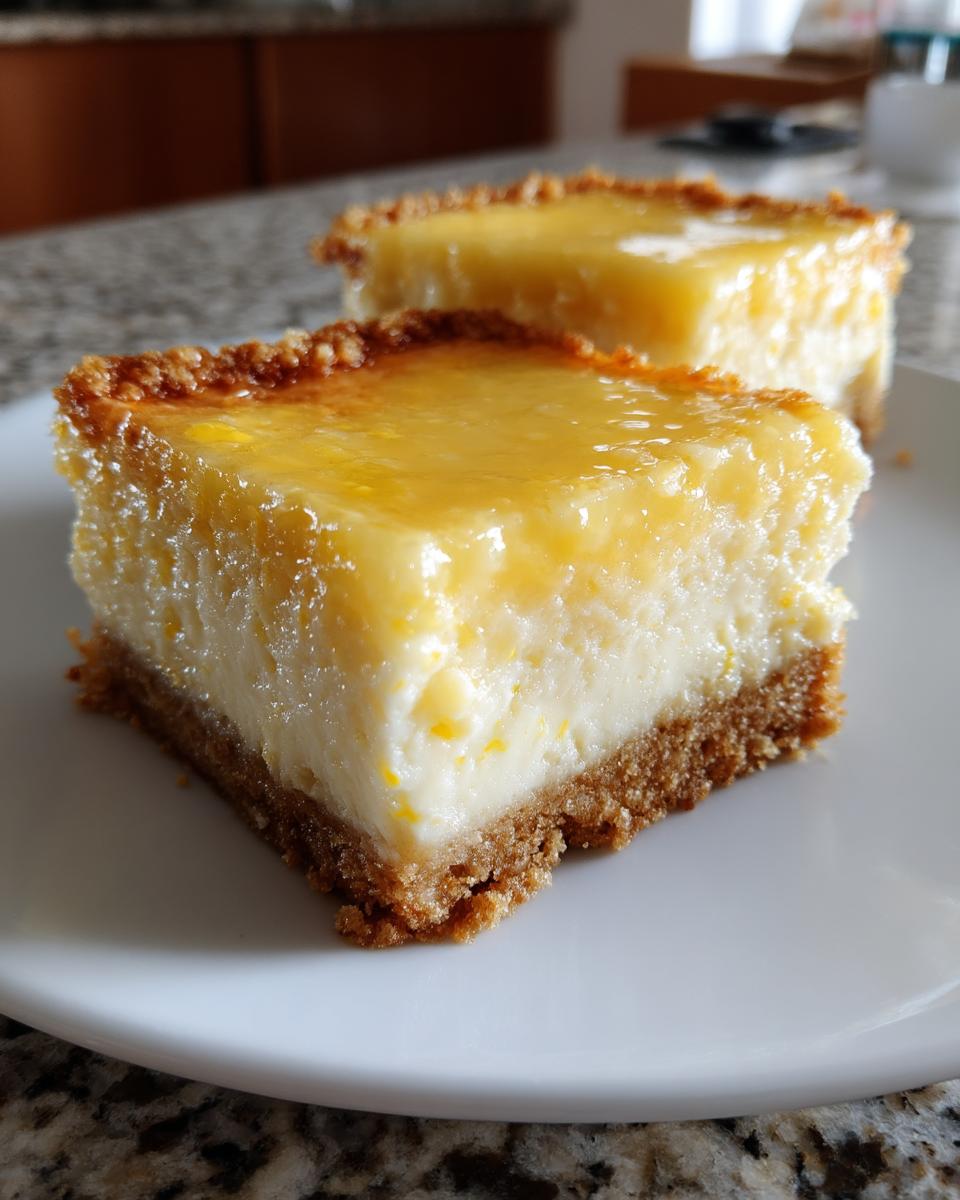
Oh my goodness, let me tell you about these lemon cheesecake bars – they’re my absolute weakness! I first made them for a summer potluck years ago, and now they’re requested at every family gathering. That perfect balance of creamy cheesecake filling with the bright zing of fresh lemon? Pure magic. The best part? They’re way easier than making a whole cheesecake but taste just as decadent.
After testing dozens of versions (my neighbors got very spoiled with taste tests!), I’ve perfected the ratio of tart lemon juice to sweet cream cheese filling. And that buttery graham cracker crust? It’s the ideal crunchy contrast to the velvety filling. Trust me you try you try these, you’ll understand why I always keep lemons and cream cheese stocked in my fridge!
Why You’ll Love These Lemon Cheesecake Bars
Let me count the ways these bars will steal your heart (and your taste buds!):
- Effortless elegance – All the fancy cheesecake flavor without the stress of a water bath
- Sunshine in every bite – That perfect sweet-tart balance that makes your mouth happy
- Crowd-pleaser magic – Always the first dessert to disappear at potlucks (I’ve seen fights break out over the last piece!)
- Beginner-friendly – If you can mix and press, you can make these beauties
- Make-ahead dream – They actually taste better after chilling overnight
Seriously, these bars check all the boxes – simple enough for weeknights, special enough for celebrations!
Ingredients for Lemon Cheesecake Bars
Now let’s talk ingredients – and trust me, every single one matters here! I’ve learned through (delicious) trial and error that quality makes all the difference with these lemon cheesecake bars. Here’s exactly what you’ll need:
- 1 1/2 cups graham cracker crumbs – about 10 full sheets, crushed to fine crumbs (but not powder!)
- 1/4 cup sugar – regular granulated works perfectly here
- 6 tbsp melted butter – unsalted is my go-to so we control the salt
- 16 oz cream cheese – must be room temperature (I leave it out 2 hours)
- 1/2 cup sugar – same granulated sugar for the filling
- 2 eggs – large, also at room temp (cold eggs make lumps!)
- 1/4 cup lemon juice – freshly squeezed please – about 2 medium lemons
- 1 tbsp lemon zest – from those same lemons – the oils make all the difference
Ingredient Notes & Substitutions
Okay, real talk – I know sometimes you’re mid-recipe and realize you’re missing something. Here’s how to adapt without sacrificing that perfect flavor:
- No graham crackers? Digestive biscuits or vanilla wafers work beautifully – same measurements!
- Out of lemons? In a pinch, bottled lemon juice works (but zest is harder to substitute – maybe try 1/2 tsp lemon extract?)
- Want lighter? Swap half the cream cheese for Greek yogurt – texture changes slightly but still delicious
- Dairy-free? There are great vegan cream cheeses now – just check they’re the block kind, not spreadable
One golden rule though – never use cold cream cheese straight from the fridge. Those lumps will haunt your cheesecake dreams! If you’re in a hurry, cut it into cubes and let it sit for 30 minutes – it helps tremendously.
How to Make Lemon Cheesecake Bars
Alright, let’s get to the fun part – making these dreamy lemon cheesecake bars! I promise it’s easier than you think, but there are a few key steps that make all the difference between good and “oh-my-goodness-I-need-the-whole-pan” amazing. Follow along and you’ll be a cheesecake bar pro in no time!
Step 1: Prepare the Crust
First things first – that buttery, crunchy crust that makes these bars so irresistible. Here’s how to get it perfect every time:
- Preheat your oven to 350°F (175°C) – this gives the oven time to stabilize while you prep
- Mix your graham cracker crumbs, sugar, and melted butter until it looks like wet sand (you should be able to squeeze it and it holds together)
- Line an 8×8-inch pan with parchment paper, leaving some overhang – this is your golden ticket to easy removal later!
- Dump the crumbs into the pan and press firmly with your fingers or a flat-bottomed cup until it’s super compact and even
- Bake for 10 minutes – this sets the crust so it doesn’t get soggy from the filling
- Let it cool while you make the filling (but keep the oven on!)
Pro tip: I like to use the bottom of a measuring cup to really press the crust down hard – it helps prevent crumbling when you cut the bars later!
Step 2: Make the Cheesecake Filling
Now for the star of the show – that creamy, dreamy lemon cheesecake filling. Here’s where patience pays off:
- Beat the room-temperature cream cheese with sugar for 2-3 minutes until completely smooth – no lumps allowed!
- Add eggs one at a time, beating well after each addition (this prevents cracking later)
- Mix in the lemon juice and zest just until combined – overmixing introduces too much air
- The filling should be silky smooth and slightly glossy – if you see lumps, keep beating!
- Pour over your cooled crust and gently smooth the top with a spatula
Watch for this visual cue: When you lift the beaters, the filling should ribbon off smoothly – that’s how you know it’s perfectly mixed!
Step 3: Bake & Chill
Almost there! The baking and chilling steps are crucial for that perfect cheesecake texture:
- Bake for 25-30 minutes – the edges should be set but the center will still jiggle slightly when you gently shake the pan
- Let cool completely at room temperature (about 1 hour) – rushing this can cause cracks!
- Chill in the fridge for at least 2 hours, but overnight is even better – this sets the filling completely
- Use the parchment overhang to lift the whole slab out before cutting into bars
- For super clean cuts, wipe your knife with a hot damp cloth between slices
Remember: That jiggly center is exactly what you want – it will firm up as it chills. Resist the temptation to overbake “just to be safe” or your bars will be dry instead of creamy!
Tips for Perfect Lemon Cheesecake Bars
After making these lemon cheesecake bars more times than I can count (my waistline can attest to this!), I’ve picked up some foolproof tricks that guarantee perfect results every single time. These are the little things that take your bars from “good” to “can’t-stop-eating-them” amazing!
Zest Before You Juice
Always zest your lemons before juicing them – trying to zest a half-squeezed lemon is like wrestling a slippery fish! I keep a little bowl nearby to catch all that fragrant zest. Pro tip: Use organic lemons when possible since you’re eating the zest, and give them a good scrub first.
The Parchment Paper Lifesaver
Don’t skip lining your pan with parchment paper – those overhanging “handles” will save you so much frustration later! I learned this the hard way when I once had to serve crumbled cheesecake bars that refused to leave the pan. Now I lightly grease the pan first so the parchment sticks in place while you press in the crust.
Room Temp is Non-Negotiable
I can’t stress this enough – cold cream cheese equals lumpy filling. If you forget to take it out ahead of time, here’s my emergency method: Unwrap the blocks, microwave at 50% power for 15 seconds, flip, then another 10 seconds. It should be slightly soft but not melty. This trick has saved me more times than I’d like to admit!
The Mixing Sweet Spot
When making the filling, mix until just combined after adding the eggs and lemon. Overbeating incorporates too much air, which can cause cracks during baking. I stop the mixer as soon as I don’t see any more streaks – that’s when you know it’s perfect.
Chill for Clean Cuts
Want those picture-perfect clean edges? Chill the bars thoroughly before cutting – I usually wait at least 4 hours. For super sharp cuts, run your knife under hot water and wipe it dry between each slice. The heat helps glide through the creamy filling without dragging.
One last secret? These bars actually taste better on day two as the flavors meld together. If you can resist, try making them a day ahead – the lemon flavor really pops after an overnight rest in the fridge!
Serving & Storage Suggestions
Now for the best part – enjoying these heavenly lemon cheesecake bars! I’ve served these at everything from backyard BBQs to fancy dinner parties, and here’s how I make them look and taste their absolute best:
Presentation Perfection: For a gorgeous finish, I love topping each bar with a dollop of freshly whipped cream and a few raspberries or blueberries – the red and blue against the pale yellow looks stunning! A light dusting of powdered sugar or a tiny mint leaf adds that professional bakery touch. Sometimes I’ll even drizzle a little lemon curd over the top for serious wow factor.
Fridge Storage: These bars keep beautifully in the fridge for up to 5 days (if they last that long!). Just cover the pan tightly with plastic wrap or transfer cut bars to an airtight container with parchment between layers. The crust stays surprisingly crisp thanks to that pre-bake step – another reason this recipe rocks!
Freezing Tips: Yes, you can freeze them! I often make a double batch just for this. Freeze the whole uncut slab first on a baking sheet, then wrap tightly in plastic and foil. They’ll keep for about 2 months. Thaw overnight in the fridge – the texture stays perfect! Pro tip: Add garnishes after thawing for the freshest look.
Serving Temperature: These bars are most delicious when served chilled but not ice-cold. I take them out of the fridge about 15 minutes before serving to let the flavors really shine. The texture becomes extra creamy at this perfect in-between temperature!
One of my favorite things about this recipe is how adaptable it is. Last summer I served these at a picnic with little paper liners under each bar – no plates needed! For fancier occasions, I’ll arrange them on a cake stand with edible flowers. However you serve them, just be prepared for recipe requests – these bars have a way of making people very curious about your baking secrets!
Lemon Cheesecake Bars Nutritional Info
Okay, let’s talk numbers – but remember, these are estimates since brands and exact measurements can vary. I calculate based on standard ingredients, but your mileage may differ slightly. Here’s the scoop per bar (when cut into 9 generous squares):
- Calories: About 280 – rich but worth every bite!
- Sugar: 20g (that sweet-tart balance comes from somewhere)
- Fat: 18g total (10g saturated from all that glorious cream cheese and butter)
- Carbs: 25g (mostly from the crust and a bit from the filling)
- Protein: 4g (thank the eggs and cream cheese for this)
- Sodium: 220mg (not bad for a dessert!)
- Cholesterol: 85mg
Now, real talk – I’m no nutritionist, just a cheesecake lover who’s done her homework! These numbers can shift if you:
- Use low-fat cream cheese (saves about 50 calories but changes texture)
- Swap in sugar substitutes (watch for aftertastes with lemon)
- Adjust lemon juice amounts (barely affects calories but changes flavor balance)
My philosophy? These are treats meant to be enjoyed fully. I’d rather have one perfect, real-ingredient bar than three “light” versions that don’t satisfy. Everything in moderation, right? Now pass me that second bar…
Frequently Asked Questions
Over the years, I’ve gotten so many questions about these lemon cheesecake bars – and I love helping fellow bakers get them just right! Here are the answers to the most common things people ask me:
Q1. Can I use bottled lemon juice instead of fresh?
You can, but fresh really makes a difference! Bottled juice works in a pinch, but it lacks the bright, vibrant flavor of freshly squeezed lemons. If you must use bottled, add an extra teaspoon of zest to boost the lemon flavor. But trust me – once you taste the version with fresh juice, you’ll never go back!
Q2. Why did my cheesecake bars crack on top?
Oh no! This usually happens from overmixing (too much air gets incorporated) or drastic temperature changes. Next time, make sure to:
- Mix the filling just until combined after adding eggs
- Let the baked bars cool gradually at room temperature before chilling
- Don’t overbake – that jiggly center is what you want!
P.S. If they do crack, just cover it with whipped cream – no one will know!
Q3. How long do these lemon cheesecake bars last in the fridge?
They stay delicious for up to 5 days when stored properly in an airtight container. The crust might soften slightly after day 3, but the flavor actually improves! I often make them 2 days ahead for parties – the lemon flavor gets more pronounced.
Q4. Can I freeze these bars?
Absolutely! Freeze the whole uncut slab first on a baking sheet for 1 hour, then wrap tightly in plastic and foil. They’ll keep for 2 months. Thaw overnight in the fridge – the texture stays perfect. Pro tip: Add any garnishes after thawing for the freshest look.
Q5. My filling came out lumpy – what went wrong?
This breaks my heart! Lumps usually mean your cream cheese wasn’t soft enough. Next time:
- Leave cream cheese out for 2 full hours
- Cut it into cubes before beating
- If in a hurry, microwave at 50% power in 10 bursts</ bursts
Smooth cream cheese = silky smooth filling – it’s worth the wait!
Share Your Feedback
Nothing makes me happier than seeing your lemon cheesecake bar creations – seriously, it’s like Christmas morning for me every time someone tags me in their photos! If you make these (and I really hope you do), I’d be absolutely thrilled if you’d:
- Rate the recipe below – your honest feedback helps me improve!
- Snap a pic and tag me @Recipesuniverse on Instagram – I feature my favorites every Friday
- Leave a comment sharing your experience – did you add any fun twists? How did your family react?
Baking is all about sharing the love, and hearing your stories makes all my kitchen experiments worthwhile. Did your picky kid finally eat dessert? Did your partner propose marriage after one bite? (Okay, that last one hasn’t happened… yet!) I want to hear it all – the triumphs, the hilarious fails, everything in between. Now go forth and cheesecake, my friends!
Print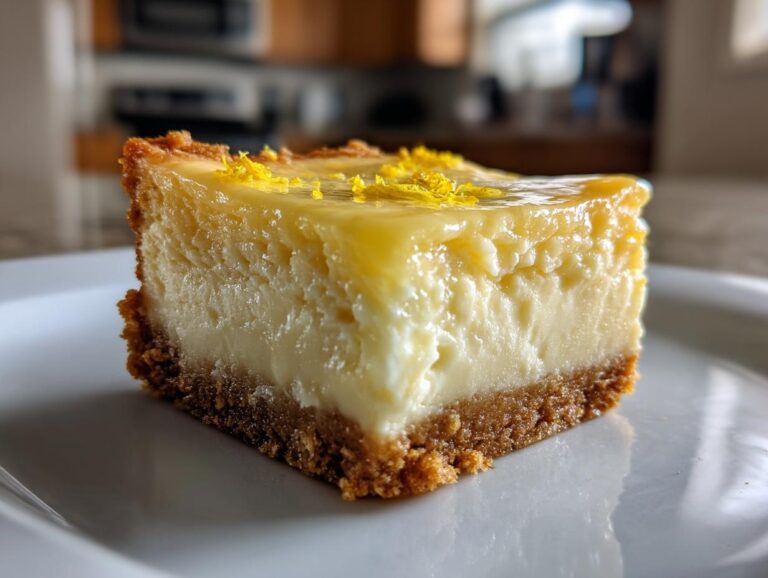
Irresistible Lemon Cheesecake Bars in Just 30 Minutes
Delicious lemon cheesecake bars with a buttery crust and creamy filling.
- Total Time: 45 minutes
- Yield: 9 bars 1x
Ingredients
- 1 1/2 cups graham cracker crumbs
- 1/4 cup sugar
- 6 tbsp melted butter
- 16 oz cream cheese, softened
- 1/2 cup sugar
- 2 eggs
- 1/4 cup lemon juice
- 1 tbsp lemon zest
Instructions
- Preheat oven to 350°F (175°C).
- Mix graham cracker crumbs, 1/4 cup sugar, and melted butter. Press into a lined 8×8-inch pan.
- Bake crust for 10 minutes, then let cool.
- Beat cream cheese and 1/2 cup sugar until smooth.
- Add eggs one at a time, then mix in lemon juice and zest.
- Pour filling over crust and bake for 25-30 minutes.
- Chill for at least 2 hours before slicing.
Notes
- Use room-temperature cream cheese for smoother filling.
- For extra tang, add more lemon juice.
- Store leftovers in the fridge for up to 5 days.
- Prep Time: 15 minutes
- Cook Time: 30 minutes
- Category: Dessert
- Method: Baking
- Cuisine: American
- Diet: Vegetarian
Nutrition
- Serving Size: 1 bar
- Calories: 280
- Sugar: 20g
- Sodium: 220mg
- Fat: 18g
- Saturated Fat: 10g
- Unsaturated Fat: 6g
- Trans Fat: 0g
- Carbohydrates: 25g
- Fiber: 0g
- Protein: 4g
- Cholesterol: 85mg