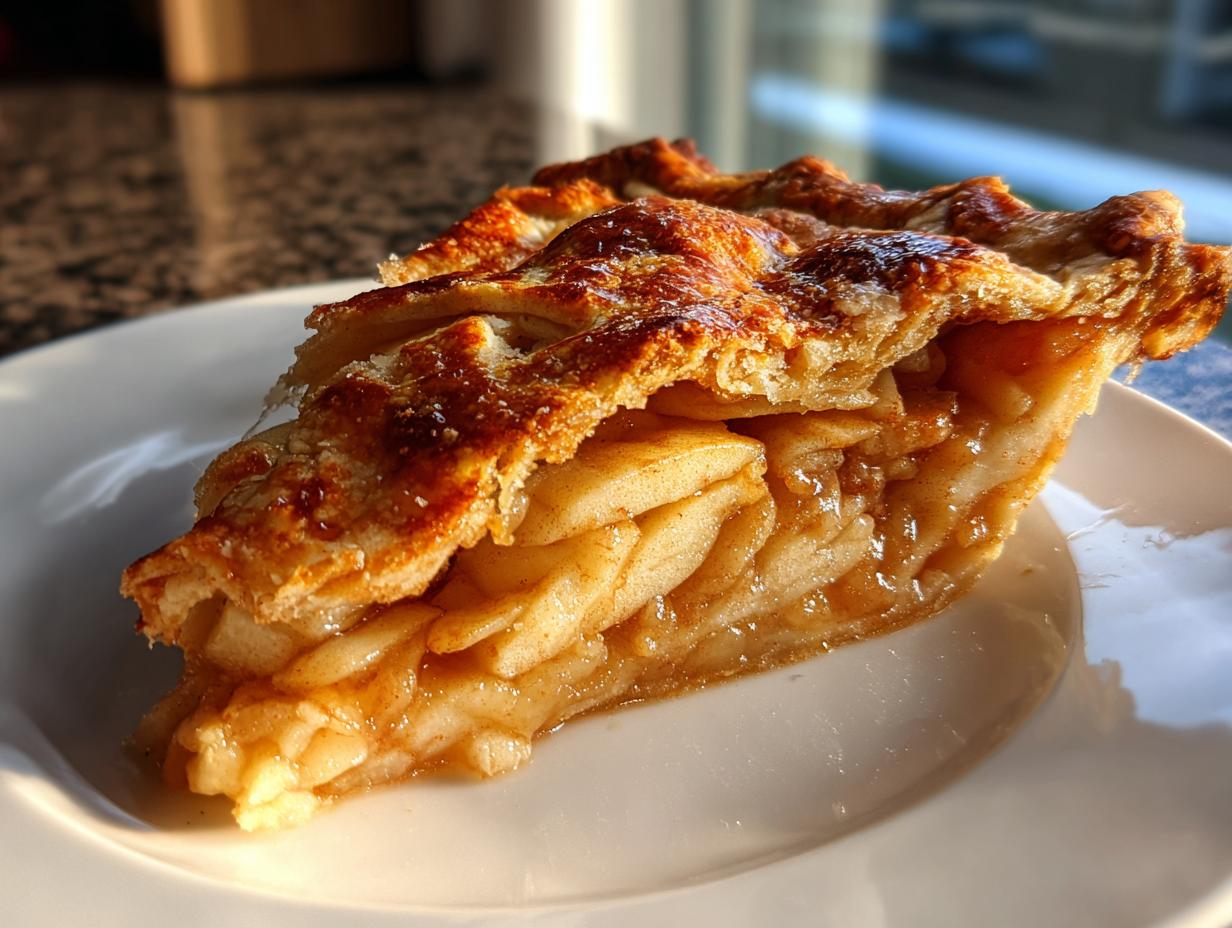
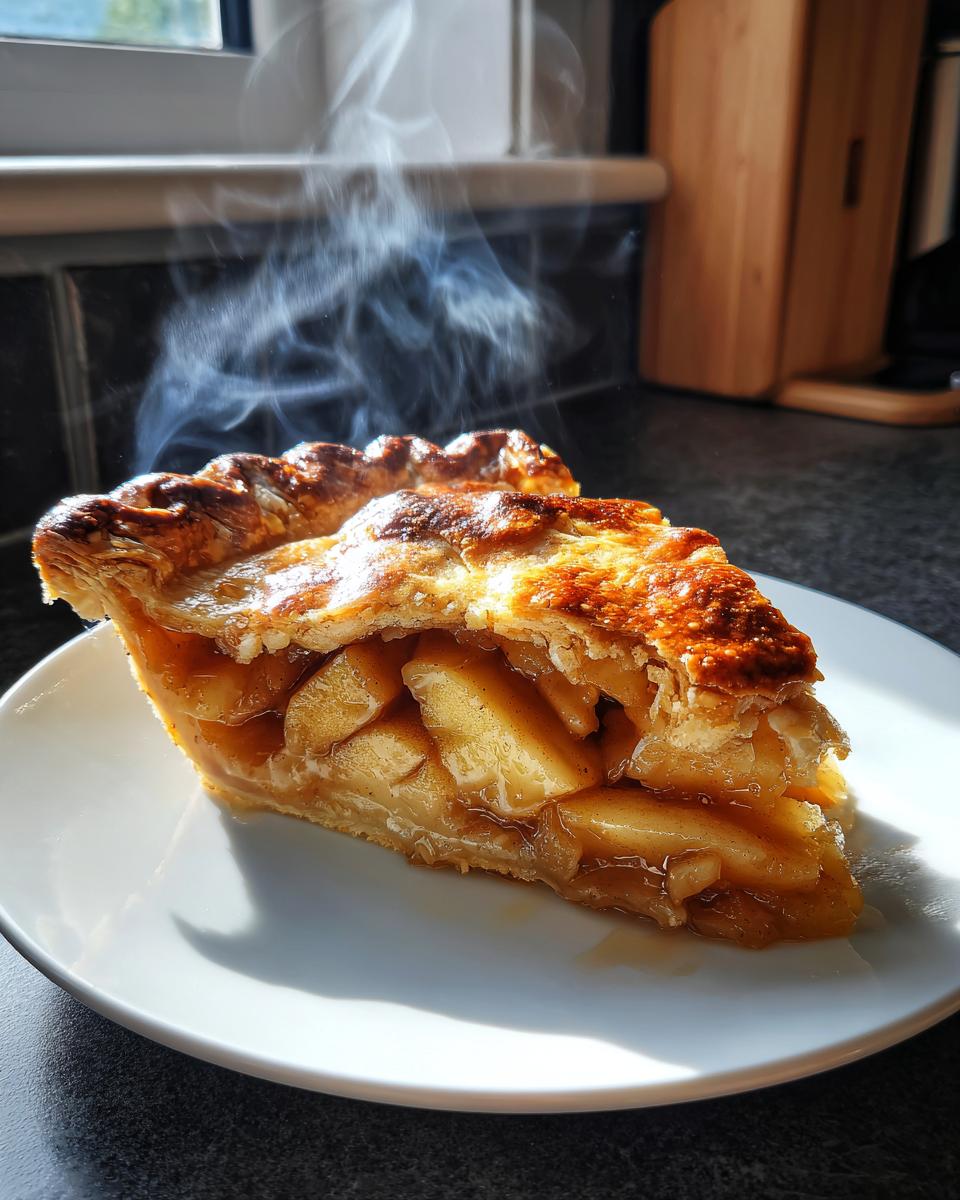
Oh, there’s just something magical about the smell of a warm, homemade Classic Apple Pie filling your kitchen, isn’t there? It instantly transports you to cozy autumn evenings, family gatherings, and pure, unadulterated comfort. For me, apple pie isn’t just a dessert; it’s a hug in pie form! I swear, I’ve baked more apple pies than I can count over the years—for birthdays, holidays, potlucks, and sometimes, just because it was Tuesday and I needed a little extra joy.
This particular Classic Apple Pie recipe? It’s my absolute go-to, the one I always come back to. It’s got that perfectly flaky, buttery crust that shatters with every forkful, and a filling that’s just the right balance of sweet and tart, bursting with spiced apple goodness. Trust me, if you’re looking for a foolproof, incredibly delicious apple pie that everyone will rave about, you’ve found it!

Why You’ll Love This Classic Apple Pie Recipe
I know, I know, there are a million apple pie recipes out there. But this one? It’s special, I promise! You’re going to fall head over heels for this Classic Apple Pie because it just hits all the right notes. Here’s why it’s going to become your new favorite:
- That Flaky, Buttery Crust: Seriously, it’s pie crust perfection. Golden, tender, and oh-so-delicious.
- Sweet & Tart Filling: We get that ideal balance, so it’s never too sweet, letting the fresh apple flavor really shine through.
- Perfect for Any Occasion: From a simple weeknight treat to a holiday showstopper, this pie fits right in.
- Super Easy to Follow: I’ve broken it down so even if you’re a pie-making newbie, you’ll feel like a pro!
The Allure of a Classic Apple Pie
There’s just something inherently comforting and nostalgic about a slice of warm Classic Apple Pie. It’s a dessert that transcends generations, bringing back memories of childhood kitchens and happy gatherings. Its timeless appeal isn’t just about the taste; it’s about the feeling it evokes. That familiar scent, that first bite of spiced apple goodness – it’s pure, unadulterated comfort food that everyone, and I mean *everyone*, loves.
Essential Ingredients for Your Classic Apple Pie
Alright, let’s talk ingredients! Crafting the perfect Classic Apple Pie starts with having the right stuff on hand. Don’t worry, it’s all pretty standard pantry fare, but getting the measurements just right is super important for that amazing flavor and texture we’re aiming for. Here’s exactly what you’ll need to gather:
- 1 recipe double-crust pie pastry: You can use your favorite homemade recipe or a good quality store-bought one. No judgment here!
- 6 cups thinly sliced, peeled apples: This is about 6 medium-sized apples. We’ll chat more about which kinds are best in a sec!
- 1/2 cup granulated sugar: For that foundational sweetness.
- 1/4 cup packed light brown sugar: This adds a lovely depth and a hint of caramel flavor.
- 1 teaspoon ground cinnamon: The classic warm spice for apple pie.
- 1/4 teaspoon ground nutmeg: Just a touch to enhance the cinnamon.
- 1/8 teaspoon ground cloves: A little goes a long way to add that extra special something.
- 2 tablespoons all-purpose flour: This helps thicken the filling so it’s not too runny.
- 1 tablespoon lemon juice: A little brightness to balance the sweetness and keep apples from browning.
- 2 tablespoons unsalted butter, cut into small pieces: Dotting these over the apples melts into pure deliciousness!
- 1 large egg, beaten: For that beautiful, golden egg wash on top.
- 1 tablespoon turbinado sugar: For sprinkling on the crust – it gives a lovely sparkle and crunch!
Choosing the Best Apples for Classic Apple Pie
Okay, this is crucial for a truly great Classic Apple Pie! You don’t want mushy apples, but you don’t want them crunchy either. I always recommend using a mix of tart and sweet apples that hold their shape well when baked. My absolute favorites are Granny Smith (for that perfect tartness) and Honeycrisp (for sweetness and a firm texture). You could also throw in some Braeburn or Fuji! The blend gives you a complex flavor that’s just divine.
How to Make the Perfect Classic Apple Pie
Alright, now for the fun part – actually *making* this incredible Classic Apple Pie! Don’t be intimidated; I’ve broken it down into super easy steps, and I promise you’ll feel like a pie-making wizard by the end. Just remember, baking should be enjoyable, so put on some music, maybe pour yourself a cup of tea, and let’s get baking!
Preparing Your Classic Apple Pie Crust
First things first, your crust! If you’re using homemade dough, make sure it’s chilled and ready to go. Divide it in half, then on a lightly floured surface, roll out one half into a nice big circle, about 1/8 inch thick. Carefully transfer it to your 9-inch pie plate. Don’t worry if it’s not perfectly round; we can trim and crimp it later! Just make sure it drapes nicely over the edges.
Assembling Your Classic Apple Pie Filling
Now for the star of the show – the apples! In a big bowl, gently toss your thinly sliced, peeled apples with the granulated sugar, brown sugar, cinnamon, nutmeg, cloves, and flour. You want every apple slice to be beautifully coated in that spiced goodness. Once they’re all mixed up, pour this glorious apple mixture right into your prepared pie crust. Then, take those little pieces of butter and dot them evenly over the top of the apples. This adds richness and helps create that wonderful, bubbly filling!
Baking Your Classic Apple Pie to Golden Perfection
Okay, almost there! Roll out your second piece of pie dough. You can either lay it over the top as a solid crust (remember to cut a few slits for steam to escape!) or get fancy with a lattice top—totally up to you! Trim any excess dough and crimp the edges together to seal everything in. Brush the top with that beaten egg wash and sprinkle with turbinado sugar for a beautiful sparkle. Preheat your oven to a hot 425°F (220°C). Pop the pie in and bake for 15 minutes at that higher temperature. This helps set the crust! Then, reduce the oven to 375°F (190°C) and bake for another 35-45 minutes. Keep an eye on it! If the edges start browning too fast, just loosely cover them with a little aluminum foil. You’re looking for a gorgeous golden-brown crust and a bubbly filling that peeks through the vents. Once it’s done, let it cool on a wire rack for at least 2-3 hours. This is super important; it gives the filling time to set up properly!
Tips for a Flawless Classic Apple Pie
Making a truly flawless Classic Apple Pie isn’t just about following the recipe; it’s about a few little tricks that can make all the difference! Trust me, I’ve learned these the hard way, so you don’t have to. These tips will help you achieve that picture-perfect, delicious pie every single time. You want success, and I want you to have it!
- Chill Your Dough: Seriously, don’t skip this! Cold dough is happy dough, and happy dough makes a flaky crust.
- Preventing that Soggy Bottom: A common pie worry! We’ll tackle this head-on.
- Patience, Patience, Patience: Cooling time is non-negotiable for a set filling.
- Don’t Be Afraid to Use Foil: Your crust can go from golden to burnt in a flash, so be ready with foil.
Achieving a Flaky Classic Apple Pie Crust
For that legendary flaky crust, keep your butter (or shortening, if that’s your thing!) super cold and work quickly when mixing the dough. Overworking the dough is the enemy of flakiness, so mix just until combined. And remember to chill it before rolling! A cold dough means the fat melts slowly in the oven, creating those amazing, airy layers.
Classic Apple Pie Serving Suggestions and Storage
Okay, you’ve baked it, you’ve patiently waited for it to cool (mostly!), and now it’s time to enjoy your masterpiece! My favorite way to serve this Classic Apple Pie is warm, with a big scoop of vanilla bean ice cream melting deliciously over each slice. A dollop of freshly whipped cream is also absolutely divine! For leftovers, if there are any, you can keep your pie at room temperature for up to two days, covered loosely. If you need it to last longer, pop it in the fridge for up to four days. Just make sure it’s well-wrapped so it doesn’t dry out!
Common Questions About Classic Apple Pie
I get a lot of questions about making the perfect Classic Apple Pie, and I love answering them! It shows me you’re just as passionate about pie as I am. Here are some of the most common things people ask, and my best advice to help you on your pie-making journey. No silly questions when it comes to pie, I say!
Can I Prepare Classic Apple Pie Ahead of Time?
Absolutely! You can assemble the entire Classic Apple Pie, unbaked, and then freeze it for up to a month. Just wrap it really well in plastic wrap and then foil. When you’re ready to bake, pop it directly into a preheated oven (no need to thaw!) and add about 20-30 minutes to the baking time. It’s a lifesaver for busy holidays!
How to Prevent a Soggy Bottom in Classic Apple Pie?
Ah, the dreaded soggy bottom! There are a few tricks for your Classic Apple Pie. First, make sure your pie crust is cold when it goes into the oven. Also, the flour in our filling helps absorb some moisture. You can also sprinkle a thin layer of breadcrumbs or crushed cornflakes on the bottom crust before adding the apples to create a barrier. Baking at a higher temperature initially helps crisp up that bottom crust too!
Estimated Nutritional Information for Classic Apple Pie
Now, I know we’re all about indulgence when it comes to pie, but for those who like to keep an eye on things, here’s an estimated peek at the nutritional breakdown for one slice of this glorious Classic Apple Pie. Please remember these are just estimates, as they can vary based on your specific ingredients and exact portion sizes. But it gives you a good idea!
- Calories: Approximately 400
- Fat: Around 20g (with about 10g saturated)
- Carbohydrates: Roughly 55g
- Sugar: About 35g
- Protein: Around 4g
- Fiber: Approximately 3g
Your Feedback on This Classic Apple Pie
Well, there you have it! My absolute favorite Classic Apple Pie recipe. I poured my heart into sharing all my tips and tricks, and now I want to hear from YOU! Did you make it? How did it turn out? Please, please leave a comment below and let me know your thoughts. What’s your favorite part? Don’t forget to give it a star rating, and if you share your beautiful pie creations on social media, tag me! I absolutely LOVE seeing your baking adventures!
Print
Classic Apple Pie You’ll Love
This classic apple pie recipe features a flaky, buttery crust and a sweet, spiced apple filling. It is a timeless dessert perfect for any occasion.
- Total Time: 3 hours 50 minutes
- Yield: 8 servings 1x
Ingredients
- 1 recipe double-crust pie pastry
- 6 cups thinly sliced, peeled apples (about 6 medium)
- 1/2 cup granulated sugar
- 1/4 cup packed light brown sugar
- 1 teaspoon ground cinnamon
- 1/4 teaspoon ground nutmeg
- 1/8 teaspoon ground cloves
- 2 tablespoons all-purpose flour
- 1 tablespoon lemon juice
- 2 tablespoons unsalted butter, cut into small pieces
- 1 large egg, beaten (for egg wash)
- 1 tablespoon turbinado sugar (for sprinkling)
Instructions
- Prepare your favorite double-crust pie pastry. Divide the dough in half and roll out one half to fit a 9-inch pie plate. Place the dough into the pie plate.
- In a large bowl, combine the sliced apples, granulated sugar, brown sugar, cinnamon, nutmeg, cloves, and flour. Toss gently to coat the apples evenly.
- Pour the apple mixture into the prepared pie crust. Dot the top of the apples with the small pieces of butter.
- Roll out the remaining pie dough. You can either place it over the filling as a solid top crust or cut it into strips to create a lattice top.
- If using a solid top crust, cut several slits in the top to allow steam to escape. If making a lattice, weave the strips over the filling.
- Trim any excess dough from the edges and crimp the edges to seal the pie.
- Brush the top crust with the beaten egg wash and sprinkle with turbinado sugar.
- Preheat oven to 425°F (220°C).
- Bake for 15 minutes at 425°F (220°C).
- Reduce oven temperature to 375°F (190°C) and bake for an additional 35-45 minutes, or until the crust is golden brown and the filling is bubbly. If the crust starts to brown too quickly, loosely cover the edges with aluminum foil.
- Let the pie cool on a wire rack for at least 2-3 hours before slicing and serving. This allows the filling to set properly.
Notes
- Granny Smith, Honeycrisp, or a mix of tart and sweet apples work well for this pie.
- For a richer color and flavor, use brown sugar for half of the granulated sugar.
- A splash of apple cider or brandy can be added to the filling for extra depth.
- Serve warm with a scoop of vanilla ice cream or a dollop of whipped cream.
- Leftovers can be stored at room temperature for up to 2 days, or refrigerated for up to 4 days.
- Prep Time: 30 minutes
- Cook Time: 50-60 minutes
- Category: Dessert
- Method: Baking
- Cuisine: American
- Diet: Vegetarian
Nutrition
- Serving Size: 1 slice
- Calories: 400
- Sugar: 35g
- Sodium: 200mg
- Fat: 20g
- Saturated Fat: 10g
- Unsaturated Fat: 8g
- Trans Fat: 0.5g
- Carbohydrates: 55g
- Fiber: 3g
- Protein: 4g
- Cholesterol: 25mg