I still remember the first time I made Teriyaki Chicken Rice Paper Rolls—it was a hot summer evening, and I wanted something light but satisfying that wouldn’t heat up the kitchen too much. One bite, and I was hooked! The tender, savory teriyaki chicken paired with crisp veggies all wrapped in that soft, chewy rice paper? Absolute perfection. These rolls are my go-to for quick lunches, easy dinners, or even as appetizers when friends come over. They’re fresh, packed with flavor, and just feel like a little bundle of happiness in every bite. Trust me, once you try them, you’ll be making them on repeat!
Ingredients for Teriyaki Chicken Rice Paper Rolls
Okay, let’s talk ingredients—because the magic starts here! I’ve made these rolls enough times to know exactly what works (and what doesn’t). Here’s everything you’ll need, down to the last detail. Trust me, fresh is best with these!
- 2 boneless, skinless chicken breasts – about 6 oz each, trimmed of any weird bits
- 1/4 cup teriyaki sauce – my homemade one’s killer, but store-bought works in a pinch
- 8 rice paper wrappers – the 22cm size is perfect for rolling
- 1 cup shredded lettuce – butter lettuce gives that perfect crunch
- 1/2 cup shredded carrots – julienned thin so they don’t poke through
- 1/2 cup sliced cucumbers – English cukes with the seeds scooped out
- 1/4 cup fresh cilantro leaves – stems removed (unless you’re into that)
- 1/4 cup sliced green onions – the green parts only, sliced on a sharp angle
- 1 tbsp sesame oil – toasted, not the light stuff!
Pro tip: Prep everything before you start rolling—I learned this the messy way! Have your fillings lined up in little bowls like a cooking show. And don’t skip the sesame oil—it gives that nutty depth that makes these rolls sing.
How to Make Teriyaki Chicken Rice Paper Rolls
Alright, let’s get rolling! Literally. I’ve made these enough times to know all the little tricks that make them turn out perfect. Follow these steps, and you’ll be wrapping like a pro in no time.
Marinating the Chicken
First things first – that chicken needs flavor! I take my trimmed chicken breasts and plop them into a shallow dish. Pour that gorgeous teriyaki sauce all over them, making sure every inch gets coated. Now here’s the important part – let them sit for at least 15 minutes. I know, I know, waiting is hard when you’re hungry, but trust me, this makes all the difference. The sauce works its magic, tenderizing the chicken and infusing it with that sweet-salty goodness.
Cooking the Teriyaki Chicken
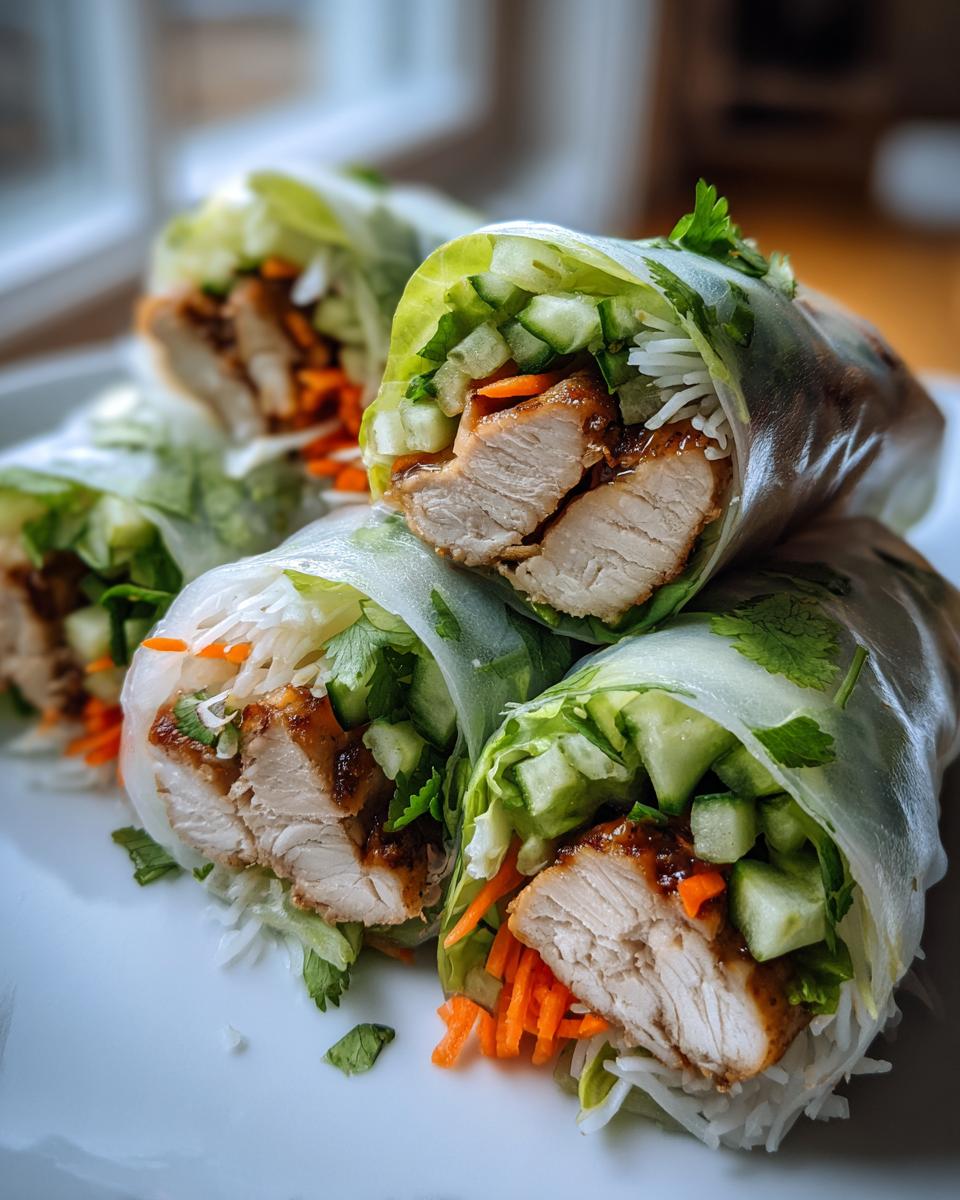
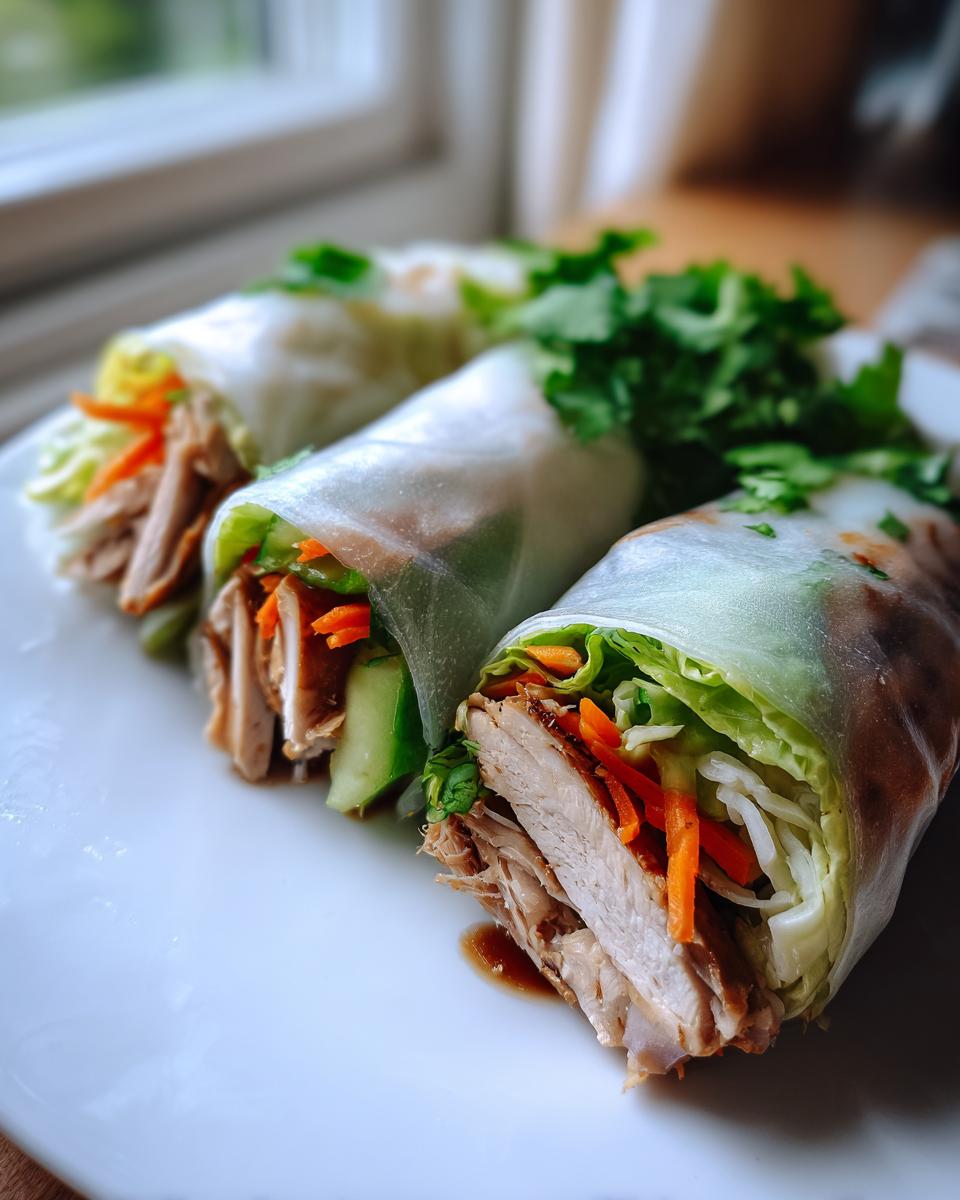
Heat up your pan with that toasted sesame oil – medium heat is perfect. When it’s shimmering, in goes the chicken! I cook it for about 6-7 minutes per side until it’s beautifully caramelized and cooked through. No pink in the middle, please! Then I transfer it to a cutting board and let it rest for a couple minutes – this keeps all those delicious juices inside. When I slice it, I go for thin strips at an angle. Thin is key here so it rolls nicely without bulging.
Assembling the Rice Paper Rolls
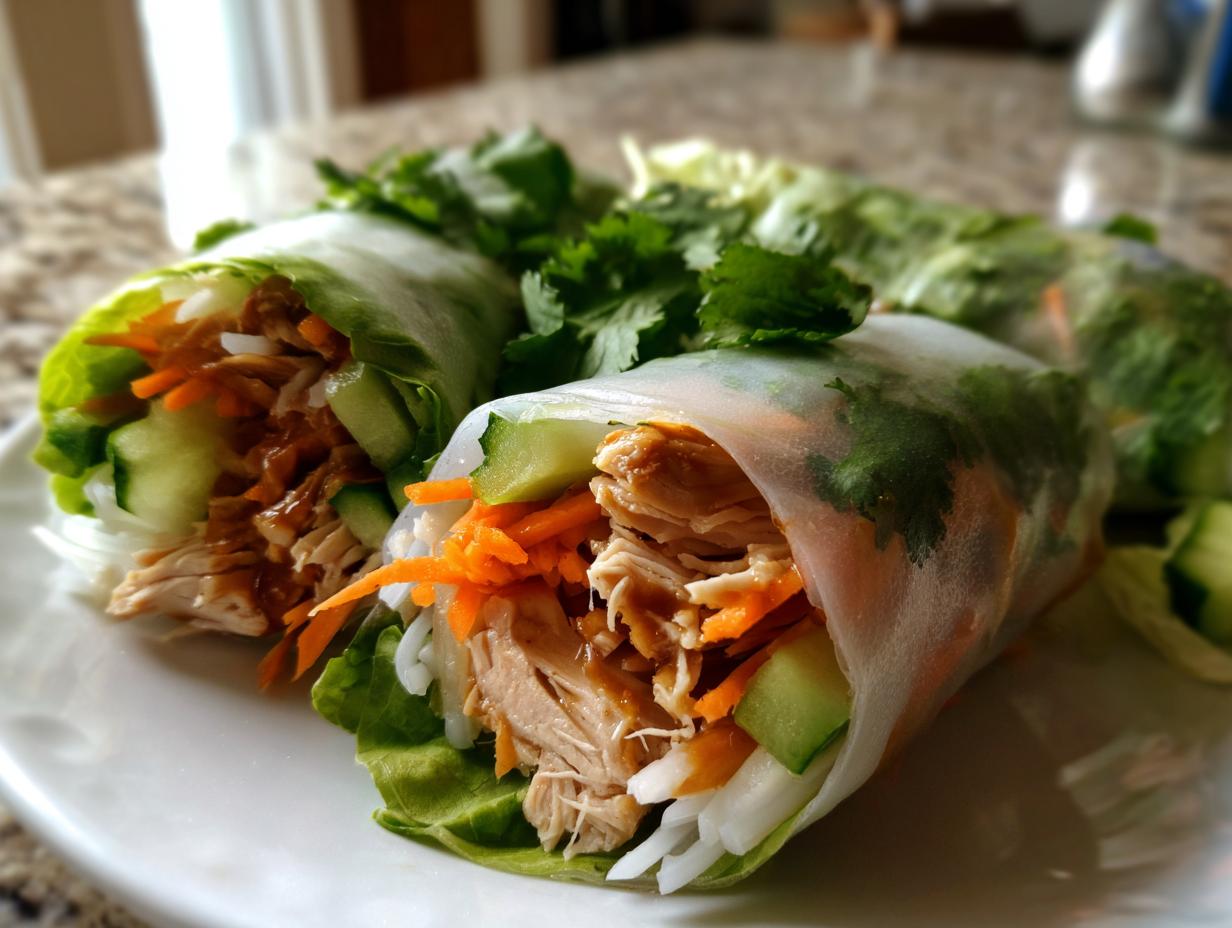
Now for the fun part! Fill a shallow dish with warm (not hot!) water – I use a pie plate. Dip one rice paper wrapper in for about 10 seconds – just until it starts to soften but still feels slightly firm. Lay it flat on a clean cutting board. Quick tip: if it sticks, just run your wet fingers over it. Now layer on your fillings – chicken first, then lettuce, carrots, cukes, cilantro, and green onions. Don’t overstuff! Fold the sides in first, then roll up tightly from the bottom. It might take one or two tries to get the hang of it, but you’ll get there. I like to set them seam-side down so they stay put.
See? Not so tricky once you get the rhythm. Now you’ve got gorgeous, fresh rolls ready to devour. The best part? No two ever look exactly the same – that’s part of the charm!
Why You’ll Love This Recipe
Okay, let me count the ways these Teriyaki Chicken Rice Paper Rolls will steal your heart. I make them at least once a week, and here’s why they never get old:
- Crazy quick to make – From fridge to table in 30 minutes flat. Perfect for those “I’m starving NOW” moments.
- Healthier than takeout – Packed with lean protein and crisp veggies, but still feels like a treat. My secret lunchbox win!
- Endlessly customizable – Swap in whatever veggies you’ve got. My kids love adding avocado slices, and I’m all about that extra cilantro.
- Meal prep superstar – The chicken keeps beautifully for days, so I often make extra for salads and wraps later.
- No oven required – A lifesaver during summer when turning on the stove feels like a punishment.
- Impressive yet easy – They look fancy at parties but take way less effort than sushi rolls. (Shh, don’t tell my guests!)
Seriously, these rolls check all the boxes. Light but satisfying, simple but special – and they make you feel like a kitchen ninja when you nail that perfect roll. What’s not to love?
Tips for Perfect Teriyaki Chicken Rice Paper Rolls
After making approximately a zillion of these rolls (okay maybe not that many, but close!), I’ve picked up some foolproof tricks to make sure yours turn out perfect every single time. These little nuggets of wisdom will save you from the disaster of torn wrappers and exploding fillings!
- Water temperature is everything – Use warm water, not hot! I learned this the hard way when my first batch turned into a sticky mess. Warm water softens the rice paper just enough without making it tear-prone.
- Don’t over-soak – 10 seconds is the magic number. The wrapper will continue softening as you work. If it feels too stiff at first, just wait a few seconds – it’ll get there!
- Roll on a wet surface – I keep a damp kitchen towel under my cutting board. This prevents sticking and gives you just enough traction to roll tightly without fighting the wrapper.
- Less is more with fillings – Resist the urge to overstuff! I use about 2 tablespoons chicken and 1/4 cup veggies per roll. Anything more and you’ll have a blowout (speaking from messy experience).
- Fold before you roll – Always tuck in the sides first, then roll up from the bottom. This keeps everything neatly contained like a little edible burrito.
- Keep them separated – Place finished rolls on a plate without touching. If they stick together, a quick spritz of water helps separate them.
- Eat ’em fresh – These are best within 2 hours of making. The rice paper gets tougher as it sits, though I’ve been known to sneak one from the fridge the next day (shhh).
My biggest tip? Don’t stress if your first few rolls aren’t perfect! Mine looked like abstract art when I started. With practice, you’ll develop that perfect touch – and even the wonky ones still taste amazing!
Ingredient Substitutions & Variations
One of my favorite things about these rolls? You can mix them up a million different ways based on what you’ve got on hand or what you’re craving. I’ve experimented with all sorts of twists over the years – some intentional, some born from “uh-oh, I’m out of that” moments – and these are my absolute favorite swaps and upgrades.
Protein Power Plays
While chicken is classic, don’t be afraid to switch it up! I’ve used thinly sliced flank steak marinated in teriyaki (so good!), and shrimp works beautifully too – just cook them quickly in the sauce until pink. For my vegetarian friends, firm tofu pressed and cubed makes an amazing substitute. One time I even used leftover grilled salmon, and wow – game changer!
Veggie Variations
The vegetable mix is where you can really get creative. Avocado slices add the creamiest texture (add them right before rolling so they don’t brown). I love throwing in some fresh mint leaves along with the cilantro for an extra refreshing pop. Shredded purple cabbage gives great color and crunch, and if you’re feeling fancy, quick-pickled carrots or daikon radish add tangy brightness. No cucumbers? Try crisp jicama sticks instead.
Sauce Swaps
If you need gluten-free, just grab a gluten-free teriyaki sauce – they’ve gotten so much better in recent years! For a spicy kick, I’ll mix sriracha into the sauce before marinating. Peanut sauce lovers can skip the teriyaki altogether and use that instead – though fair warning, they’ll disappear even faster. And if you’re watching sodium, low-sodium teriyaki works just fine, or you can make your own with less soy sauce.
The moral of the story? These rolls are practically begging for your personal touch. Don’t be shy – experiment and find your perfect combo. Just promise me you’ll keep the rice paper and that beautiful rolling technique – those are non-negotiable in my book!
Serving Suggestions
Now let’s talk about the best part – eating these beauties! I’ve served these rolls every which way over the years, and these are my absolute favorite pairings that take them from great to “oh my goodness, I need another batch!”
Double down on teriyaki – I always keep extra sauce on the side for dipping. The bottled stuff works fine, but if you’ve got homemade? Even better! I like to warm mine slightly so it’s pourable but not hot enough to wilt the rolls.
Spice it up – My go-to is a quick sriracha mayo mix (just mayo with a squeeze of lime and sriracha to taste). For something different, try blending hoisin sauce with a bit of peanut butter and chili garlic paste – it’s addictive!
Keep it classic – Sometimes simple is best. A small dish of soy sauce with a few drops of sesame oil and sliced scallions makes the perfect light accompaniment.
Make it a meal – These rolls shine as part of a bigger spread! I love serving them with:
- A crisp Asian slaw with sesame dressing
- Steamed edamame sprinkled with sea salt
- Hot and sour soup for cooler days
- Simple veggie fried rice when I’m extra hungry
Presentation tip: Arrange the rolls on a platter with the dipping sauces in small bowls in the center. Garnish with extra cilantro and sesame seeds if you’re feeling fancy. They look so impressive, no one needs to know how easy they were to make!
Oh! And don’t forget napkins – these are finger food at its finest. The first bite might be neat, but by roll number three, you’ll be happily licking sauce off your fingers like I always do.
Storage & Reheating
Okay, let’s talk about keeping these beauties fresh—because I’ll be honest, these rolls are at their absolute best when eaten right away. The rice paper has this perfect chewy-but-tender texture when freshly made that just can’t be beat. But life happens! If you need to store them, here’s exactly what works (and what doesn’t) from my many, many experiments.
Short-term storage: If you must store them, wrap each roll individually in damp paper towels (not soaking wet—just lightly moistened) and pop them in an airtight container. They’ll keep in the fridge for about 2 hours before the wrapper starts getting tough. Pro tip: Lay them in a single layer—stacking squishes them and makes them stick together.
What not to do: Don’t freeze them! I tried this once in a moment of desperation, and let me tell you—thawed rice paper has the texture of a wet sock. Just… don’t. Also avoid leaving them out at room temperature for more than an hour—the chicken needs to stay chilled.
Smart prep-ahead trick: What I do instead is prep all the components separately—cook and slice the chicken, chop the veggies, keep the wrappers dry—then assemble right before eating. The marinated chicken keeps beautifully in the fridge for 3-4 days, and the prepped veggies stay crisp for about 2 days. This way, you can whip up fresh rolls in minutes whenever the craving hits!
Reheating? Nope. These are meant to be enjoyed cold or at room temp. If you try to microwave them, you’ll end up with a rubbery mess. If you absolutely must have warm chicken in your rolls, heat the sliced chicken separately and add it to freshly assembled rolls—but trust me, the contrast of cool veggies with room-temp chicken is part of the magic.
My golden rule? Make only what you’ll eat right away. These rolls are so quick to assemble that it’s better to make a second batch than try to save leftovers. But if you do end up with some that have sat too long? Don’t toss them—unwrap them and turn the fillings into a delicious salad instead!
Teriyaki Chicken Rice Paper Rolls FAQs
After making these rolls for countless friends and family (and fielding all their questions!), I’ve rounded up the most common things people ask me. Consider this your quick-reference guide to rice paper roll success!
Can I use store-bought teriyaki sauce?
Absolutely! While I adore my homemade version, a good-quality store-bought teriyaki sauce works just fine in a pinch. Look for one with simple ingredients (avoid ones with corn syrup as the first item). My grocery store favorites are the ones in the refrigerated section near the tofu—they tend to have better flavor and less artificial stuff. Just taste it first—some can be very salty, so you might want to dilute it with a splash of water or pineapple juice.
How do I prevent the rice paper from tearing?
Oh, I feel this one—nothing worse than a torn wrapper! Here’s my foolproof method: Use warm (not hot) water and soak for exactly 10 seconds—set a timer if you need to. The wrapper should still feel slightly firm when you take it out (it keeps softening as you work). Lay it on a damp cutting board or kitchen towel—this gives you traction without sticking. And here’s my secret weapon: if a small tear happens, just patch it with a tiny piece of another soaked wrapper. It’ll blend right in once rolled!
Are these rolls gluten-free?
They can be! Traditional teriyaki sauce contains soy sauce (which has wheat), but gluten-free versions are easy to find—just check labels carefully. The rice paper wrappers themselves are naturally gluten-free (made from rice flour and water). All the veggies are safe too. My celiac friends love when I make these with gluten-free teriyaki—it’s one of those rare dishes that doesn’t feel like a compromise.
Can I make these ahead for a party?
Here’s the truth: they’re best assembled right before serving. BUT! You can prep all components separately up to a day ahead—cook and slice the chicken, wash and chop veggies, have your sauces ready. Keep everything chilled, then set up a rolling station when guests arrive. It becomes a fun activity! If you must pre-roll, follow my storage tips (damp paper towels, single layer) and accept they won’t be quite as perfect—but still delicious.
Why do my rolls keep sticking together?
Ah, the classic rice paper roll dilemma! The trick is to keep them from touching—give each roll its own space on the plate. If they must be stacked, place parchment paper between layers. A light spritz of water helps separate them if they stick (but don’t soak them!). Pro tip: If serving on a platter, arrange them like spokes of a wheel with the ends pointing outward—they’ll look gorgeous and stay separate.
Got more questions? Drop them in the comments—I love chatting about these rolls almost as much as I love eating them!
Nutritional Information
Okay, let’s talk numbers—because I know some of you (like me!) like to keep an eye on what you’re eating. Each of these gorgeous Teriyaki Chicken Rice Paper Rolls comes in at about:
- 120 calories – Light enough for seconds!
- 10g protein – Thanks to that lean chicken
- 15g carbs – Mostly from the rice paper
- 2g fat – That sesame oil does its magic
- 1g fiber – Veggies for the win
- 320mg sodium – Mostly from the teriyaki
Now, full disclosure—these numbers can vary based on your exact ingredients. Use more chicken? Protein goes up. Extra avocado? Healthy fats increase. Gluten-free teriyaki? Sodium might be lower. I calculate based on my standard recipe, but your mileage may vary!
What I love is how balanced these rolls are—you get protein, veggies, and just enough carbs to keep you satisfied without feeling heavy. They’re my go-to when I want something delicious that won’t derail my day.
Made them? I’d love to see your creations! Tag me with your roll photos—I’m always looking for new filling inspiration!
Print
Amazing 4-Step Teriyaki Chicken Rice Paper Rolls Recipe
Teriyaki chicken rice paper rolls are a fresh and light dish perfect for lunch or dinner. They combine tender teriyaki chicken with crisp vegetables wrapped in soft rice paper.
- Total Time: 30 mins
- Yield: 8 rolls 1x
Ingredients
- 2 boneless, skinless chicken breasts
- 1/4 cup teriyaki sauce
- 8 rice paper wrappers
- 1 cup shredded lettuce
- 1/2 cup shredded carrots
- 1/2 cup sliced cucumbers
- 1/4 cup fresh cilantro leaves
- 1/4 cup sliced green onions
- 1 tbsp sesame oil
Instructions
- Marinate the chicken in teriyaki sauce for 15 minutes.
- Cook the chicken in a pan with sesame oil until fully done, then slice thinly.
- Soak one rice paper wrapper in warm water for 10 seconds.
- Lay the wrapper flat and add chicken, lettuce, carrots, cucumbers, cilantro, and green onions.
- Fold the sides inward and roll tightly.
- Repeat for remaining wrappers and ingredients.
- Serve fresh or refrigerate for up to 2 hours.
Notes
- Use warm water for soaking rice paper to prevent tearing.
- Adjust teriyaki sauce to taste.
- Add avocado or mint for extra flavor.
- Prep Time: 20 mins
- Cook Time: 10 mins
- Category: Appetizer
- Method: Pan-frying
- Cuisine: Asian
- Diet: Low Fat
Nutrition
- Serving Size: 1 roll
- Calories: 120
- Sugar: 3g
- Sodium: 320mg
- Fat: 2g
- Saturated Fat: 0.5g
- Unsaturated Fat: 1g
- Trans Fat: 0g
- Carbohydrates: 15g
- Fiber: 1g
- Protein: 10g
- Cholesterol: 25mg