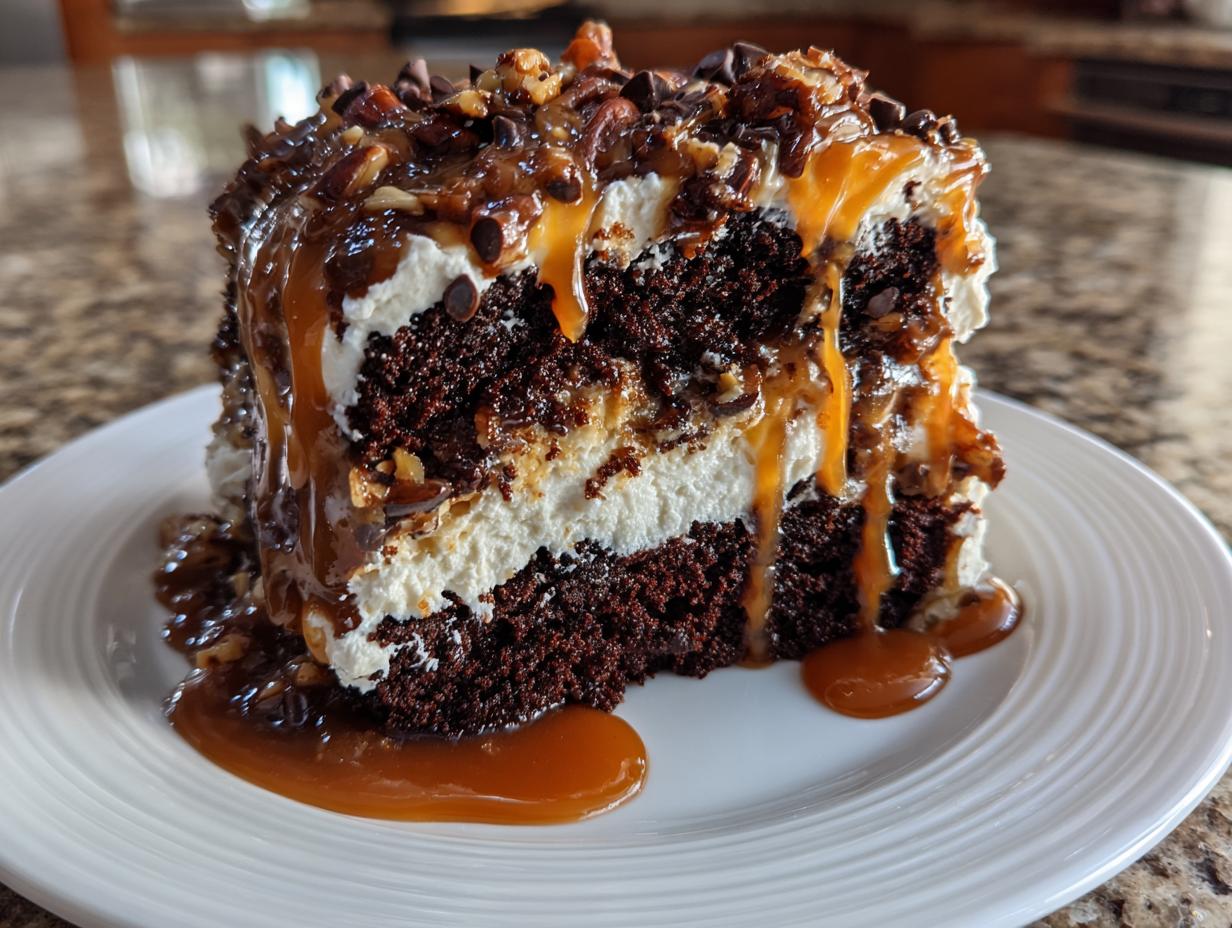
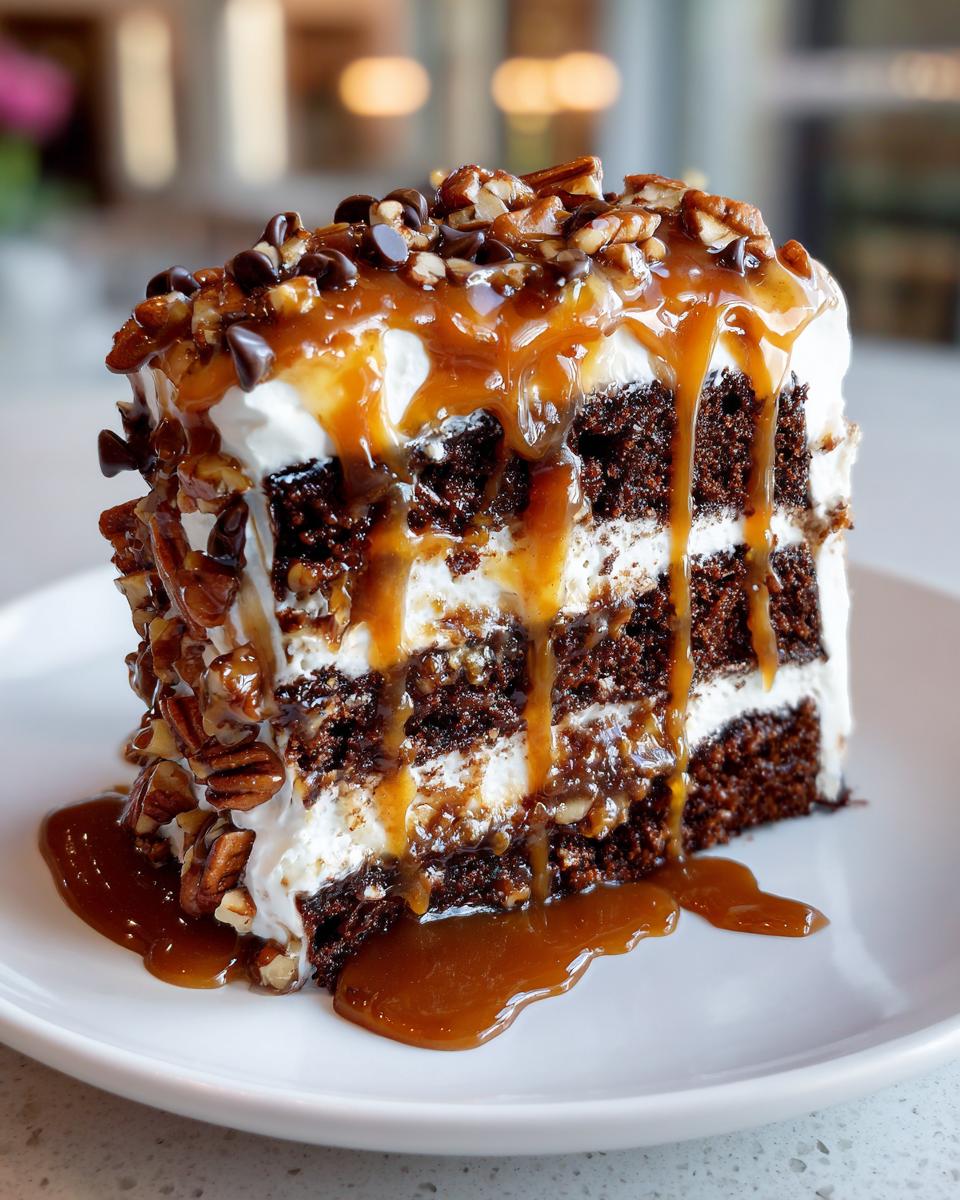
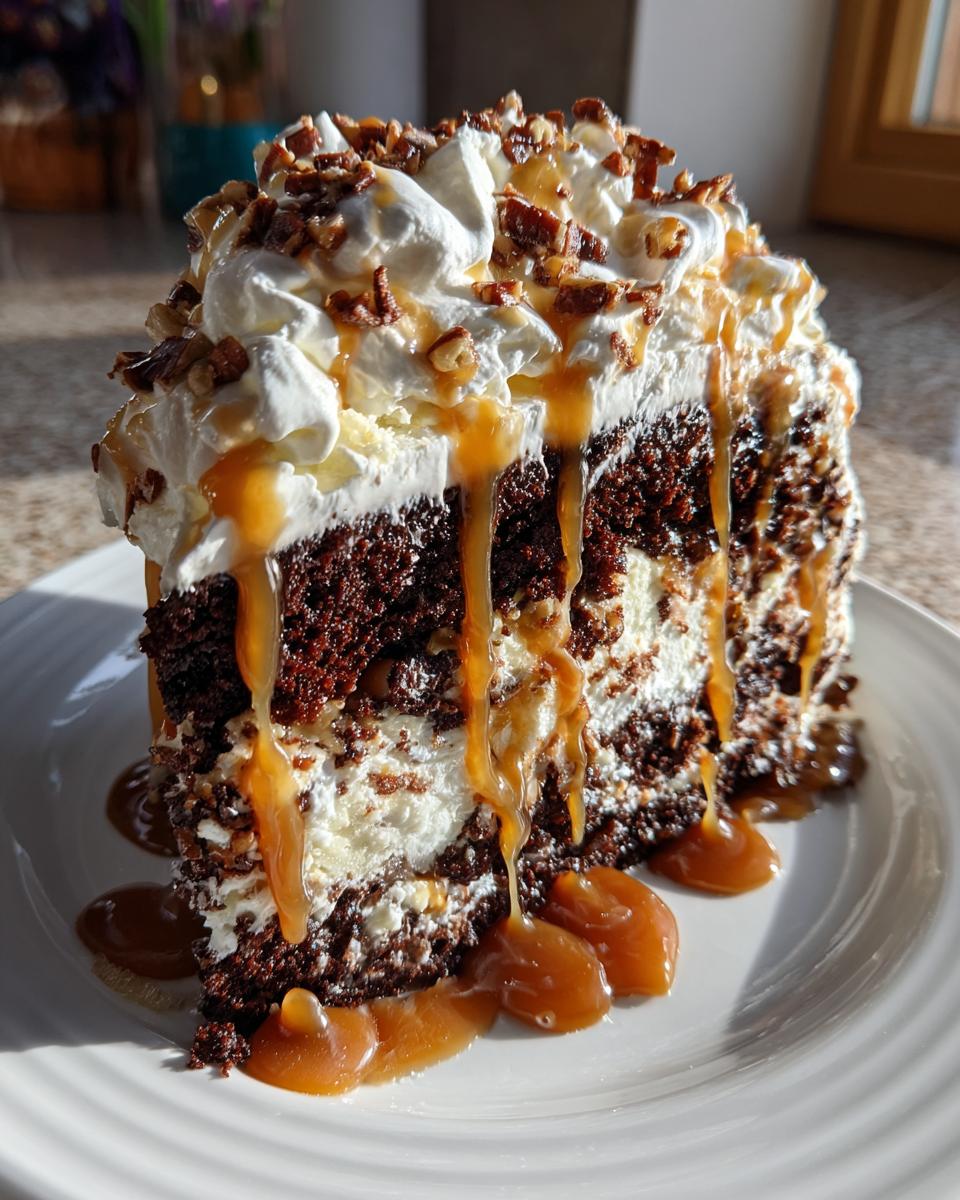
Oh, let me tell you about my all-time favorite chocolate turtle cake—it’s the kind of dessert that makes people sneak second slices when they think no one’s looking! Picture this: a rich, fudgy chocolate cake base, soaked in gooey caramel, then topped with clouds of whipped cream, crunchy pecans, and a shower of chocolate chips. And just when you think it can’t get any better, that final drizzle of salted caramel sauce sends it over the top. I swear, every bite is like a little party in your mouth.
I first made this chocolate turtle cake for my dad’s birthday years ago, and now it’s become our family’s go-to celebration dessert. There’s something magical about how the caramel seeps into the warm cake, creating these pockets of sweet, sticky goodness. And those pecans? They add the perfect crunch against the smooth whipped topping. Trust me, this isn’t just any cake—it’s the dessert that’ll have your friends begging for the recipe. The best part? It comes together with mostly pantry staples and minimal fuss. Just wait till you see how quickly it disappears at parties!
Why You’ll Love This Chocolate Turtle Cake
This chocolate turtle cake isn’t just delicious—it’s downright addictive! Here’s why it’s become my most-requested dessert:
- Rich, layered flavors that hit all the right notes – chocolatey, caramel-y, nutty, and just the right amount of salty sweetness
- Super easy to make with simple ingredients (no fancy baking skills required!)
- The caramel soaks into the cake as it chills, creating these amazing gooey pockets
- It’s a total crowd-pleaser – I’ve never brought it to a party without getting recipe requests
- The make-ahead factor means less stress when entertaining (it actually gets better overnight!)
Seriously, this cake checks all the boxes – it’s impressive enough for special occasions but simple enough for weeknight cravings. Just try not to eat the whole pan yourself!
Ingredients for Chocolate Turtle Cake
Here’s everything you’ll need to make this dreamy chocolate turtle cake – I promise it’s all simple stuff you can find at any grocery store:
- 1 box (15.25 oz) Devil’s Food chocolate cake mix – trust me, the rich chocolate flavor works perfectly here
- 1 can (14 oz) sweetened condensed milk – that thick, creamy sweetness is magic
- 1 jar (12 oz) caramel sundae topping – I usually grab Smucker’s or Mrs. Richardson’s
- 1 container (8 oz) whipped topping, thawed – Cool Whip works great, but homemade whipped cream is divine if you’re feeling fancy
- 1/2 cup chopped pecans – Fisher’s are my go-to for that perfect crunch
- 1/2 cup mini semi-sweet chocolate chips – the little ones distribute better than regular chips
- 1/3 cup salted caramel sauce – for that gorgeous final drizzle
See? Nothing too crazy – just pantry staples that come together to create something truly special. Now let’s get baking!
How to Make Chocolate Turtle Cake
Okay, let’s dive into making this glorious chocolate turtle cake! Don’t worry – it’s way easier than it looks, and I’ll walk you through each step so you get perfect results every time.
Step 1: Prepare the Cake Batter
First things first – preheat that oven to 350°F and line your 9×13-inch pan with foil (trust me, this makes cleanup a breeze!). Now grab your chocolate cake mix and follow the package directions – usually eggs, water, and oil. I like to mix mine just until combined – no need to overdo it!
Here’s my secret: start checking the cake about 3-5 minutes before the box says it’ll be done. Chocolate cakes can go from perfect to overbaked in a flash! You’ll know it’s ready when a toothpick comes out with just a few moist crumbs.
Step 2: Add the Caramel Layer
While the cake bakes, whisk together the sweetened condensed milk and caramel topping – this combo is liquid gold! As soon as the cake comes out, take the handle end of a wooden spoon and poke holes all over the top. Don’t be shy – I make about 60 holes for maximum caramel penetration!
Now slowly pour that caramel mixture over the warm cake, making sure to get it into all those holes. I use a spatula to gently spread it around. The cake will drink it up like a sponge – it’s magical to watch!
Step 3: Chill and Decorate
Pop the cake in the fridge for at least 10 minutes to let the caramel set a bit. Then comes the fun part – spreading on that fluffy whipped topping! I go all the way to the edges for maximum prettiness.
Sprinkle on those chopped pecans and chocolate chips – I like to press them in slightly so they stick. Now here’s the hard part: cover it and let it chill for at least 2 hours (overnight is even better!). The wait is torture, but it lets all those flavors meld together perfectly.
Right before serving, drizzle that salted caramel sauce over the top – make it pretty! Then watch as your masterpiece disappears faster than you can say “seconds please!”
Tips for the Perfect Chocolate Turtle Cake
After making this chocolate turtle cake more times than I can count, I’ve picked up some tricks that guarantee perfection every time:
- Line your pan with foil – it makes cleanup a breeze and lets you lift the whole cake out for easy slicing
- Don’t skip the chilling time – that overnight rest lets the caramel fully soak in and flavors develop
- Use room temperature ingredients – your whipped topping will spread smoother if it’s not ice cold
- Toast those pecans for extra flavor (just 5 minutes at 350°F does wonders!)
- Warm your caramel sauce slightly before drizzling – it flows beautifully when slightly warm
Oh, and one last thing – always make extra caramel sauce for serving! People go crazy for that extra drizzle on their slices.
Ingredient Substitutions
Don’t stress if you’re missing something – this chocolate turtle cake is super forgiving! Here are my favorite swaps:
- No pecans? Try walnuts or leave them out entirely for a nut-free version
- Out of caramel sauce? Melt down some soft caramel candies with a splash of cream
- Whipped topping alternative? Fresh whipped cream works beautifully (just sweeten it slightly)
- Different cake mix? Any rich chocolate variety will do – I’ve even used dark chocolate with great results
The beauty of this recipe is how adaptable it is – make it your own!
Serving and Storing Chocolate Turtle Cake
Here’s the best part – serving this beauty! I love cutting generous squares and plating them with extra pecan pieces and a little pool of caramel sauce underneath. It’s perfect slightly chilled, but if you want the caramel extra gooey, let slices sit at room temperature for 10 minutes first.
For storage, just cover the pan tightly with plastic wrap or transfer slices to an airtight container. It’ll stay fresh in the fridge for up to 5 days (if it lasts that long!). Pro tip – the whipped topping holds up best if you don’t freeze it, so enjoy this one fresh!
Nutritional Information
Now, let’s be real – this chocolate turtle cake isn’t exactly health food, but everything in moderation, right? These are rough estimates per slice (based on 12 servings), but actual numbers can vary depending on your exact ingredients:
- Calories: About 420 per generous slice
- Fat: 18g (7g saturated from all that delicious caramel and chocolate)
- Sugar: 35g (it’s a celebration cake, after all!)
- Protein: 5g (hey, pecans count as protein, right?)
Remember, different brands of caramel or cake mix can change these numbers, so take this as a general guide rather than gospel. Worth every indulgent bite if you ask me!
Frequently Asked Questions
I’ve gotten so many questions about this chocolate turtle cake over the years – here are the ones that pop up most often:
Can I use homemade caramel instead of store-bought?
Absolutely! Homemade caramel takes this cake to the next level. Just make sure it’s pourable when warm – about the consistency of pancake syrup. My go-to is a simple 4-ingredient caramel with heavy cream, butter, sugar, and vanilla.
How long does the cake stay fresh?
It keeps beautifully in the fridge for up to 5 days when covered tightly. The caramel actually gets more infused into the cake over time – some say day two is even better than day one!
Can I make this cake nut-free?
Of course! Just skip the pecans – the chocolate and caramel flavors still shine. You could even sprinkle crushed pretzels on top for that salty crunch if you want.
Why does my caramel sink to the bottom?
Make sure you poke plenty of holes (I do about 60!) and pour slowly so it has time to soak in. The cake should still be warm when you add it – this helps absorption.
Can I freeze leftovers?
Honestly, the whipped topping doesn’t freeze well – it gets watery when thawed. I recommend enjoying it fresh or within a few days for best texture.
Share Your Chocolate Turtle Cake
I’d love to hear how your chocolate turtle cake turns out! Did your family go crazy for it like mine does? Maybe you put your own spin on it with different nuts or extra chocolate. Drop a comment below or tag me in your photos – nothing makes me happier than seeing your delicious creations!
Print
Irresistible Chocolate Turtle Cake Recipe in 3 Easy Steps
A rich and decadent chocolate turtle cake with layers of caramel, pecans, and chocolate chips.
- Total Time: 40 minutes (plus chilling time)
- Yield: 12 servings
Ingredients
- Chocolate Cake Mix (Devil’s Food), 15.25-ounce box
- Sweetened Condensed Milk, 14-ounce can
- Caramel Sundae Topping, 12-ounce jar
- Whipped Topping (thawed), 8-ounce container
- Pecans (Chopped Fisher), 1/2 cup
- Mini Semi-Sweet Chocolate Chips, 1/2 cup
- Salted Caramel Sauce, 1/3 cup
Instructions
- Preheat your oven to 350°F. Prepare a 9×13-inch pan with aluminum foil and a light spray of cooking oil.
- Follow the cake mix package instructions – this typically involves adding eggs, water, and oil. Bake as suggested, but keep an eye on it! You might find it ready 3-5 minutes sooner than stated.
- While the cake is in the oven, mix the sweetened condensed milk and caramel topping in a bowl.
- Once baked, remove the cake and create about 60 evenly spaced holes using a wooden spoon’s blunt end.
- Gradually pour the milk and caramel blend over the cake, ensuring even distribution into the holes.
- Let the cake cool in the fridge for 10 minutes before adding the whipped topping.
- Spread the whipped topping, sprinkle pecans and chocolate chips, cover, and refrigerate for a minimum of 2 hours. Overnight refrigeration yields the best results.
- Drizzle with salted caramel sauce right before serving.
Notes
- The cake stays fresh in the fridge for up to 5 days if kept airtight.
- Prep Time: 15 minutes
- Cook Time: 25 minutes
- Category: Dessert
- Method: Baking
- Cuisine: American
- Diet: Vegetarian
Nutrition
- Serving Size: 1 slice
- Calories: 420
- Sugar: 35g
- Sodium: 320mg
- Fat: 18g
- Saturated Fat: 7g
- Unsaturated Fat: 9g
- Trans Fat: 0g
- Carbohydrates: 60g
- Fiber: 2g
- Protein: 5g
- Cholesterol: 25mg