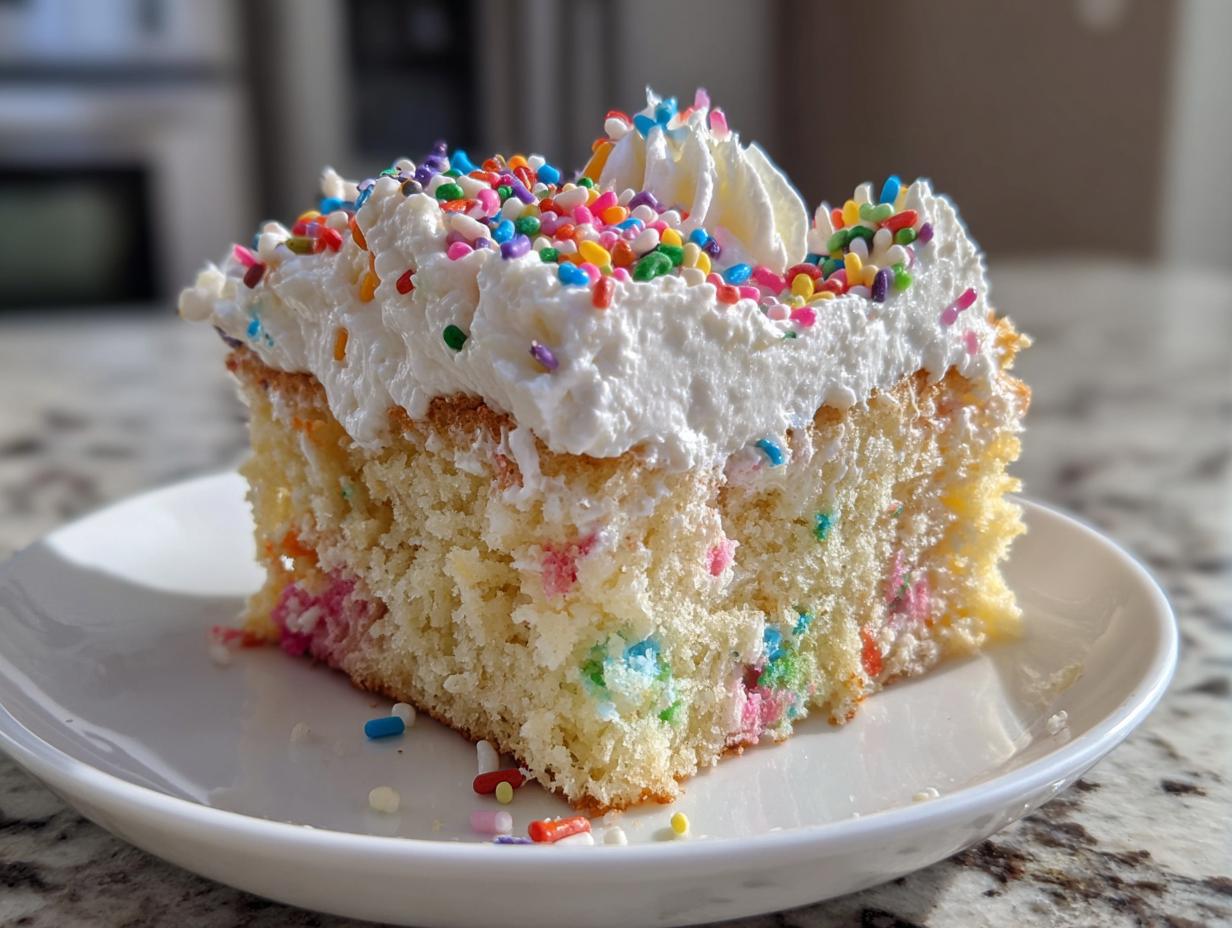
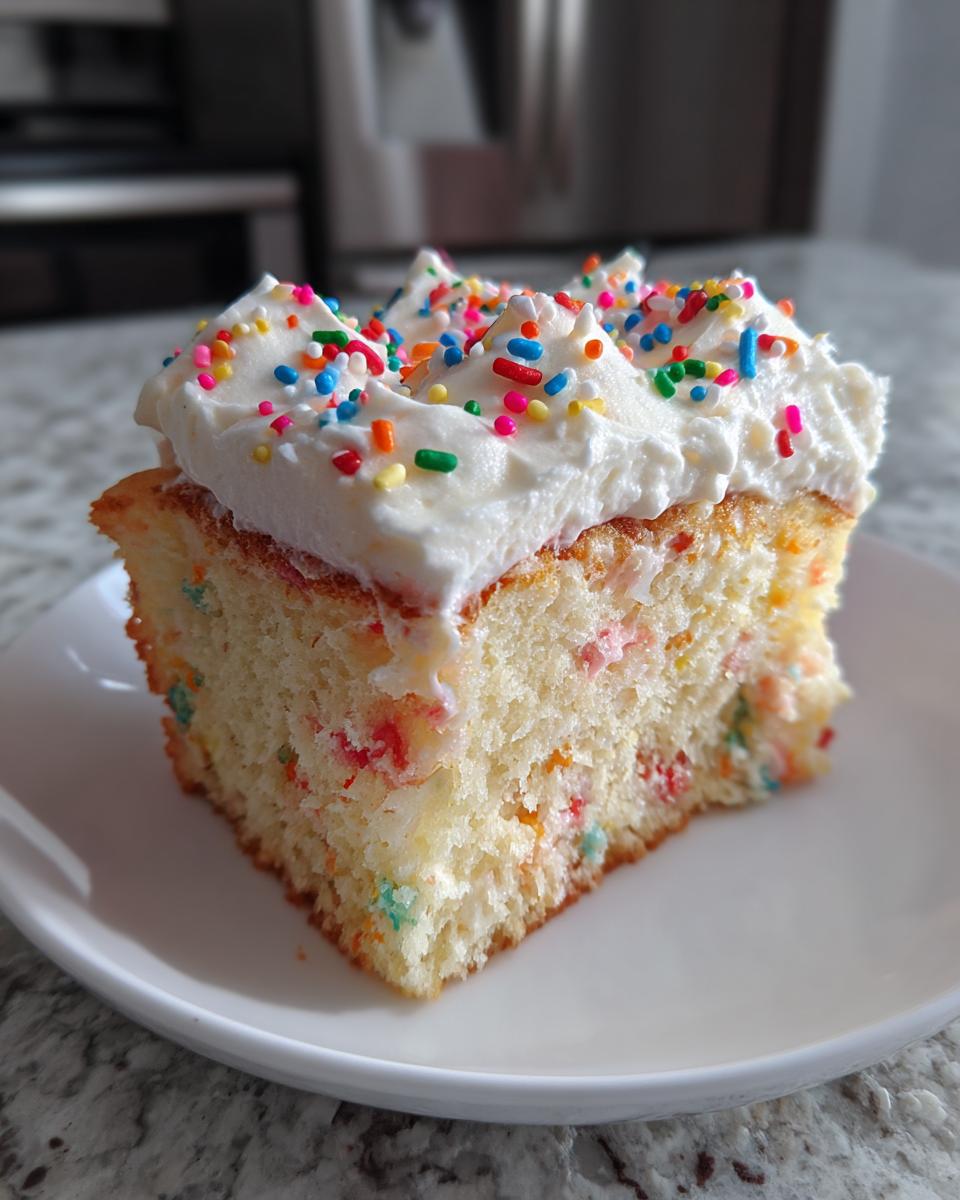
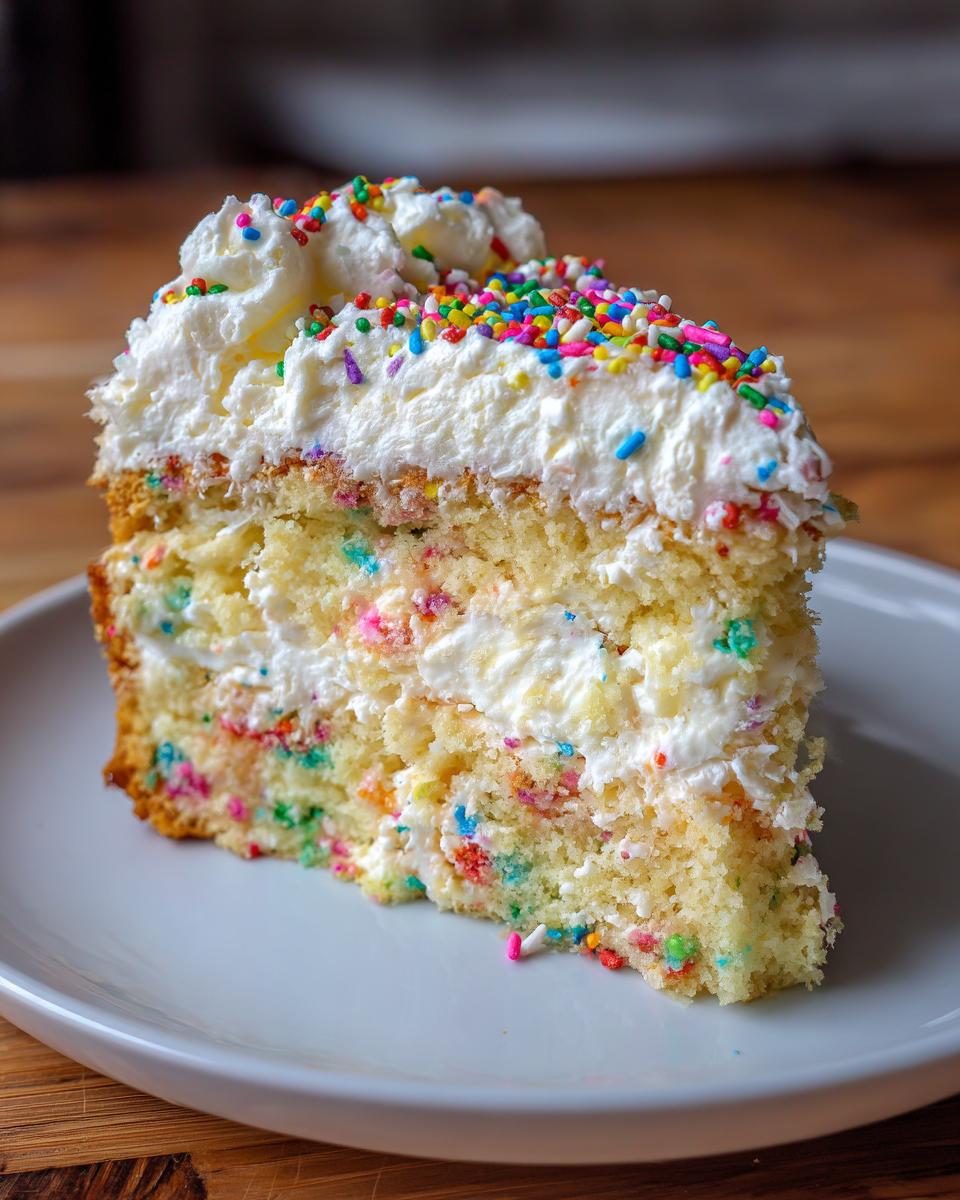
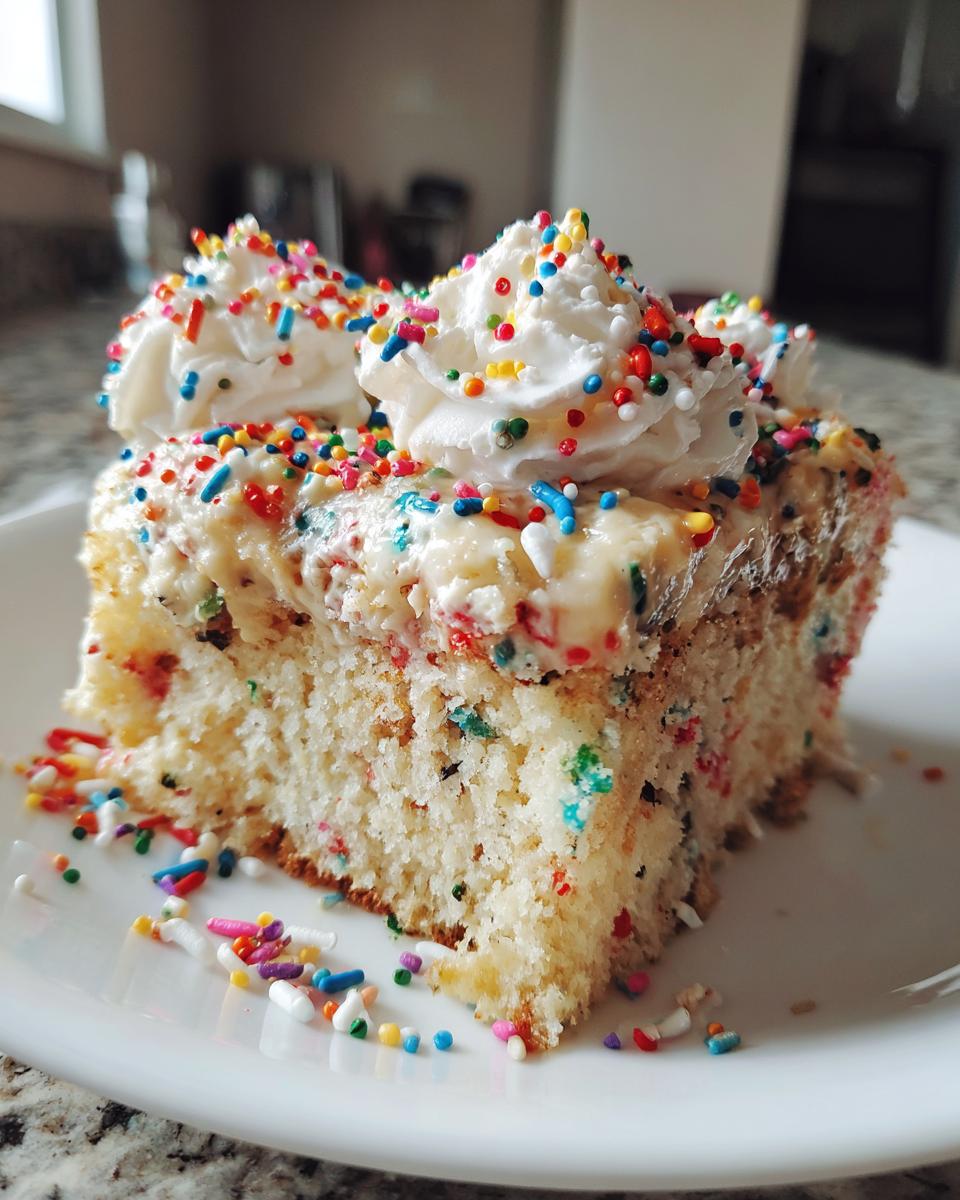
Oh my gosh, have I got the easiest, most joyful birthday cake to share with you today! This Funfetti Birthday Poke Cake has saved me more times than I can count – from last-minute school parties to surprise celebrations when my niece showed up announcing, “Auntie, I’m seven TODAY!”
The magic happens when a simple Funfetti cake gets transformed into something extraordinary. You poke holes (the best part – kids love helping with this!), pour in creamy vanilla pudding that seeps into every nook, then top it all with fluffy whipped topping and, of course, more sprinkles. Because let’s be honest, you can never have too many sprinkles when it comes to birthday magic.
What I love most (besides how ridiculously easy it is) is how the pudding makes every bite impossibly moist. It’s like the cake version of those “magic in every bite” cereal commercials from my childhood. And the best part? It looks like you spent hours decorating when really, you just had fun poking holes and pouring pudding. My kind of baking!
Why You’ll Love This Funfetti Birthday Poke Cake
Listen, I know we’re all busy, and that’s exactly why this cake is a lifesaver. Here’s what makes it so special:
- Instant joy: Box mix shortcuts mean you’re halfway done before the oven even preheats
- No decorating skills needed: Poking holes is the most technical step (and it’s foolproof!)
- Crowd-pleasing magic: The pudding seeps into every bite, making it unbelievably moist
- Pure celebration: Those rainbow sprinkles scream “party” without you lifting a piping bag
- Kids adore it: Mine fight over who gets to poke the holes and add extra sprinkles
Trust me, this cake disappears faster than birthday candles!
Ingredients for Funfetti Birthday Poke Cake
Gather these simple ingredients – I promise you probably have most in your pantry already! The beauty of this recipe is how ordinary items transform into something extraordinary:
- 1 (15.25 oz) box funfetti cake mix – The star of the show! Any brand works, but I’m partial to the classic Betty Crocker version
- 2 (3.4 oz) boxes instant vanilla pudding – Not cook-and-serve! The instant kind is crucial for the right texture
- 2 1/2 cups milk – Whole milk makes the pudding extra creamy, but 2% works in a pinch
- 4 cups frozen whipped topping – That’s one 8 oz tub, thawed (Cool Whip or store brand both work beautifully)
- 1/4 cup candy sprinkles, plus extra for decorating – Rainbow jimmies hold their color best, but use whatever makes you happy!
See? Nothing fancy – just pantry staples that come together to create pure birthday magic!

Equipment You’ll Need
No fancy gadgets required here! Just grab:
- 9×13 inch baking pan – My trusty Pyrex has seen countless birthday celebrations
- Wooden spoon handle or chopstick – For poking those perfect holes (the kids fight over this job!)
- 2 mixing bowls – One for cake, one for pudding – nothing fancy needed
- Small piping bag or spoon (optional) – I’ve used a ziplock with the corner snipped in a pinch
That’s it! Now let’s make some birthday magic.
How to Make Funfetti Birthday Poke Cake
Alright, let’s dive into the fun part! This cake comes together so easily, you’ll be amazed at how professional it looks with minimal effort. Just follow these simple steps, and you’ll have a showstopper dessert that’ll have everyone asking for seconds.
Step 1: Bake the Cake
First, preheat your oven to whatever temperature your cake mix box recommends (usually 350°F). Here’s my little secret – I always grease my 9×13 pan with butter AND line it with parchment paper. Nothing ruins a birthday faster than a stuck cake!
Mix up your Funfetti cake batter according to the package directions, then stir in that 1/4 cup of extra sprinkles – because more sprinkles equals more happiness! Pour it into your prepared pan and bake as directed, about 25-30 minutes. The hardest part? Waiting for it to cool completely before poking! I usually let mine sit for a full hour – trust me, warm cake + pudding = mushy mess.
Step 2: Prepare the Pudding Filling
Now for the magic! Grab one box of instant vanilla pudding and whisk it with 1 ½ cups of milk until it just starts to thicken – you want it runny enough to pour, like a thick cream. This is crucial! If it gets too thick, add a splash more milk.
Time for the most satisfying step – poking holes! Use the end of a wooden spoon or a chopstick to make holes about ½ inch apart over the entire cake. Then slowly pour or pipe the pudding over, letting it seep into every nook. I like to use a spoon to help guide it into the holes. Any extra? Just spread it over the top – bonus flavor layer!
Step 3: Add the Whipped Topping
For the fluffy cloud on top, mix your second pudding box with just 1 cup of milk (yes, less than before!), then gently fold in the thawed whipped topping until smooth. It should be spreadable but hold its shape. Carefully spread this over your cake – I use an offset spatula but a butter knife works great too.
Now the pièce de résistance – more sprinkles! Go wild here – I let my kids decorate with their favorite colors. Then pop it in the fridge for at least 30 minutes (if you can wait that long!) to let everything set. The anticipation makes it taste even better, I swear!
Tips for the Best Funfetti Birthday Poke Cake
After making this cake more times than I can count (seriously, my neighbors start hinting about birthdays just to get a slice), I’ve picked up some foolproof tricks:
- Patience pays off: Let that cake cool completely before poking – warm cake turns into pudding soup (learned that the messy way!)
- Go big with holes: Use a thick chopstick or small funnel – skinny holes won’t soak up enough pudding goodness
- Pudding consistency is key: Too thick? Add milk a teaspoon at a time. Too runny? Let it sit for a minute before pouring
- Chill time matters: That 30-minute fridge wait isn’t optional – it lets the magic happen as the pudding sets
- Extra sprinkle trick: Toss some sprinkles in the cake batter AND reserve some for decorating – double the festive crunch!
Follow these, and you’ll have a cake that disappears faster than birthday candles every time!
Variations and Substitutions
Oh, the possibilities! This cake is like your favorite pair of jeans – endlessly adaptable. Here are my favorite ways to mix it up:
- Pudding switcheroo: Swap vanilla for cheesecake or white chocolate pudding – instant flavor upgrade!
- Whipped cream dream: Use homemade whipped cream instead of frozen topping for extra richness
- Gluten-free option: Any gluten-free yellow cake mix works beautifully – just check the pudding boxes too
- Color themes: Match sprinkles to party colors – all pink for princess parties, school colors for graduations
- Adult version: Add a tablespoon of bourbon to the pudding filling – happy birthday indeed!
The best part? No matter how you customize it, the magic poke cake method never fails!
Serving and Storing Funfetti Birthday Poke Cake
Here’s the beautiful thing about this cake – it actually gets better after chilling! Serve it straight from the fridge where the pudding has set into that perfect creamy texture. Leftovers (ha! as if!) keep beautifully covered in the fridge for up to 3 days. Pro tip: Press plastic wrap directly onto the cut edges to keep them moist. Not that it’ll last that long – in my house, it’s usually gone by day two!
Funfetti Birthday Poke Cake FAQs
I get asked these questions all the time – here are the answers straight from my sprinkle-covered kitchen:
Can I use homemade cake instead of box mix?
Absolutely! Use your favorite vanilla cake recipe – just bake it in a 9×13 pan. The box mix is my cheat for busy days, but homemade adds that special touch. Either way works beautifully with the poke method.
How long does this cake keep in the fridge?
It stays delicious for 3 days when covered tightly. The pudding actually makes it moister each day! Though between you and me – it’s never lasted that long at my house.
Can I make this ahead for a party?
Yes! Bake, poke, and add pudding the day before. Wait to add the whipped topping and sprinkles until about an hour before serving for maximum freshness and crunch.
What if my pudding gets too thick?
No panic! Just whisk in milk a teaspoon at a time until it’s pourable again. I’ve rescued many a too-thick pudding this way!
Can I use different sprinkles?
Please do! Rainbow jimmies are classic, but themed sprinkles make it extra special. Just avoid nonpareils – they bleed color into the cake when baked.
Nutritional Information
Just a heads up – nutrition info varies by brands used. For one slice (based on my ingredients): about 145 calories, 5g fat, and pure joy! Always check your specific product labels.
Share Your Funfetti Birthday Poke Cake
I’d love to see your creations! Snap a photo of your masterpiece and tag me—nothing makes me happier than seeing all those colorful sprinkles spread with love. Happy baking!
Print
Joyful Funfetti Birthday Poke Cake Recipe in 3 Easy Steps
Funfetti birthday poke cake is a light vanilla cake dotted with colorful candy sprinkles and creamy vanilla pudding. Finished with a light and fluffy whipped topping, this simple cake is quick, easy to prepare, and perfect for serving a crowd.
- Total Time: 2 hours 50 minutes
- Yield: 12 servings 1x
Ingredients
- 1 (15.25 oz) box funfetti cake mix
- 2 (3.4 oz) boxes instant vanilla pudding
- 2 1/2 cups milk
- 4 cups frozen whipped topping
- 1/4 cup candy sprinkles, plus extra for decorating
Instructions
- Preheat the oven according to the package directions on the cake mix.
- Mix the cake according to the package directions and stir in 1/4 cup of candy sprinkles.
- Pour the cake batter into a prepared 9×13 cake pan and bake the cake according to package directions.
- Let the cake cool completely, then use the end of a wooden spoon or other tool, such as a wide chopstick, to poke holes in the top of the cake. You want holes that are about half an inch wide.
- In a medium bowl, mix one box of the instant pudding with 1 ½ cups of milk just until it begins to thicken but is still runny. Use a small tipped piping bag or small spoon to fill the holes with pudding, then spread any remaining pudding over the top of the cake.
- Mix 1 cup of milk with the remaining box of pudding just until it begins to thicken, then fold in the frozen whipped topping.
- Spread the topping over the cake in an even layer. If you wish, you can reserve part to pipe swirls on top of the cake.
- Decorate the cake with sprinkles, then refrigerate for at least 30 minutes in order to allow the pudding to set.
- Slice and serve as desired.
Notes
- Let the cake cool completely before poking holes.
- Refrigerate the cake for at least 30 minutes after decorating to allow the pudding to set.
- Prep Time: 20 minutes
- Cook Time: 30 minutes
- Category: Dessert
- Method: Baking
- Cuisine: American
- Diet: Vegetarian
Nutrition
- Serving Size: 1 slice
- Calories: 145 kcal
- Sugar: 15g
- Sodium: 200mg
- Fat: 5g
- Saturated Fat: 2g
- Unsaturated Fat: 2g
- Trans Fat: 0g
- Carbohydrates: 25g
- Fiber: 0g
- Protein: 2g
- Cholesterol: 10mg