Nothing says summer like a backyard full of laughter, sparklers, and of course, a table piled high with festive treats. Every Fourth of July, I get giddy planning our dessert spread—it’s my chance to go all out with red, white, and blue everything. But let’s be real: turning on the oven when it’s 90 degrees outside? No thank you! That’s why these Fourth of July Cheesecake Pops are my absolute go-to. Creamy, no-bake cheesecake stars dipped in chocolate and drizzled with patriotic colors—they’re like little edible fireworks on a stick. Plus, they’re shockingly easy to make (just promise me you’ll freeze the filling long enough—trust me, I’ve learned the hard way!). Whether you’re hosting a big bash or just want to surprise the kids, these pops are guaranteed to steal the show.
Why You’ll Love These Fourth of July Cheesecake Pops
These little stars of deliciousness are about to become your new favorite summer treat. Here’s why:
- No oven required! When it’s hot enough to fry an egg on the sidewalk, the last thing you want is to heat up your kitchen. These pops come together with just a mixer and some freezer time.
- They’re showstoppers without the stress. That gorgeous red, white, and blue drizzle? It looks fancy but takes minutes to do—I’ve fooled many guests into thinking I slaved over these!
- Creamy meets crunchy perfection. The velvety cheesecake center paired with that crisp chocolate shell? Absolute magic. Kids and adults go wild for that texture combo.
- Make-ahead dream. Prep them the day before your party (they actually taste better after chilling overnight), then just pull them out when the fireworks start.
- Customizable for any holiday. Swap the star shape for hearts, pumpkins, or trees, and change up the drizzle colors—this recipe’s your year-round secret weapon.
Seriously, once you see how fast these disappear from the dessert table, you’ll be making them every summer. Maybe even for Labor Day… and Memorial Day… okay, fine, I’ve been known to make them in December with green and red sprinkles too.
Ingredients for Fourth of July Cheesecake Pops
Gathering the right ingredients is half the battle with these pops—but don’t worry, everything’s easy to find. I’ve broken it down so you can shop (or raid your pantry) without missing a thing. Pro tip: set your cream cheese out on the counter at least an hour before starting—cold cream cheese is the enemy of smooth filling!
Cheesecake Filling Ingredients
- 16 oz (2 blocks) cream cheese – Must be full-fat and properly softened (I leave mine out until it dents easily when poked)
- 1/2 cup powdered sugar – Sift it if yours is lumpy! This gives sweetness without graininess
- 1 teaspoon pure vanilla extract – The good stuff makes all the difference
- 1 tablespoon lemon juice – Freshly squeezed gives the best bright flavor
- 1/2 cup heavy cream – Straight from the fridge! Cold whips up fluffier
Chocolate Coating Ingredients
- 12 oz semi-sweet chocolate chips – I prefer Ghirardelli or Guittard for smoother melting
- 2 tablespoons coconut oil – Or vegetable shortening if you prefer (this keeps the chocolate shiny and helps it set firmly)
Decorating Ingredients
- Red candy melts – About 1/4 cup melted (Wilton’s works great)
- White candy melts – Same as above
- Blue candy melts – You’ll need less blue than red/white for drizzles
- Patriotic sprinkles – Optional but oh-so-festive (the star-shaped ones are my weakness)
- Wooden popsicle sticks – The 4-inch ones fit perfectly
See? Nothing too crazy! Just quality basics that come together for something spectacular. Now let’s talk tools—because even the best ingredients need the right helpers.
Equipment You’ll Need
Alright, let’s gather our kitchen squad! You won’t need anything fancy here—just a few trusty tools that probably already live in your drawers. But don’t skip any of these; each one plays a key role in creating those perfect pops. (Ask me how I know… the year I tried using a butter knife instead of a proper cutter? Let’s just say my “stars” looked more like blobs.)
- Hand mixer or stand mixer – Your arms will thank you when whipping that heavy cream
- Large mixing bowl – For the creamy cheesecake filling
- 8×8 inch square baking pan – Any similar-sized dish works, but I like this for even thickness
- Parchment paper – Non-negotiable unless you enjoy chiseling cheesecake off glass
- Star-shaped cookie cutter – About 2-3 inches wide (the metal ones cut cleaner than plastic)
- Microwave-safe bowls – Small ones for melting chocolate and candy melts
- Silicone spatula – For folding that whipped cream without deflating it
- Measuring cups and spoons – Precision matters with cheesecake textures
- Baking sheet – Lined with parchment for setting your dipped pops
- Small piping bags or zip-top bags – For those gorgeous patriotic drizzles
That’s it! No specialty gadgets needed. Just grab these basics, and you’re minutes away from the cutest (and tastiest) Fourth of July treats on the block. Now, who’s ready to mix up some magic?
How to Make Fourth of July Cheesecake Pops
Okay, let’s dive into the fun part—turning these simple ingredients into star-spangled showstoppers! I’ll walk you through each step just like I do with my nieces when we make these together (though I may skip the part where we “accidentally” eat half the sprinkles). Follow along, and you’ll have picture-perfect pops in no time.
Preparing the Cheesecake Filling
First things first: that luscious, creamy center. Grab your softened cream cheese—it should dent like a firm pillow when you poke it. Toss it into your mixing bowl and beat it on medium until it’s completely smooth, scraping down the sides a couple times. No lumps allowed! Then add the powdered sugar, vanilla, and lemon juice. Beat again until it’s silky and dreamy—about 1-2 minutes. Now, in a separate bowl, whip that cold heavy cream to soft peaks (think: billowy clouds that just barely hold their shape). Here’s the trick: fold the whipped cream into the cheesecake mixture gently, like you’re tucking it in with a spatula. Overmixing deflates all that air we worked so hard for! You’ll know it’s ready when the mixture is uniform but still light and fluffy.
Freezing and Cutting the Stars
Line your square pan with parchment paper, leaving some overhang—this is your cheesecake’s escape route later! Spread the filling evenly; I like to use an offset spatula for this. Pop it in the freezer for at least 4 hours—I know, the waiting is torture, but trust me, rushing leads to melty star disasters. When it’s rock solid, lift it out using the parchment handles. Now for the fun part: cutting! Dip your star cutter in warm water between each press (shake off excess water) for super clean edges. If the cheesecake sticks, run a thin knife around the cutter’s inside edge. Insert popsicle sticks about halfway into each star’s base, then return them to the freezer for another 30-60 minutes. This second chill keeps them firm during their chocolate bath.
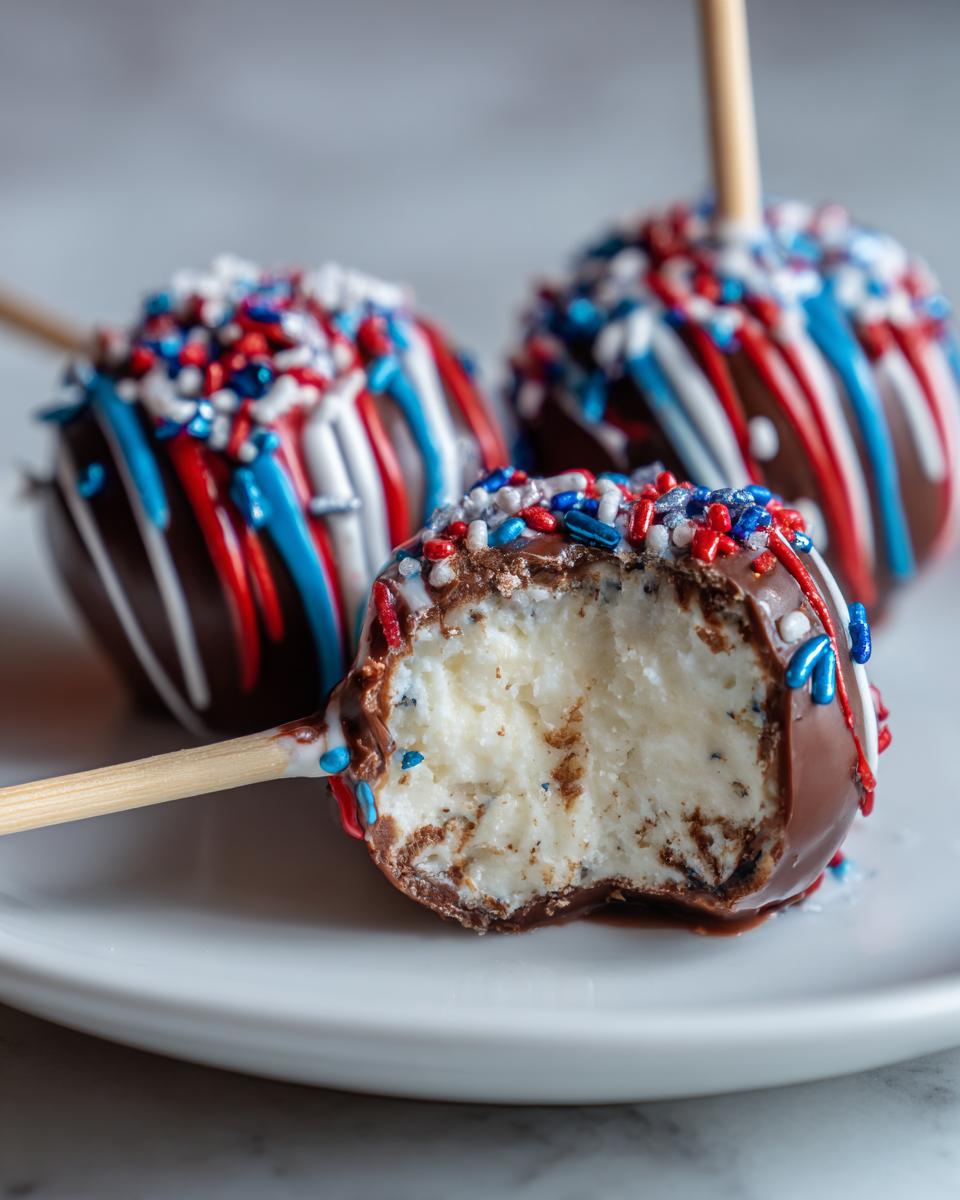
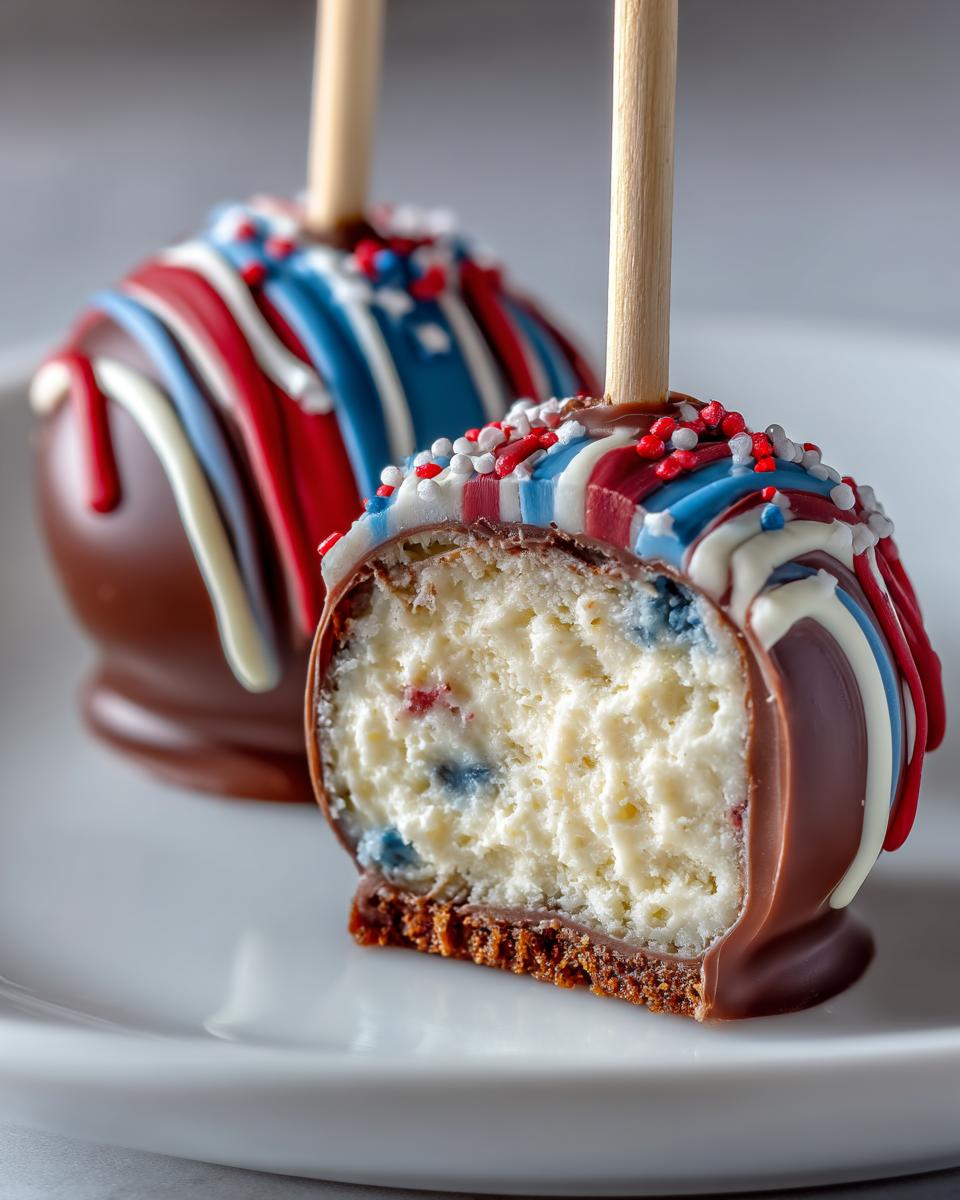
Coating and Decorating the Pops
Melt your chocolate chips with coconut oil in 20-second microwave bursts, stirring between each. Let it cool slightly—hot chocolate makes the cheesecake sweat (not a good look). Work with a few pops at a time, keeping the rest frozen. Dip each star straight down, then tilt to coat all sides. Let excess chocolate drip off before placing on parchment. Hurry—the cold filling sets the chocolate fast! Melt candy melts separately (use piping bags with tiny snipped corners or zip-top bags with a corner cut for drizzling). Go wild with red, white, and blue zigzags! Add sprinkles immediately before the drizzle sets. If your kitchen’s warm, chill the pops for 10 minutes between steps to prevent melting. The result? Edible patriotism that’ll have everyone oohing and aahing!
Tips for Perfect Fourth of July Cheesecake Pops
After making these pops more times than I can count (and yes, learning from every “oops” along the way), I’ve gathered all my best tricks to guarantee your stars come out flawless. Write these down—they’re the difference between good pops and “how did you make these?!” pops!
- Freeze like you mean it. That first 4-hour freeze is non-negotiable. Test the center with your finger—it should feel completely firm, like a brick of cream cheese straight from the fridge. Shortcut this step, and your stars will collapse when you try to dip them. (Voice of experience talking here!)
- Warm your cutter like a pro. Dipping the star cutter in hot water (not just warm) between each cut makes cleaner edges. Dry it quickly with a towel so you don’t add extra moisture to the filling.
- Chocolate too thick? Add a smidge more coconut oil (1/2 tsp at a time) until it flows smoothly off a spoon. Too thin? Stir in a handful more chocolate chips to thicken it up.
- The 2-second dip rule. When coating, submerge each pop for exactly 2 seconds—any longer and the cold cheesecake starts melting the chocolate from the inside, leading to cracks as it sets.
- Drizzle with confidence. Hold your piping bag a foot above the pops and move your hand quickly in zigzags. Hesitating makes blobs instead of pretty lines. (Pro tip: Practice on parchment first!)
- No candy melts? Use white chocolate tinted with oil-based food coloring for your red and blue drizzles. Regular food coloring will seize chocolate—learned that the messy way!
- Emergency fix: If a pop cracks during dipping, just patch it with extra chocolate and call it “rustic charm.” No one will notice once the sprinkles go on!
Remember: even the “imperfect” ones taste amazing. My first batch looked like abstract art, but they disappeared just as fast as the pretty ones! The key is to have fun with it—these pops are meant to be joyful, just like the holiday.
Variations and Substitutions
Listen, I’m all about sticking to the classics (Grandma would haunt me if I messed with her cheesecake ratios too much), but sometimes you gotta mix things up! Whether you’re out of an ingredient or just feeling adventurous, here are my tried-and-true tweaks that still deliver those star-spangled results.
- Dairy-free delight: Swap in your favorite plant-based cream cheese and coconut cream instead of heavy cream. The texture stays miraculously creamy—just check that your chocolate coating is dairy-free too if needed.
- Chocolate switcheroo: Not a semi-sweet fan? Use white chocolate for the coating (add 1 extra tbsp coconut oil since it’s thicker). For a grown-up twist, dark chocolate with a pinch of sea salt is *chef’s kiss*.
- Zesty twist: Replace the lemon juice with orange or lime zest for a different citrus kick. My cousin adds a teaspoon of almond extract instead of vanilla—divine, but warn guests about nuts!
- Berry blast: Fold 1/4 cup freeze-dried strawberry or blueberry powder into the filling for natural color and flavor. Bonus: it makes the centers look like little galaxies!
- Sugar shuffle: Low-carb? Use powdered erythritol instead of regular powdered sugar. Just know the texture might be slightly grainier (still tasty though!).
- Shape shifters: No star cutter? Hearts for Valentine’s Day, circles for birthdays—any shape works! For July 4th, you can even cut squares and call them “firecracker blocks.” (The kids in my family love that one.)
- Sprinkle alternatives: Out of patriotic sprinkles? Crushed freeze-dried raspberries (red) and blueberries (blue) make gorgeous natural “sprinkles” when pressed onto wet chocolate.
See? This recipe’s like your favorite little black dress—dress it up or down for any occasion. The main thing is keeping that creamy-to-crunchy ratio perfect. Now, who’s ready to raid their pantry and get creative?
Serving and Storage Instructions
Okay, here’s the deal—these pops are at their absolute best when served chilled but not straight-from-the-freezer cold. About 10 minutes before your party starts, pull them from the fridge to let the chocolate coating soften just enough to bite through without cracking a tooth (been there!). Arrange them upright in a tall glass filled with sugar or rice to keep them standing proud on your dessert table.
Now, about leftovers (as if!): If by some miracle you have extras, store them in an airtight container in the fridge with parchment between layers. They’ll keep beautifully for 3 days—any longer and the cheesecake starts weeping (and not in a patriotic way). Want to freeze them? Wrap each pop individually in plastic wrap, then tuck them into a freezer bag for up to 2 months. Thaw overnight in the fridge before serving. Pro tip: The chocolate might dull slightly after freezing, but a quick drizzle of fresh candy melts hides all sins!
One warning: Don’t leave these out in the summer heat for more than an hour—that chocolate coating turns into a sticky mess faster than you can say “Declaration of Independence.” Trust me, last year’s poolside party taught me that lesson the hard way!
Nutritional Information
Let’s keep it real—these cheesecake pops aren’t health food, but everything in moderation, right? Here’s the scoop on what you’re biting into (because knowledge is power, even when covered in sprinkles!). Remember: These numbers are estimates—your exact values might dance around a bit depending on brands and how generous you are with those candy melts!
- Serving Size: 1 pop (about 2.5 oz)
- Calories: 220
- Total Fat: 16g (20% DV)
- Saturated Fat: 9g (45% DV)
- Cholesterol: 30mg (10% DV)
- Sodium: 120mg (5% DV)
- Total Carbohydrates: 20g (7% DV)
- Dietary Fiber: 1g (4% DV)
- Sugars: 18g
- Protein: 3g
Percent Daily Values (DV) are based on a 2,000 calorie diet. Nutritional values are estimates and vary based on ingredients used.
There you have it! Now you can decide whether to savor one slowly or “accidentally” eat two (we won’t judge). If you’re watching certain nutrients, check out our variations section for lighter twists—though personally, I believe holidays were made for indulging in creamy, chocolatey stars!
Frequently Asked Questions
Over the years, I’ve gotten all sorts of questions about these cheesecake pops—from panicked texts (“Help! My stars are melting!”) to curious DMs (“Can I use X instead of Y?”). Here are the answers to the most common head-scratchers, straight from my trial-and-error kitchen adventures!
Can I make Fourth of July Cheesecake Pops ahead of time?
Absolutely! In fact, they taste even better after chilling overnight. Just store them in an airtight container in the fridge for up to 3 days before your party. The chocolate coating stays crisp, and the flavors have more time to mingle. If making more than 2 days ahead, I’d freeze them (see storage tips above).
Why did my chocolate coating crack?
Oh honey, I feel your pain—this happened my first three tries! Usually it’s because: 1) The cheesecake stars weren’t frozen solid enough before dipping (that 4-hour freeze is sacred!), or 2) The chocolate was too hot when applied. Let your melted chocolate cool until it’s just warm to the touch (about 90°F) for the smoothest, crack-free shell.
Can I use regular food coloring for the drizzle?
Nope—and trust me, you don’t want to learn this the messy way! Regular food coloring makes chocolate seize up into a grainy mess. You need oil-based candy coloring or pre-colored candy melts. In a pinch? Crush up red and blue hard candies, melt them with a tiny bit of oil, and drizzle away!
Help! My star shapes keep breaking when I insert the sticks!
First, make sure your cheesecake slab is frozen rock-solid before cutting. Then, here’s my secret: use a toothpick to make a starter hole where you want the stick to go. Gently twist the popsicle stick as you push it in—this prevents cracks better than forcing it straight in. Still breaking? Try slightly thicker sticks or chill your stars for another 30 minutes before attempting again.
What’s the best way to transport these to a party?
After one disastrous car ride where my pops became “abstract art,” I perfected this method: Stand them upright in a tall container lined with crumpled parchment (to cushion), then place the whole container in a cooler with ice packs on the sides—not underneath! The goal is to keep them cool without freezing, which can cause condensation. Pro tip: Bring extra sprinkles and candy melts for on-site touch-ups!
Still stumped? Slide into my DMs @CheesecakePopQueen (okay fine, that’s not really my handle, but it should be!). I’m happy to troubleshoot your pop predicaments—because everyone deserves perfect star-spangled sweetness!
Share Your Fourth of July Cheesecake Pops
Nothing makes me happier than seeing your versions of these star-spangled treats! Every summer, my phone lights up with photos from friends who’ve tried the recipe—some pristine and picture-perfect, others gloriously messy (my personal favorites). There’s something magical about how each batch turns out just a little different, like edible fingerprints. Last year, my neighbor’s kids arranged theirs into a flag pattern on the plate—total genius move that I’ve stolen for every party since.
If you snap pics of your creations, I’d be over the moon if you shared them. Tag me so I can ooh and aah over your drizzle skills or clever sprinkle combos! Bonus points if you catch that perfect moment when someone takes their first bite—the look of surprise when they realize it’s cheesecake inside gets me every time. Whether yours turn out bakery-worthy or charmingly homemade (hello, my first lumpy stars!), they’re all beautiful because you made them with love. Now go forth and spread the red, white, and blue joy!
Print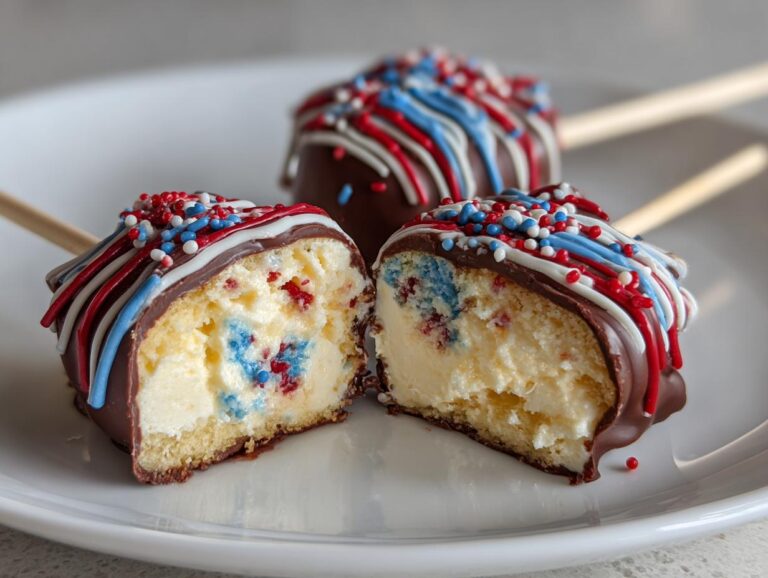
Irresistible Fourth of July Cheesecake Pops in 6 Easy Steps
Fourth of July Star Cheesecake Pops are a festive no-bake treat featuring a creamy cheesecake filling cut into star shapes, dipped in smooth chocolate, and drizzled with red, white, and blue candy melts. Freezing the filling makes it easy to cut and coat. These pops are a refreshing and colorful dessert for summer celebrations.
- Total Time: 6 hours 40 minutes
- Yield: 12–15 pops 1x
Ingredients
- FOR THE CHEESECAKE FILLING
- 16 oz (450g) cream cheese, softened
- 1/2 cup powdered sugar
- 1 teaspoon pure vanilla extract
- 1 tablespoon lemon juice
- 1/2 cup heavy cream, cold
- FOR THE CHOCOLATE COATING
- 12 oz semi-sweet chocolate chips
- 2 tablespoons coconut oil or vegetable shortening
- FOR DECORATING
- Red candy melts
- White candy melts
- Blue candy melts
- Patriotic sprinkles (optional)
- Wooden popsicle sticks
Instructions
- MAKE THE CHEESECAKE FILLING: In a large bowl, beat the softened cream cheese until smooth and fluffy using a hand mixer or stand mixer.
- COMBINE INGREDIENTS: Add powdered sugar, vanilla extract, and lemon juice to the cream cheese and beat again until fully smooth and creamy.
- WHIP THE CREAM: In a separate bowl, whip the cold heavy cream until soft peaks form using a hand mixer on medium speed.
- FOLD IN THE WHIPPED CREAM: Gently fold the whipped cream into the cream cheese mixture using a spatula until the mixture is smooth and fully combined.
- FREEZE THE MIXTURE: Line an 8×8 inch square pan with parchment paper, leaving an overhang on the sides. Spread the cheesecake mixture into an even 1-inch thick layer and freeze for 4 to 5 hours, or until completely firm.
- CUT OUT THE STARS: Remove the frozen cheesecake slab from the pan using the parchment handles. Use a star-shaped cookie cutter to punch out stars, dipping the cutter into warm water between cuts for clean edges.
- INSERT THE STICKS: Gently insert a wooden popsicle stick into the bottom of each star and place them back in the freezer for another 30 to 60 minutes to firm up again.
- PREPARE THE CHOCOLATE COATING: Melt the semi-sweet chocolate chips with the coconut oil in a microwave-safe bowl, stirring every 20 to 30 seconds until smooth. Let the chocolate cool slightly so it is warm but not hot.
- COAT THE STARS: Dip each frozen cheesecake star into the melted chocolate, turning to coat completely. Set coated pops onto a parchment-lined tray. The chocolate will harden quickly due to the cold filling.
- DECORATE THE POPS: Melt the red, white, and blue candy melts separately according to package directions. Drizzle the melted candy melts over the chocolate-coated stars in crisscrossing patterns. Add patriotic sprinkles while the drizzle is still wet, if desired.
- CHILL AND SERVE: Chill the finished cheesecake pops in the refrigerator until ready to serve.
Notes
- Freeze the cheesecake filling thoroughly for easy cutting and coating.
- Use a sharp, star-shaped cookie cutter dipped in warm water for clean edges.
- Chill the pops again after inserting sticks to ensure they stay firm during coating.
- Work quickly when dipping in chocolate to prevent melting.
- Prep Time: 40 minutes
- Cook Time: 0 minutes
- Category: Dessert
- Method: No-Bake
- Cuisine: American
- Diet: Vegetarian
Nutrition
- Serving Size: 1 pop
- Calories: 220
- Sugar: 18g
- Sodium: 120mg
- Fat: 16g
- Saturated Fat: 9g
- Unsaturated Fat: 5g
- Trans Fat: 0g
- Carbohydrates: 20g
- Fiber: 1g
- Protein: 3g
- Cholesterol: 30mg