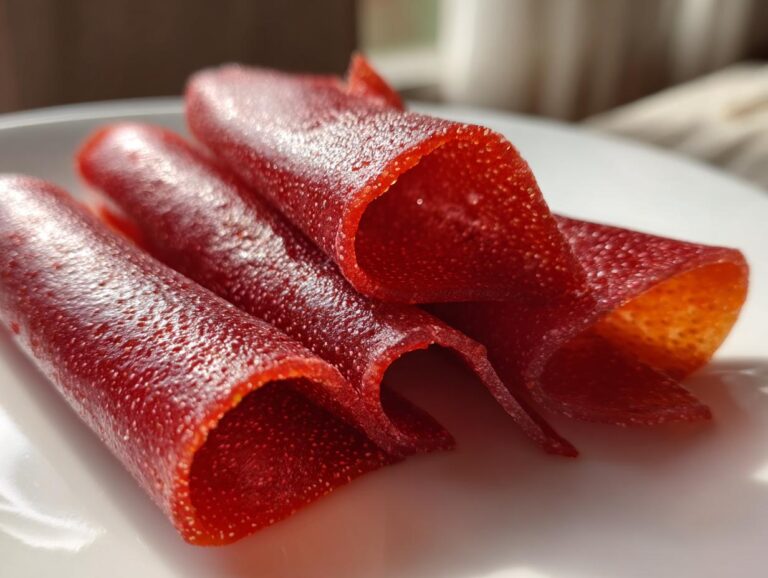
Oh my gosh, you have to try these 3 Ingredient Fruit Roll-Ups – they’re my go-to snack when I want something sweet without the guilt! I stumbled onto this recipe years ago when my niece begged for store-bought fruit snacks at the grocery store. “We can make better ones at home,” I told her, and now she refuses to eat anything but our homemade version. The best part? You probably have everything you need in your kitchen right now.
Just picture it: fresh fruit blended with a touch of honey and lemon juice, dried into chewy strips that taste like summer. No weird preservatives, no artificial colors – just pure fruity goodness. My kitchen always smells like a candy store when these are baking (but way better, because it’s real fruit!). Trust me, once you try making these, you’ll never go back to those expensive packaged ones again.

Why You’ll Love These 3 Ingredient Fruit Roll-Ups
Listen, I know what you’re thinking – “Only three ingredients? Really?” But that’s exactly why these fruit roll-ups are magic! Here’s why they’ve become my snack obsession:
- Super simple – No fancy techniques or hard-to-find ingredients. Just blend, spread, bake!
- Actually healthy – Unlike store-bought versions packed with sugar, you control what goes in (and what stays out).
- Kid-approved – My picky eaters go crazy for these, and I don’t have to feel guilty about handing them out.
- Endless possibilities – Swap fruits based on what’s in season or what’s sitting in your fruit bowl looking sad.
Honestly? The hardest part is waiting while they bake – that fruity smell will drive you crazy!
Ingredients for 3 Ingredient Fruit Roll-Ups
Here’s all you need to make magic happen – I swear, it’s ridiculously simple:
- 2 cups fresh fruit (strawberries, mangoes, or apples – pick your favorite! Just make sure they’re ripe and juicy)
- 1 tablespoon honey or maple syrup (packed – this is where you can adjust sweetness to taste)
- 1 teaspoon lemon juice (freshly squeezed, please – it makes all the difference in brightening up the flavors)
See? Told you it was easy! Now let’s make some magic.
Equipment You’ll Need
Okay, you already know the ingredients are crazy simple – the equipment is just as easy! Here’s what you’ll grab from your kitchen:
- Blender or food processor (even a stick blender works in a pinch!)
- Baking sheet (standard half-sheet size works perfectly)
- Parchment paper (don’t skip this – trust me, you don’t want to scrape fruit off your pan later)
- Rubber spatula (for spreading that fruity goodness nice and thin)
That’s seriously it! No fancy dehydrators or special tools – just regular kitchen basics.
How to Make 3 Ingredient Fruit Roll-Ups
Alright, let’s get rolling – literally! This process is so simple you’ll wonder why you ever bought those expensive packaged versions. Just follow these easy steps and you’ll have delicious fruit roll-ups in no time (okay, fine – they do take a few hours to bake, but active time is minimal!).

Step 1: Prepare the Fruit Mixture
First things first – toss your fruit, honey, and lemon juice into the blender. Now here’s my secret: blend until it’s completely smooth, like baby food consistency. No chunks allowed! If it’s too thick, add a teaspoon of water at a time until it pourable but not watery. Taste it now (my favorite part!) and adjust sweetness if needed.
Step 2: Spread and Bake
Pour your fruity mixture onto parchment-lined baking sheet and spread it thin – I’m talking credit card thickness! Use your spatula to make sure it’s even everywhere or you’ll get crispy edges and soft centers. Pop it in your preheated oven (170°F is perfect) and let it work its magic for about 4-6 hours. Your house will smell amazing!
Step 3: Cut and Roll
When it’s dry to touch but still slightly flexible (not crispy!), take it out and let it cool. Then comes the fun part – peel it off the parchment (so satisfying!) and cut into strips with kitchen scissors. Roll them up snugly just like the store-bought ones, but way better because you made them! Pro tip: roll them in parchment or wax paper for easy storage.

Tips for Perfect 3 Ingredient Fruit Roll-Ups
After making approximately a zillion batches of these (okay, maybe just dozens), I’ve picked up some tricks that make all the difference:
- Ripe fruit is non-negotiable – The sweeter your fruit, the better the flavor. If it’s not quite ripe enough, add an extra teaspoon of honey.
- Watch the edges! They dry faster than the center. If they start browning too much, just trim them off with scissors.
- The touch test never lies – They’re done when slightly tacky but not sticky. If they crack when bent, they’ve gone too far (but are still delicious as fruit chips!).
- Store them right – Keep in an airtight container with parchment between layers. They’ll stay fresh for a week… if they last that long!
My biggest tip? Make a double batch – they disappear fast!
Variations for 3 Ingredient Fruit Roll-Ups
Oh, the possibilities! Once you master the basic recipe, get creative with different fruits. My niece and I love making “flavor of the week” roll-ups. Try mixed berries for a tart punch, peaches for summer sweetness, or even pineapple for a tropical twist. For a fun layered effect, swirl two different fruit purees together before baking. The only limit is your fruit bowl!
Serving and Storing 3 Ingredient Fruit Roll-Ups
Here’s the best part – these roll-ups are ready to grab and go right after you make them! I love tossing a few in lunchboxes (wrapped in parchment paper like little fruit burritos) or keeping them in my purse for snack emergencies. For storage, an airtight container is key – layer them with parchment between to prevent sticking. They’ll stay perfect for about a week… though mine never last that long!
Nutritional Information
Each roll-up is about 35 calories with 6g of natural sugar from the fruit – way better than store-bought versions! (Remember, these are estimates and will change slightly based on your fruit choices.)
Frequently Asked Questions
I get questions about these fruit roll-ups all the time – here are the ones that pop up most often:
Can I use frozen fruit?
Absolutely! Just thaw it completely first and drain any extra liquid. I actually keep frozen mango chunks on hand specifically for emergency roll-up cravings. The texture works great!
How long do they last?
Stored properly in an airtight container, they’ll stay fresh for about a week. Though between you and me, they’ve never lasted more than two days in my house!
My roll-ups are sticky – what went wrong?
They might have needed a bit more drying time. Pop them back in the oven for another 30-60 minutes. Next time, spread the mixture just a tiny bit thinner.
Can I make these without honey?
Of course! The honey just enhances sweetness – ripe fruit alone often does the trick. For no sweetener at all, use very ripe bananas or dates blended with your fruit.
3 Ingredient Fruit Roll-Ups Your Kids Will Beg For
Simple homemade fruit roll-ups with only three ingredients.
- Total Time: 6 hours 10 minutes
- Yield: 8-10 roll-ups 1x
Ingredients
- 2 cups fresh fruit (strawberries, mangoes, or apples)
- 1 tablespoon honey or maple syrup
- 1 teaspoon lemon juice
Instructions
- Preheat your oven to 170°F (75°C).
- Blend the fruit, honey, and lemon juice until smooth.
- Spread the mixture thinly on a baking sheet lined with parchment paper.
- Bake for 4-6 hours or until dry.
- Cut into strips and roll up.
Notes
- Use ripe fruit for best flavor.
- Store in an airtight container for up to a week.
- Prep Time: 10 minutes
- Cook Time: 6 hours
- Category: Snack
- Method: Baking
- Cuisine: American
- Diet: Vegetarian
Nutrition
- Serving Size: 1 roll-up
- Calories: 35
- Sugar: 6g
- Sodium: 1mg
- Fat: 0g
- Saturated Fat: 0g
- Unsaturated Fat: 0g
- Trans Fat: 0g
- Carbohydrates: 9g
- Fiber: 1g
- Protein: 0g
- Cholesterol: 0mg